Naturally fresh, beautifully stored

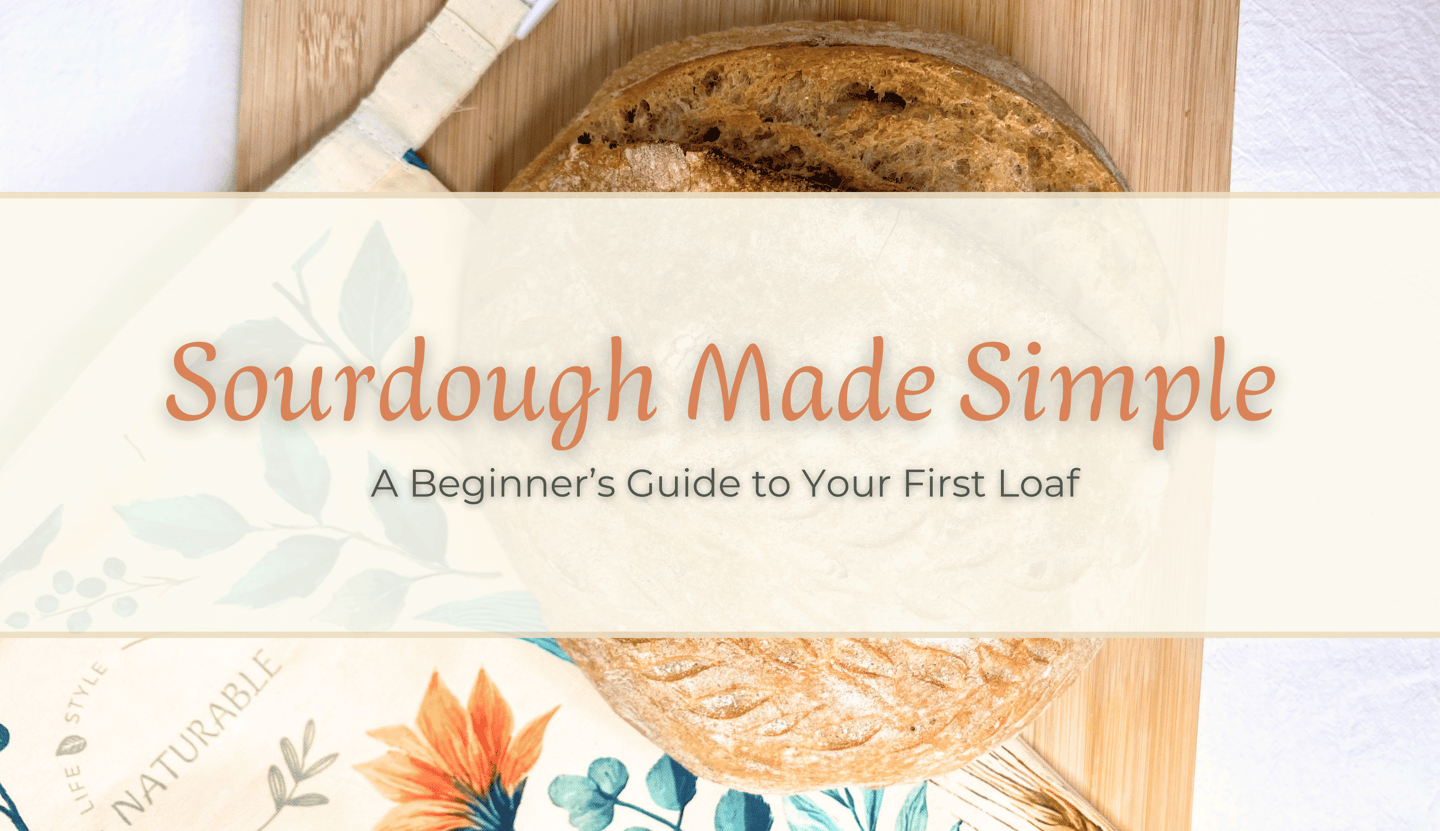
Sourdough Made Simple: A Beginner’s Guide to Your First Loaf
New to sourdough? You’re in the right place. This beginner-friendly guide walks you through every step of making your first sourdough loaf, from mixing your dough to pulling a crusty, golden loaf from the oven. No complicated jargon, no intimidating techniques, just clear instructions, smart tips, and simple tool swaps so anyone can do it. Whether you're baking in a Dutch oven or just using what you already have at home, this post has you covered. If you've ever wanted to start baking sourdough but didn’t know where to begin, this is the guide for you.
A

Everyone remembers their first sourdough loaf. It might be flat, a little weird, or surprisingly wonderful, but it’s yours. This guide is here to walk you through the process, step by step, from flour and water to a golden, crackly crust. No fancy tools required. Just time, care, and curiosity.
What This Guide Covers
How to mix, knead, and shape your dough.
When and how to fold during bulk fermentation.
How to proof overnight and bake with or without a Dutch oven.
Alternatives for tools like bannetons or oven-safe pots.
Tips, troubleshooting, and encouragement at every step.
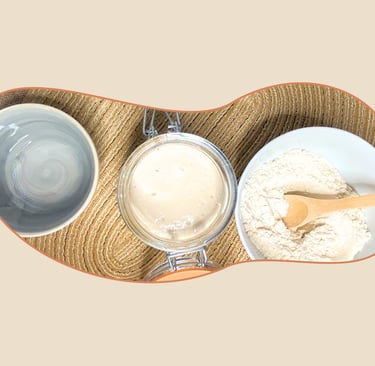
Ingredients (for one loaf)
500g bread flour.
100g active sourdough starter (recently fed and bubbly).
320g water (lukewarm).
15g additional water (to dissolve salt).
10g fine sea salt.
Tools (and Easy Substitutes)
Large mixing bowl.
Kitchen scale (recommended).
Dough scraper or spatula.
Proofing basket → or use a medium bowl lined with a floured cotton/linen cloth).
Dutch oven → or use:
A hot baking tray or pizza stone + metal bowl to cover or inverted baking tray over the loaf for the first 20 minutes.
A rimmed pan with hot water at the bottom of the oven for steam.
Bread lame → or use a clean razor blade.
Parchment paper (optional but helpful).
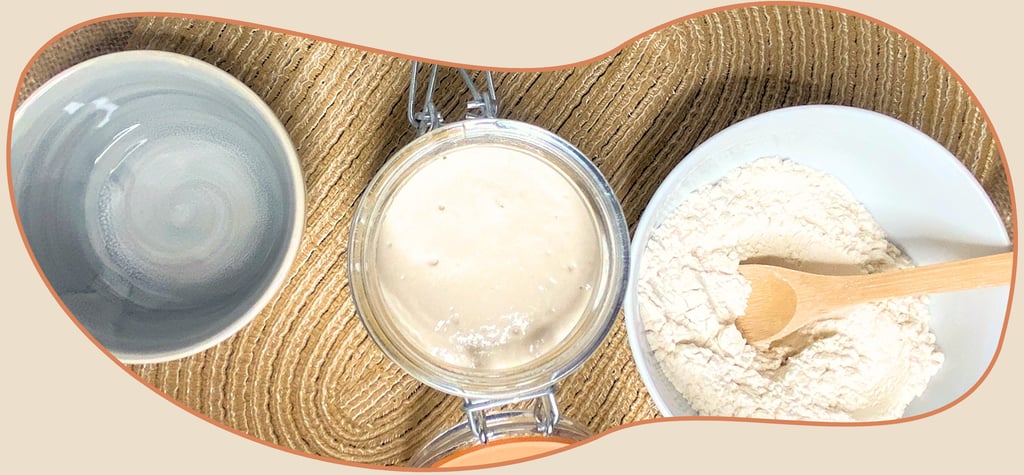

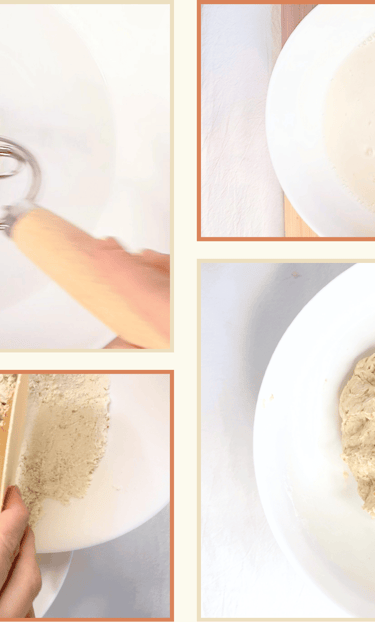
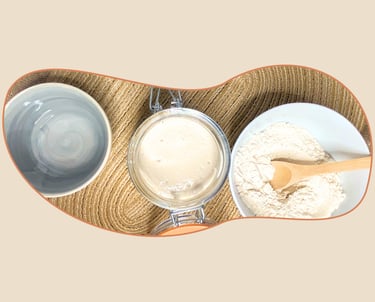
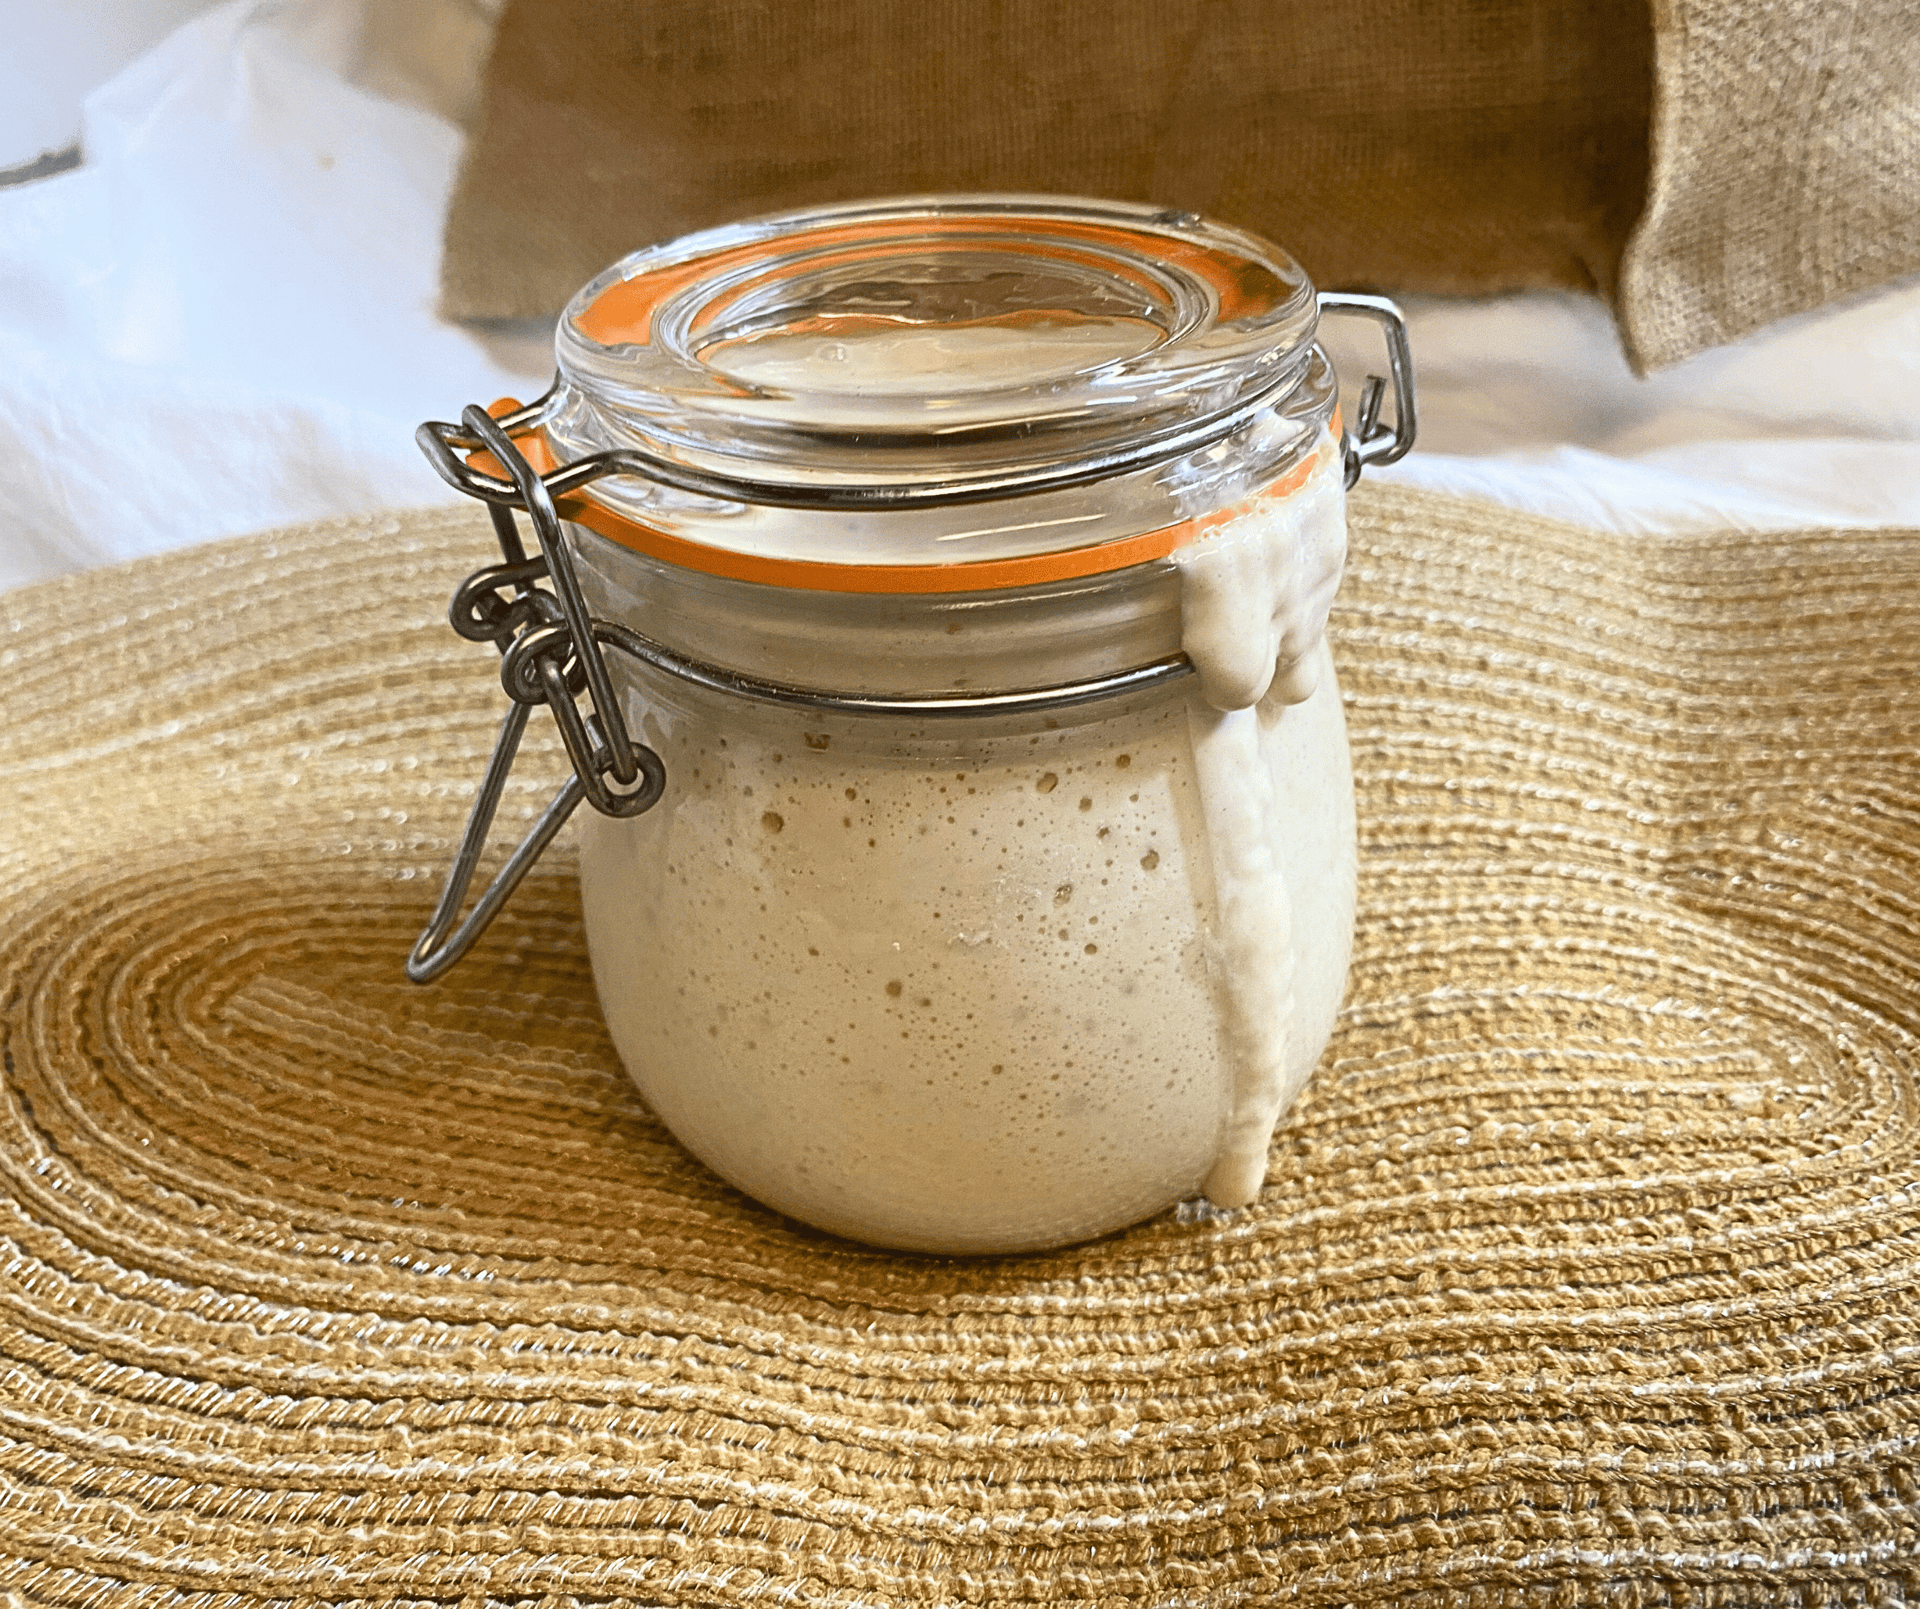
Mix Starter & Water
Start by dissolving 100g active sourdough starter into 320g lukewarm water in a large bowl. Stir gently until the starter is mostly broken up and cloudy.
This helps evenly distribute the yeast and bacteria from the starter.
Add Flour
Add 500g bread flour to the bowl. Mix until no dry flour remains. The dough will be shaggy and sticky, this is normal.
Rest 30 minutes (autolyse). This helps the flour absorb the water and naturally begin gluten formation.
The dough should look rough but cohesive and fully hydrated. If you still see dry flour, mix a little more.
Ideal dough temp: Around 70–75°F (21–24°C).
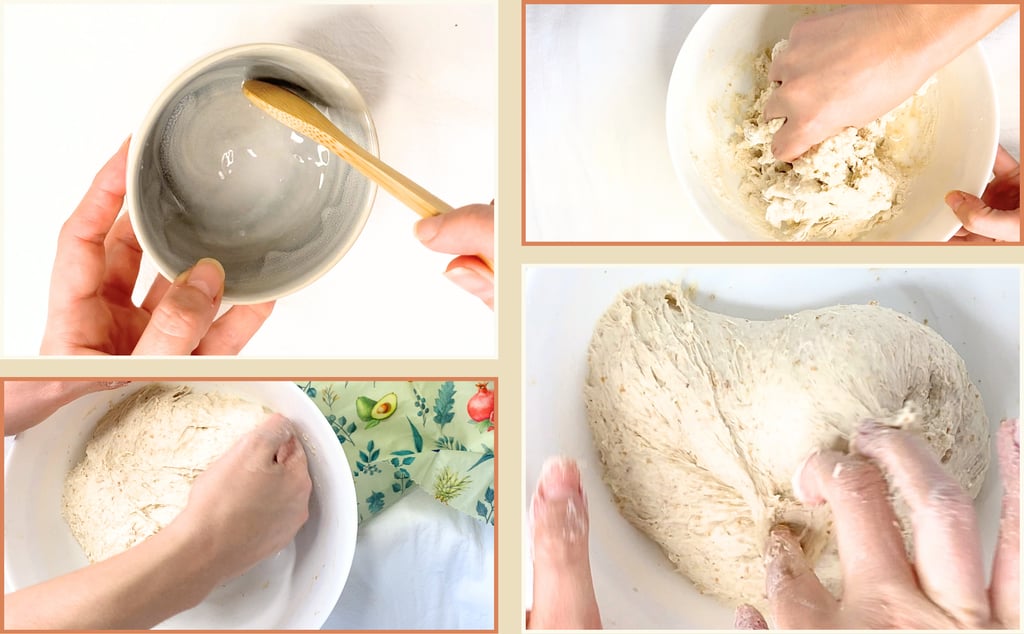
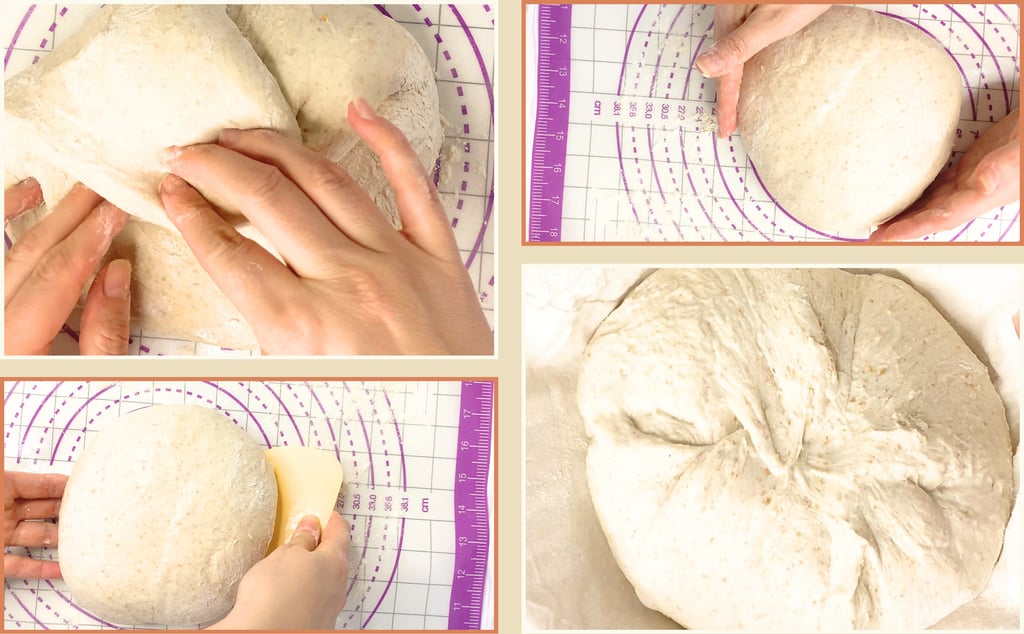
Add Salt & Knead
Dissolve 10g fine sea salt in 15g water and pour it over the dough. Use your hands to squish, fold, and turn the dough until the salt is fully incorporated.
Simple Beginner-Friendly Kneading:
Stretch and fold the dough onto itself gently in the bowl for 8–10 minutes. You can also push the dough away from you with the heel of your hand, fold it over, rotate, and repeat. Keep your hands damp to prevent sticking.
There are other kneading methods like slap-and-fold or Rubaud, but this stretch-fold approach is ideal for beginners, simple and effective.
The dough should feel more cohesive and less sticky. Don’t expect perfection, just some improvement in structure.
Dough should feel more elastic and less sticky. It might not be smooth yet, but that’s okay!
Keep it in a warm spot (70–75°F) to keep fermentation moving.
Bulk Fermentation (with 3 Folds)
Cover the bowl and let it rest at room temperature (~21–24°C / 70–75°F).
Over the next few hours:
After 40 minutes: do your first stretch and fold.
Repeat every 40 minutes (total of 3 rounds).
Let the dough rest another 30–60 minutes until bulk is done.
How to fold:
Wet your hands, reach under one side of the dough, stretch it up, and fold it over. Repeat on all four sides.
Dough should look puffier, with a smoother surface and visible bubbles underneath.
Goal:
About 50–75% increase in volume, not necessarily doubled.
If you gently shake the bowl, the dough should wobble slightly.
Tips:
Always moisten your hands slightly before handling the dough. This helps prevent sticking and makes folds easier.
If your kitchen is cold, place the bowl in your (turned-off) oven with the light on, or put a bowl of hot water beside it for gentle warmth.
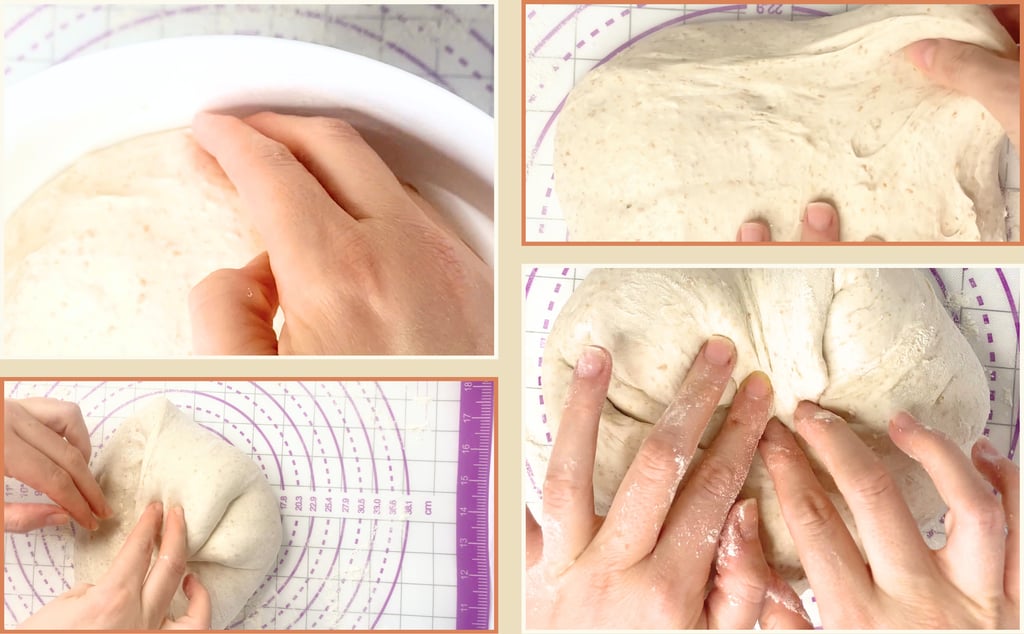
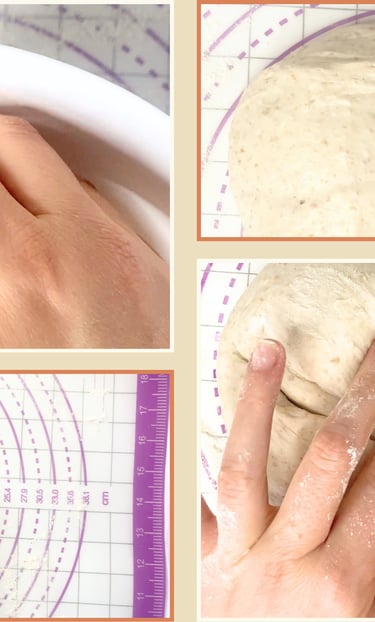
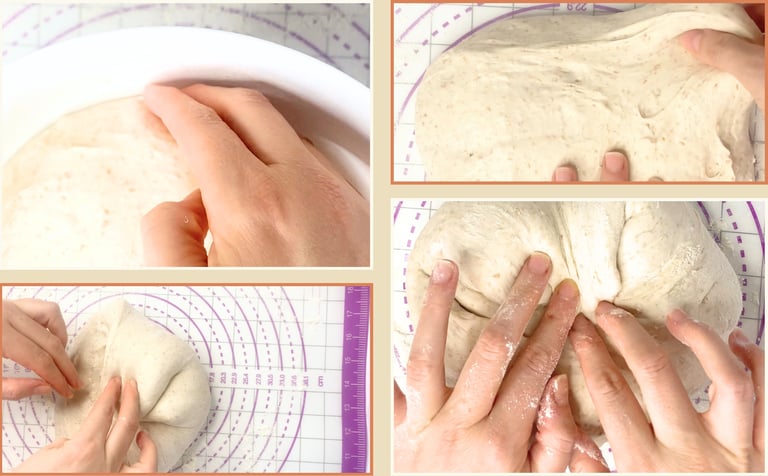
Final Shape
Flip the dough seam-side up and repeat the folding process. Draw the edges into the center, working all around the dough to create tension. As you fold, aim slightly past the center each time; this helps build more tension on the dough's surface.
Then flip it seam-side down and use your hands to gently tighten it into a taut ball by rotating it on the counter and pulling it slightly toward you with each turn.
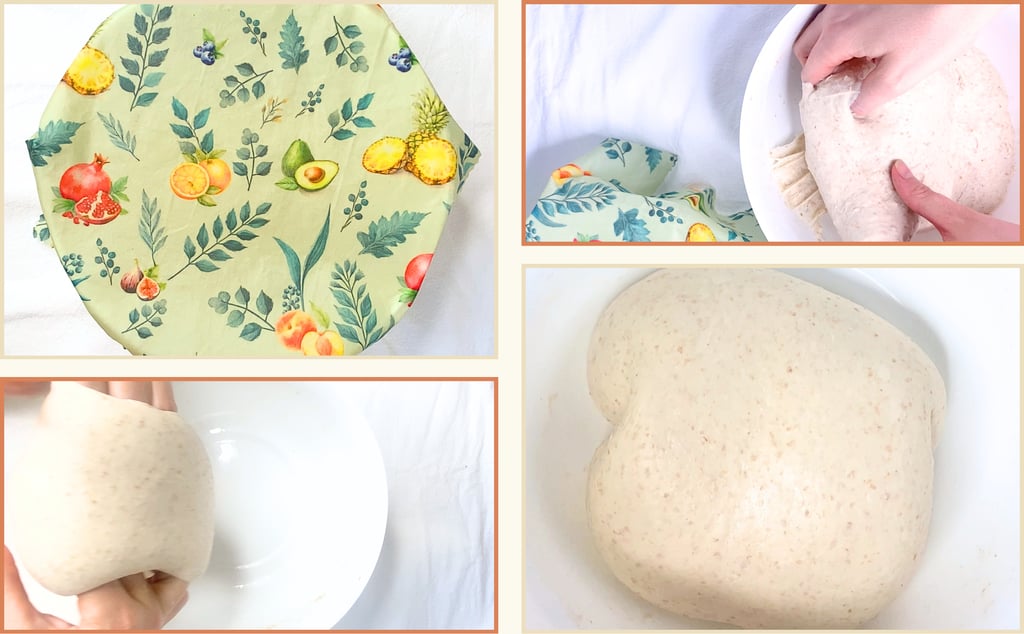
Place into a floured proofing basket or a bowl lined with a floured cotton or linen towel. Seam side goes up.
Tension is key here, apply enough to help the dough hold shape, but not so much that the surface tears or the dough resists folding.
The loaf should feel tight and slightly springy. Surface should be smooth with no tearing.
If the shape spreads a bit before proofing, that’s okay, it’ll hold better after chilling.
Tips:
Use a bench scraper or spatula to help move and shape the dough. If needed, dampen the scraper slightly to prevent sticking.
Move it to the fridge ASAP to prevent over-proofing at room temp.
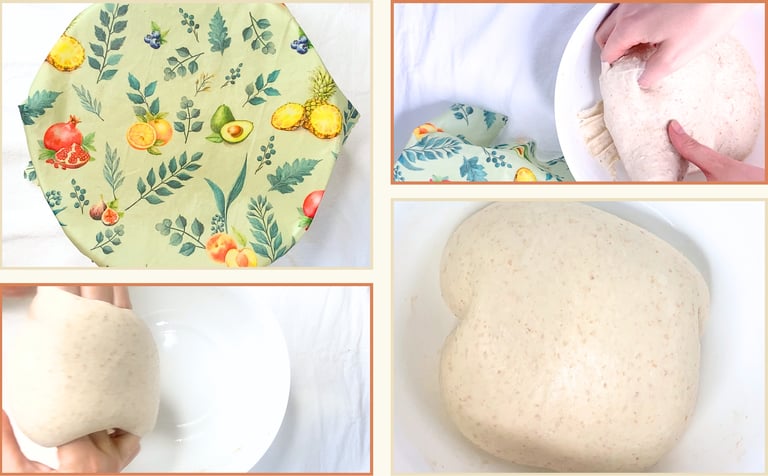
Preshape & Rest Gently
Turn the dough out onto a lightly floured surface. Before shaping, it’s recommended to gently stretch the dough out slightly. This helps distribute internal air bubbles evenly, aligns the structure, and makes the pre-shaping more uniform.
Begin forming a loose round by lifting one edge of the dough and folding it toward the center; continue around the dough, folding each edge inward like wrapping a package.
This process helps gather the dough into a cohesive mass without creating too much surface tension, save that for the final shape.
Once folded, flip the dough seam-side down and let it rest for 20–30 minutes. You can leave it on the counter covered with a cloth, or place it back in the bowl and cover it to prevent drying.
The dough should hold shape but relax slightly. If it spreads a lot, the dough may be overproofed or under-strengthened.
Tips:
Don’t skip this rest, it helps relax the dough before final shaping.
You can leave it covered on the counter with a towel, or pop it back in the bowl to keep it from drying out.

Cold Proof (Overnight)
Cover the bowl or basket and place it in the fridge for 8–12 hours. This slow rise improves flavor and helps with scoring.
In the morning, the dough should be slightly expanded, with a smooth, tight surface.
To test readiness:
Gently press with a dampened fingertip, it should spring back slowly.
Dough will look slightly puffed and hold its form.
Fridge should be around 39–43°F (4–6°C) for best results.
The longer it proofs (up to ~12h), the tangier the flavor!
Score & Bake
Preheat oven to 475°F (245°C) with your Dutch oven, baking tray, or stone inside. Let everything preheat for at least 30 minutes to ensure proper oven spring.
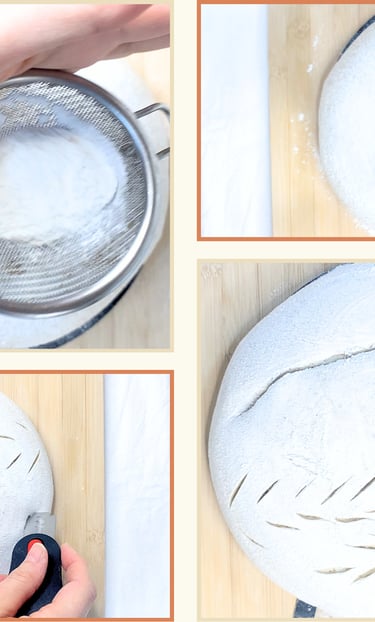
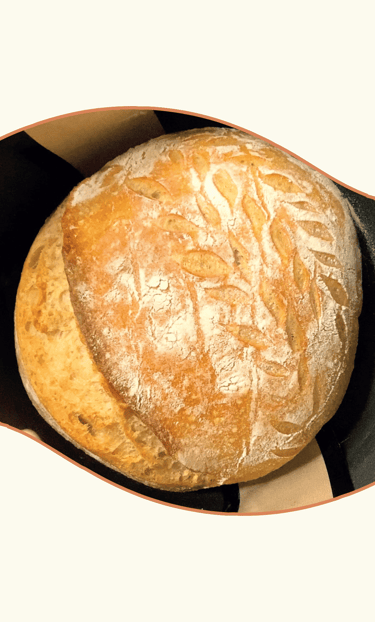
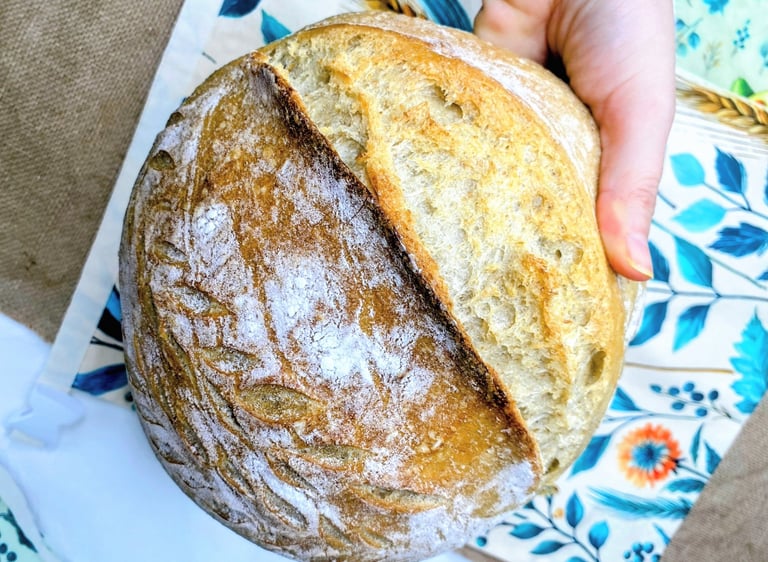
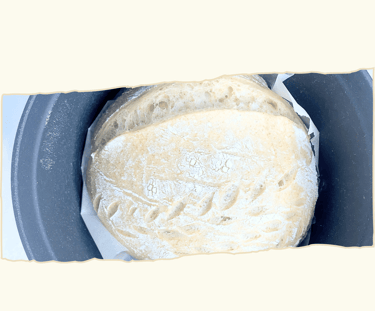
Flip the dough onto parchment paper. Before scoring, lightly dust the surface of the dough with flour, this helps your blade glide more easily and enhances contrast for decorative scoring. Use a bread lame, a clean razor blade, or a very sharp knife to make a confident slash about ½ inch deep.
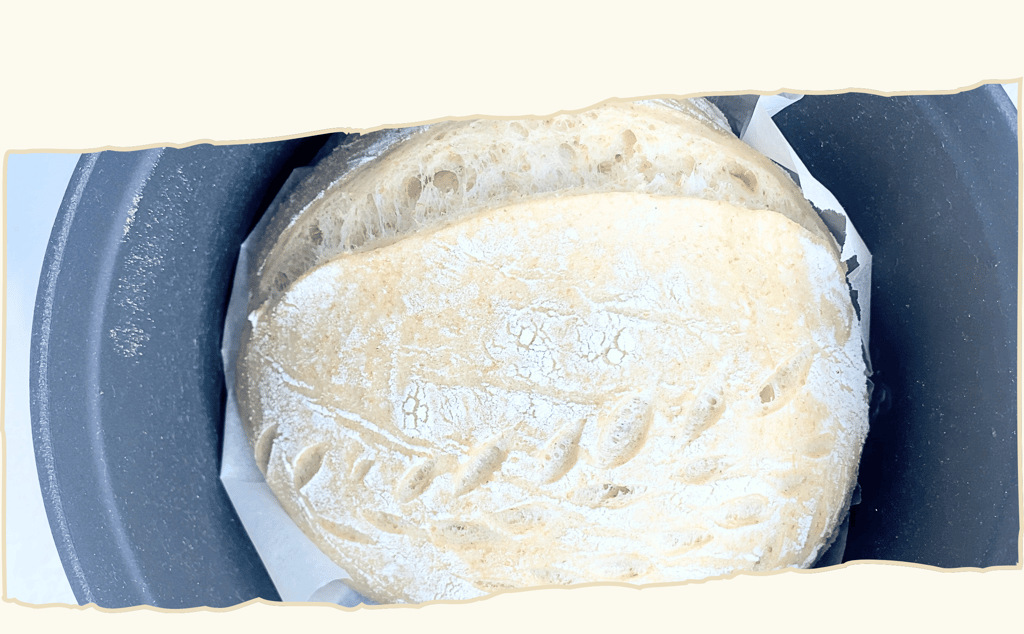
Carefully place the dough into the preheated Dutch oven (or onto a hot tray) using the parchment paper.

Tips:
For a rustic, flour-dusted finish, use rice flour before scoring, it resists moisture and makes patterns stand out better.
Handle the pot and steam carefully, everything is extremely hot. Use long oven mitts and avoid touching the metal.
For extra steam inside a Dutch oven, you can also place 2–3 small ice cubes under the parchment right before closing the lid, but this is not totally necessary.
If you're using a Dutch oven:
Cover it with the lid, this traps steam naturally, so no extra steam is needed. Make sure to use long oven mitts, everything will be extremely hot.
If you don't have a Dutch oven (You have a few good options):
Place the dough on a hot baking tray or preheated pizza stone (which helps the loaf rise more evenly).
To trap steam, cover the dough with a large, heat-safe metal bowl. Alternatively, place an inverted baking tray above the loaf to prevent the crust from forming too quickly.
At the same time, place a metal pan or oven-safe saucepan with hot water at the bottom of the oven. You can also drop in a few ice cubes instead, these will melt slowly and provide extended steam. This step is important for a good rise and to avoid a tough crust.
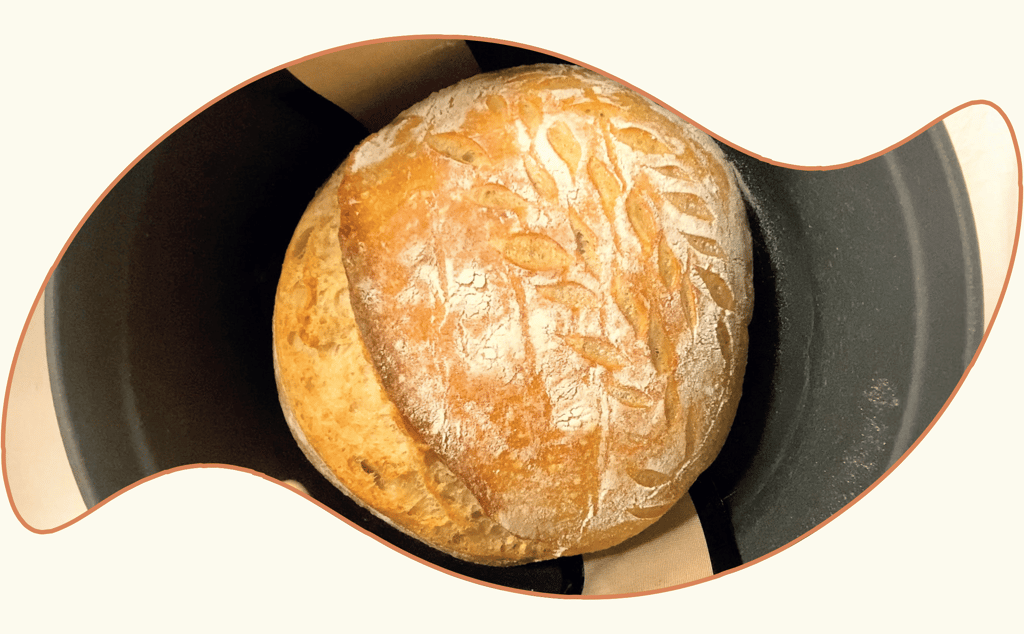
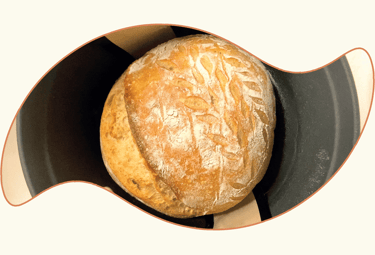
After 20 minutes of baking, remove the lid (if using a Dutch oven) or steam cover (if using a bowl or tray), reduce the oven temperature to 430°F (220°C), and continue baking for another 20–25 minutes until the crust turns deep golden brown.
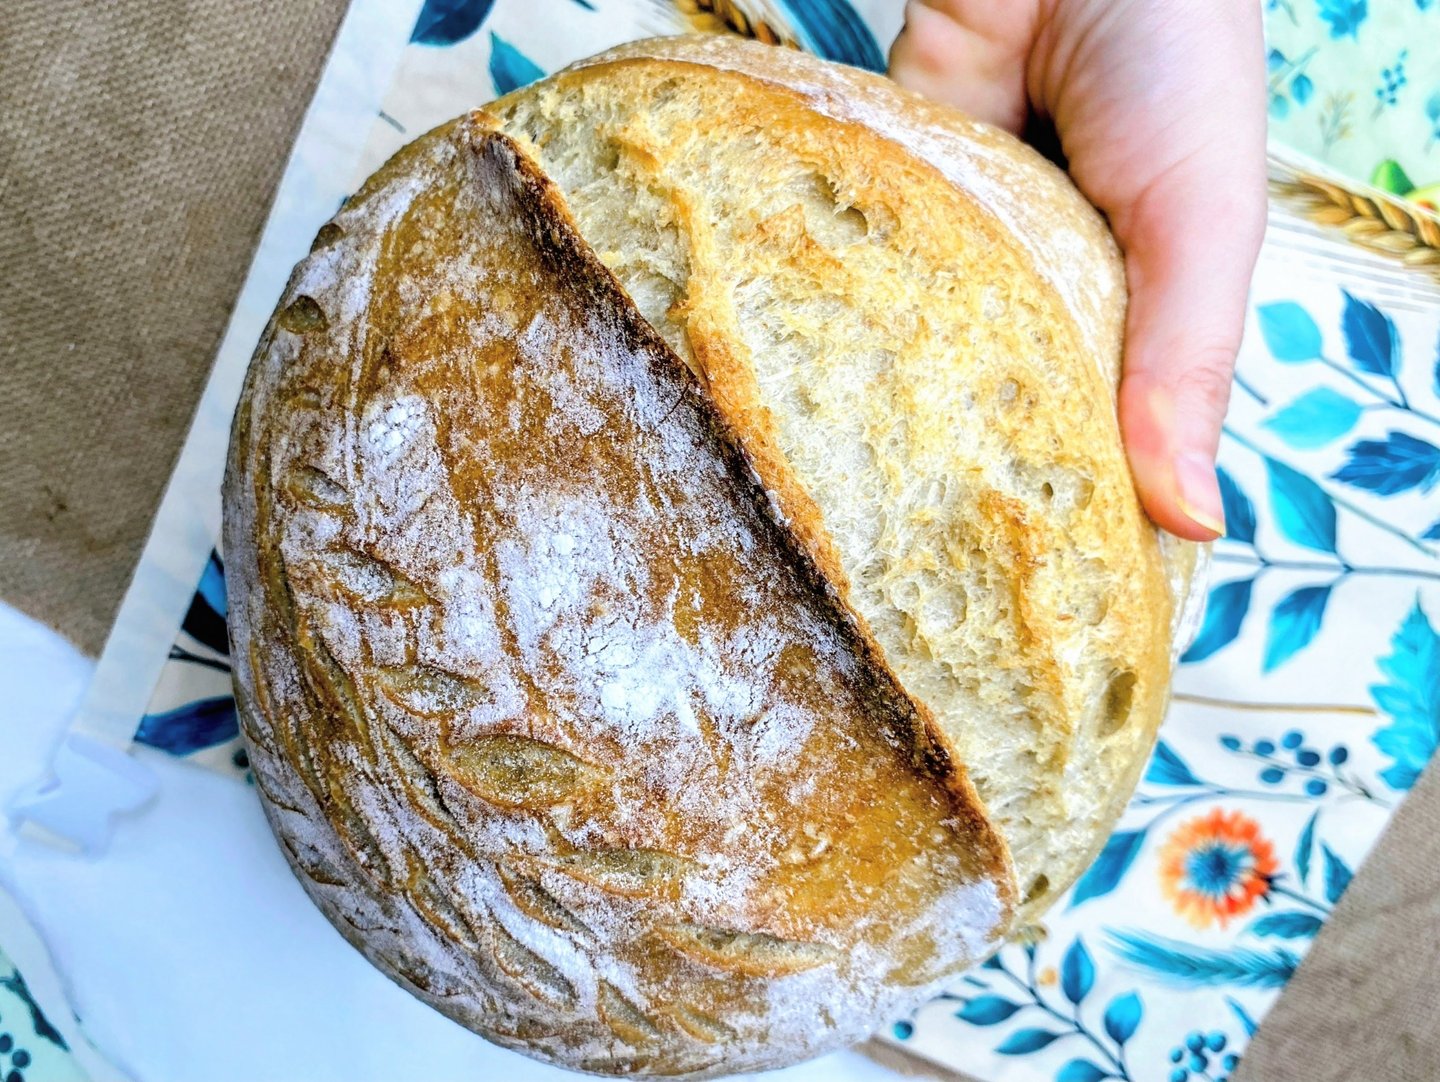
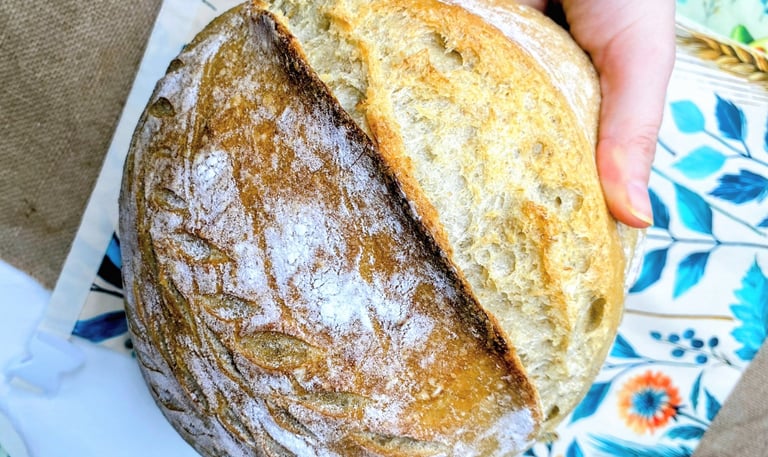
The loaf should sound hollow when tapped on the bottom, and the crust should feel firm.

Cool Before Slicing
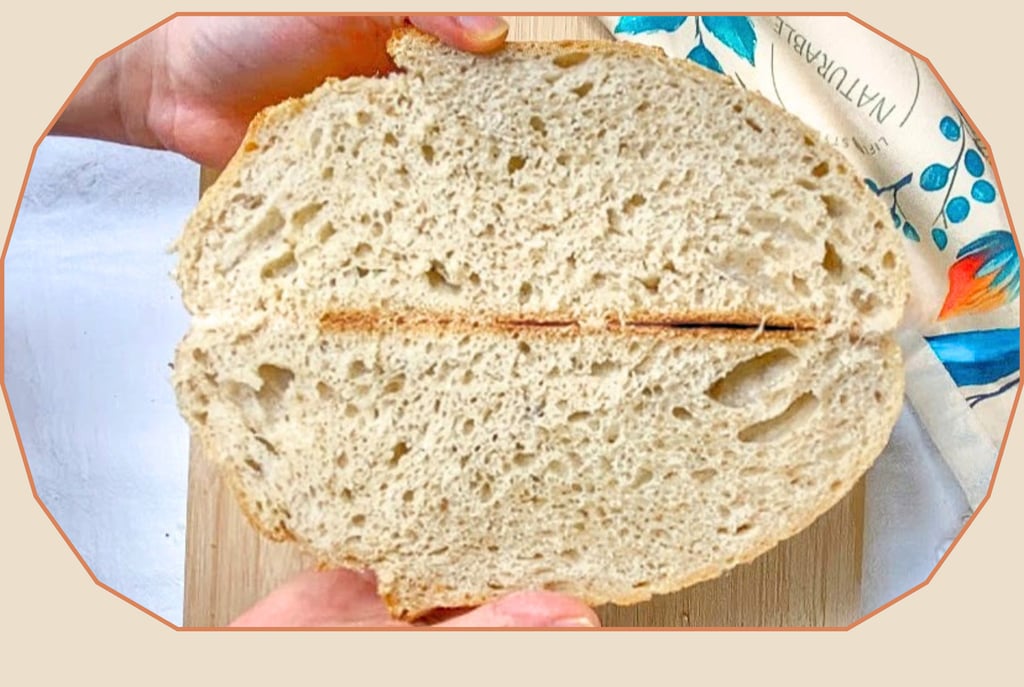
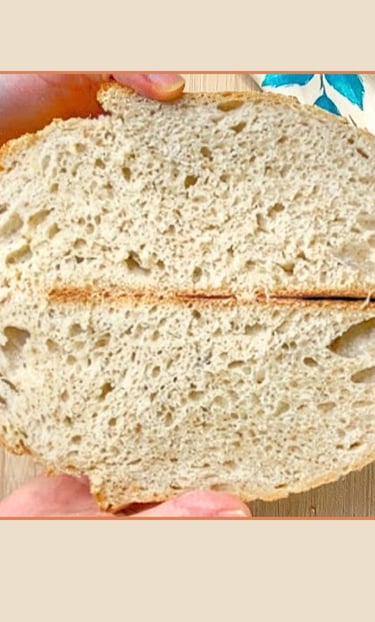
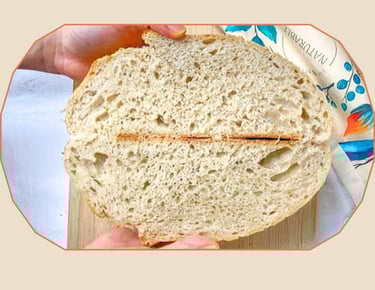
Place bread on a wire rack. Let it cool at least 1 hour. Cutting too early can lead to a gummy interior.
The crust is firm, the loaf feels light for its size, and slicing reveals a tender crumb.
Have you spent years worrying about whether bread is really bad for you?
Find out what science actually says in Is Bread (and Gluten) Really That Bad for You? Science Says… Not Really
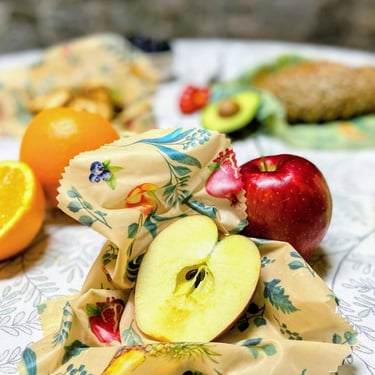
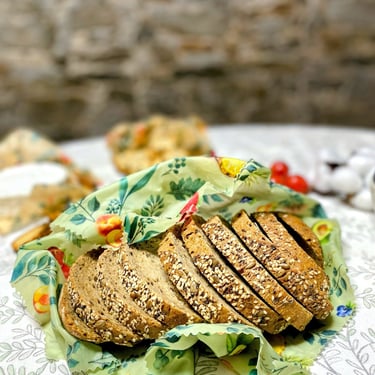
Looking for a sustainable way to keep your homemade sourdough fresh for longer?
Discover how to make it last beautifully with Swap Plastic for Beeswax: The Kitchen Upgrade You Didn’t Know You Needed
Your first loaf won’t be perfect, and that’s perfect. Bake, learn, improve. Share your loaf with us, we’d love to see it! Tag us on Instagram, we want to celebrate your first sourdough!
Happy baking!
Recap and Final Tips for Your First Loaf
You’ve made it through your first sourdough bake. Here’s a recap of the most helpful tips from the guide, plus a few extras to keep in mind next time.
Keep your hands damp while mixing or folding, this prevents the dough from sticking to your skin.
Moisten your fingers before doing the poke test or shaping. It keeps the dough from clinging and helps you work more gently.
Windowpane test: Want to check gluten development? Take a small piece of dough and gently stretch it, if it forms a thin, translucent film without tearing, you’re on the right track.
Dampen your bench scraper or spatula before using it to handle sticky dough during shaping.
Use a kitchen scale: It’s far more accurate than cups and helps you stay consistent.
Room temperature matters: Dough ferments faster in warm rooms, slower in cool ones. Adjust rest times as needed.
Cold kitchen? Place dough in the (turned-off) oven with the light on, or place a bowl of hot water inside to create gentle warmth and steam.
Hot kitchen? Use cold water from the fridge when mixing to slow fermentation. Avoid direct sunlight or placing dough near hot appliances.
Starter from the fridge? Take it out at least 4 hours ahead of mixing your dough to give it time to activate and peak.
Slow starter? Move it to a warmer spot in your kitchen, near the oven or on top of the fridge, to help it become more active.
No bread lame? Use a clean razor blade or a very sharp knife to score your loaf if you don’t have a scoring tool.
Patience is part of the process: Let each phase take its time. Sourdough isn’t fast, but it’s worth it.
Don’t stress over fancy tools: Bowls, towels, and steam trays work great if you don’t have specialty gear.
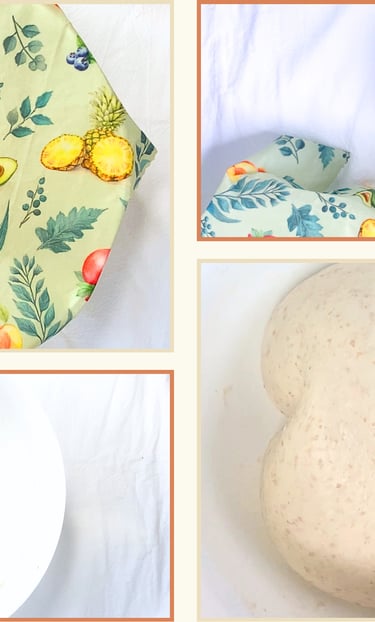
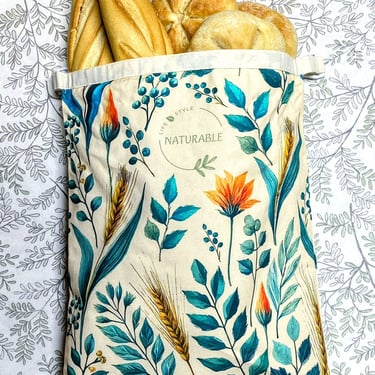
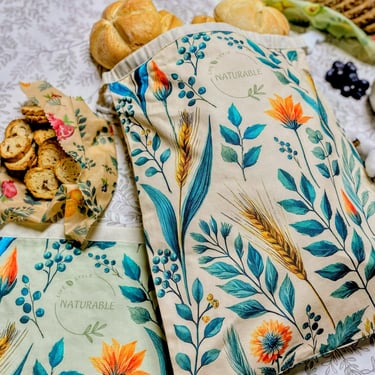
Have You Tried Our Beeswax Bags & Wraps?
A natural way to keep your food and bread fresh while reducing plastic in your kitchen.
Each set includes 2 reusable bread bags and 2 wraps, made from 100% cotton, beeswax, jojoba oil, and pine resin.
Simple, sustainable, and long-lasting.
Let’s Connect on Instagram

Everyone remembers their first sourdough loaf. It might be flat, a little weird, or strangely wonderful, but it’s yours. This guide is here to walk with you, step by step, from flour and water to a golden loaf fresh out of the oven. No fancy tools required. Just time, care, and curiosity.
What This Guide Covers
How to mix, knead, and shape your dough.
When and how to fold during bulk fermentation.
How to proof overnight and bake with or without a Dutch oven.
Alternatives for tools like bannetons or oven-safe pots.
Tips, troubleshooting, and encouragement at every step.
Ingredients (for one loaf)
500g bread flour.
100g active sourdough starter (recently fed and bubbly).
320g water (lukewarm).
15g additional water (to dissolve salt).
10g fine sea salt.
Tools
(and Easy Substitutes)
Large mixing bowl.
Kitchen scale (recommended).
Dough scraper or spatula.
Proofing basket → or use a medium bowl lined with a floured cotton/linen cloth).
Dutch oven → or use:
A hot baking tray or pizza stone + metal bowl to cover or inverted baking tray over the loaf for the first 20 minutes.
A rimmed pan with hot water at the bottom of the oven for steam.
Bread lame → or use a clean razor blade.lean
Parchment paper (optional but helpful).
Mix Starter & Water
Start by dissolving 100g active sourdough starter into 320g lukewarm water in a large bowl. Stir gently until the starter is mostly broken up and cloudy.
This helps evenly distribute the yeast and bacteria from the starter.
Add Flour
Add 500g bread flour to the bowl. Mix until no dry flour remains. The dough will be shaggy and sticky, this is normal.
Rest 30 minutes (autolyse). This helps the flour absorb the water and naturally begin gluten formation.
The dough should look rough but cohesive and fully hydrated. If you still see dry flour, mix a little more.
Ideal dough temp: Around 70–75°F (21–24°C).

Add Salt & Knead
Dissolve 10g fine sea salt in 15g water and pour it over the dough. Use your hands to squish, fold, and turn the dough until the salt is fully incorporated.
Simple Beginner-Friendly Kneading:
Stretch and fold the dough onto itself gently in the bowl for 8–10 minutes. You can also push the dough away from you with the heel of your hand, fold it over, rotate, and repeat. Keep your hands damp to prevent sticking.
There are other kneading methods like slap-and-fold or Rubaud, but this stretch-fold approach is ideal for beginners, simple and effective.
The dough should feel more cohesive and less sticky. Don’t expect perfection, just some improvement in structure.
Dough should feel more elastic and less sticky. It might not be smooth yet, but that’s okay!
Keep it in a warm spot (70–75°F) to keep fermentation moving.

Bulk Fermentation (with 3 Folds)
Cover the bowl and let it rest at room temperature (~21–24°C / 70–75°F).
Over the next few hours:
After 40 minutes: do your first stretch and fold.
Repeat every 40 minutes (total of 3 rounds).
Let the dough rest another 30–60 minutes until bulk is done.
How to fold:
Wet your hands, reach under one side of the dough, stretch it up, and fold it over. Repeat on all four sides.
Dough should look puffier, with a smoother surface and visible bubbles underneath.
Goal:
About 50–75% increase in volume, not necessarily doubled.
If you gently shake the bowl, the dough should wobble slightly.
Tips:
Always moisten your hands slightly before handling the dough. This helps prevent sticking and makes folds easier.
If your kitchen is cold, place the bowl in your (turned-off) oven with the light on, or put a bowl of hot water beside it for gentle warmth.
Final Shape
Flip the dough seam-side up and repeat the folding process. Draw the edges into the center, working all around the dough to create tension. As you fold, aim slightly past the center each time; this helps build more tension on the dough's surface.
Then flip it seam-side down and use your hands to gently tighten it into a taut ball by rotating it on the counter and pulling it slightly toward you with each turn.
Place into a floured proofing basket or a bowl lined with a floured cotton or linen towel. Seam side goes up.
Tension is key here, apply enough to help the dough hold shape, but not so much that the surface tears or the dough resists folding.
The loaf should feel tight and slightly springy. Surface should be smooth with no tearing.
If the shape spreads a bit before proofing, that’s okay, it’ll hold better after chilling.
Tips:
Use a bench scraper or spatula to help move and shape the dough. If needed, dampen the scraper slightly to prevent sticking.
Move it to the fridge ASAP to prevent over-proofing at room temp.

Preshape & Rest Gently
Turn the dough out onto a lightly floured surface. Before shaping, it’s recommended to gently stretch the dough out slightly. This helps distribute internal air bubbles evenly, aligns the structure, and makes the pre-shaping more uniform.
Begin forming a loose round by lifting one edge of the dough and folding it toward the center; continue around the dough, folding each edge inward like wrapping a package.
This process helps gather the dough into a cohesive mass without creating too much surface tension, save that for the final shape.
Once folded, flip the dough seam-side down and let it rest for 20–30 minutes. You can leave it on the counter covered with a cloth, or place it back in the bowl and cover it to prevent drying.
The dough should hold shape but relax slightly. If it spreads a lot, the dough may be overproofed or under-strengthened.
Tips:
Don’t skip this rest, it helps relax the dough before final shaping.
You can leave it covered on the counter with a towel, or pop it back in the bowl to keep it from drying out.
Cold Proof (Overnight)
Cover the bowl or basket and place it in the fridge for 8–12 hours. This slow rise improves flavor and helps with scoring.
In the morning, the dough should be slightly expanded, with a smooth, tight surface.
To test readiness:
Gently press with a dampened fingertip, it should spring back slowly.
Dough will look slightly puffed and hold its form.
Fridge should be around 39–43°F (4–6°C) for best results.
The longer it proofs (up to ~12h), the tangier the flavor!

Score & Bake
Preheat oven to 475°F (245°C) with your Dutch oven, baking tray, or stone inside. Let everything preheat for at least 30 minutes to ensure proper oven spring.
Flip the dough onto parchment paper. Before scoring, lightly dust the surface of the dough with flour, this helps your blade glide more easily and enhances contrast for decorative scoring. Use a bread lame, a clean razor blade, or a very sharp knife to make a confident slash about ½ inch deep.
Carefully place the dough into the preheated Dutch oven (or onto a hot tray) using the parchment paper.
If you're using a Dutch oven:
Cover it with the lid, this traps steam naturally, so no extra steam is needed. Make sure to use long oven mitts, everything will be extremely hot.
If you don't have a Dutch oven (You have a few good options):
Place the dough on a hot baking tray or preheated pizza stone (which helps the loaf rise more evenly).
To trap steam, cover the dough with a large, heat-safe metal bowl. Alternatively, place an inverted baking tray above the loaf to prevent the crust from forming too quickly.
At the same time, place a metal pan or oven-safe saucepan with hot water at the bottom of the oven. You can also drop in a few ice cubes instead, these will melt slowly and provide extended steam. This step is important for a good rise and to avoid a tough crust.
After 20 minutes of baking, remove the lid (if using a Dutch oven) or steam cover (if using a bowl or tray), reduce the oven temperature to 430°F (220°C), and continue baking for another 20–25 minutes until the crust turns deep golden brown.
The loaf should sound hollow when tapped on the bottom, and the crust should feel firm.
Tips:
For a rustic, flour-dusted finish, use rice flour before scoring, it resists moisture and makes patterns stand out better.
Handle the pot and steam carefully, everything is extremely hot. Use long oven mitts and avoid touching the metal.
For extra steam inside a Dutch oven, you can also place 2–3 small ice cubes under the parchment right before closing the lid, but this is not totally necessary.
Cool Before Slicing
Place bread on a wire rack. Let it cool at least 1 hour. Cutting too early can lead to a gummy interior.
The crust is firm, the loaf feels light for its size, and slicing reveals a tender crumb.
Have you spent years worrying about whether bread is really bad for you?
Find out what science actually says in Is Bread (and Gluten) Really That Bad for You? Science Says… Not Really
Looking for a sustainable way to keep your homemade sourdough fresh for longer?
Discover how to make it last beautifully with Swap Plastic for Beeswax: The Kitchen Upgrade You Didn’t Know You Needed
Your first loaf won’t be perfect, and that’s perfect. Bake, learn, improve. Share your loaf with us, we’d love to see it! Tag us on Instagram, we want to celebrate your first sourdough!
Happy baking!
Keep your hands damp while mixing or folding, this prevents the dough from sticking to your skin.
Moisten your fingers before doing the poke test or shaping. It keeps the dough from clinging and helps you work more gently.
Windowpane test: Want to check gluten development? Take a small piece of dough and gently stretch it, if it forms a thin, translucent film without tearing, you’re on the right track.
Dampen your bench scraper or spatula before using it to handle sticky dough during shaping.
Use a kitchen scale: It’s far more accurate than cups and helps you stay consistent.
Room temperature matters: Dough ferments faster in warm rooms, slower in cool ones. Adjust rest times as needed.
Cold kitchen? Place dough in the (turned-off) oven with the light on, or place a bowl of hot water inside to create gentle warmth and steam.
Hot kitchen? Use cold water from the fridge when mixing to slow fermentation. Avoid direct sunlight or placing dough near hot appliances.
Starter from the fridge? Take it out at least 4 hours ahead of mixing your dough to give it time to activate and peak.
Slow starter? Move it to a warmer spot in your kitchen, near the oven or on top of the fridge, to help it become more active.
No bread lame? Use a clean razor blade or a very sharp knife to score your loaf if you don’t have a scoring tool.
Patience is part of the process: Let each phase take its time. Sourdough isn’t fast, but it’s worth it.
Don’t stress over fancy tools: Bowls, towels, and steam trays work great if you don’t have specialty gear.
Recap and Final Tips for Your First Loaf
You’ve made it through your first sourdough bake. Here’s a recap of the most helpful tips from the guide, plus a few extras to keep in mind next time.
Have You Tried Our Beeswax Bags & Wraps?
A natural way to keep your food and bread fresh while reducing plastic in your kitchen.
Each set includes 2 reusable bread bags and 2 wraps, made from 100% cotton, beeswax, jojoba oil, and pine resin.
Simple, sustainable, and long-lasting.
Let’s Connect on Instagram
Subscribe to Our Newsletter
Join the Naturable Blog! Stay updated with our tips, kitchen hacks, and much more
Stay connected! Follow us for tips, updates, and a little extra inspiration for your home and kitchen.
Have a question or need assistance?
Feel free to contact us!
© 2025. Naturable – A brand of Horizon Origin LLC