Naturally fresh, beautifully stored

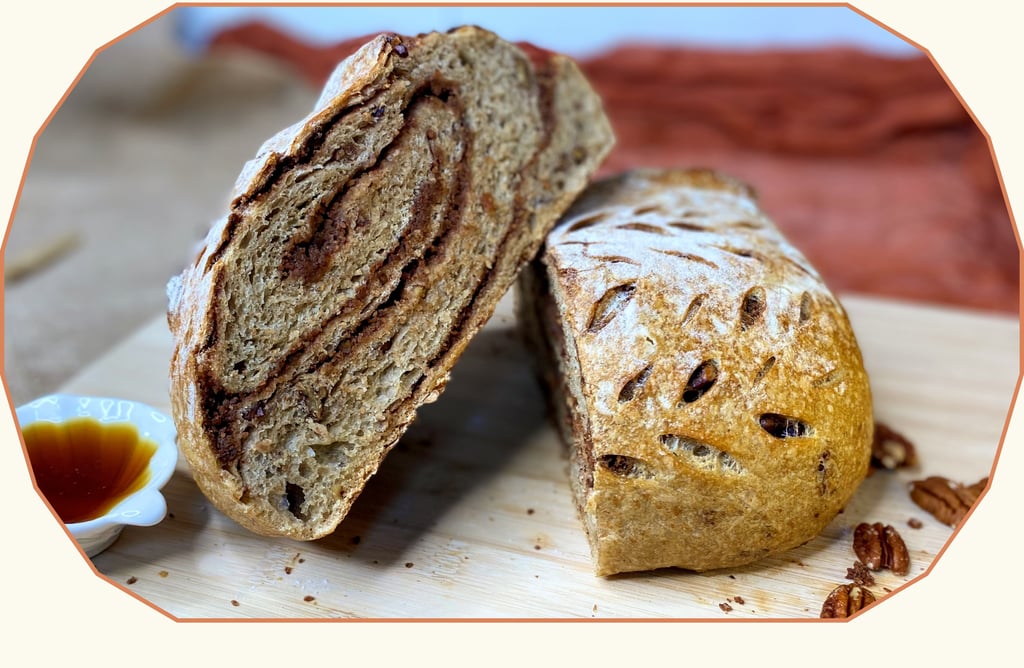
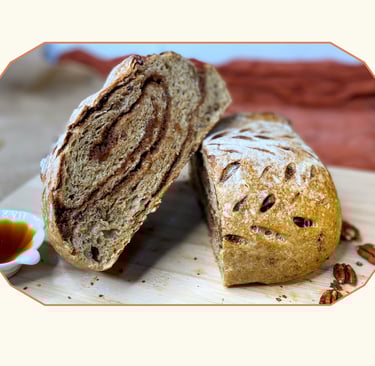
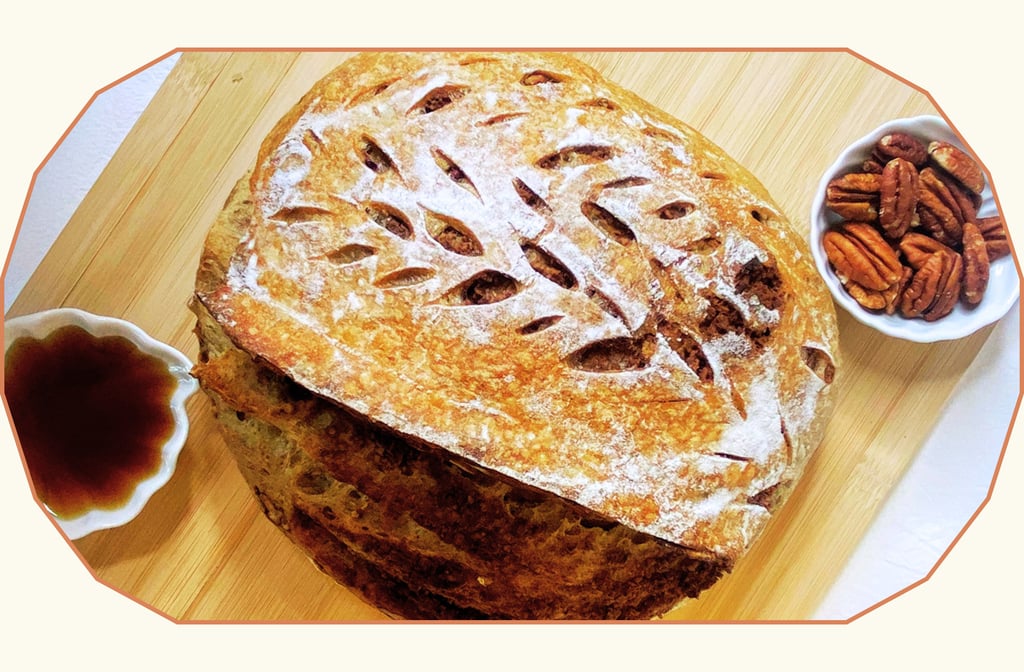
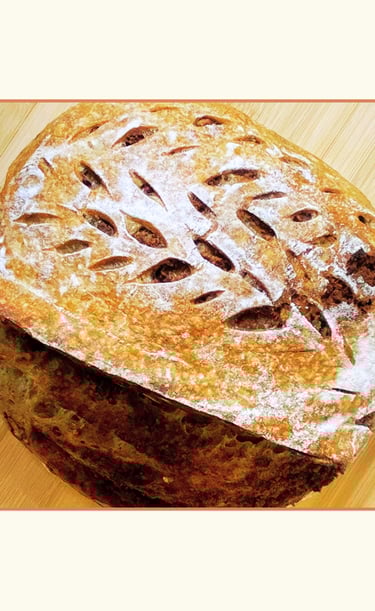
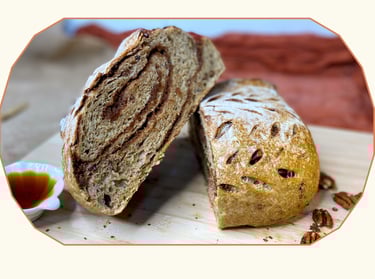
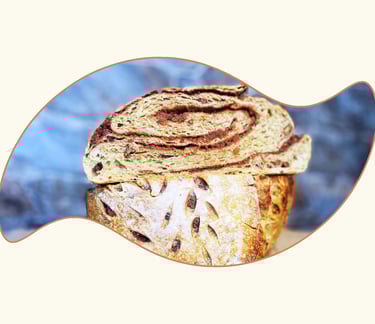
Maple Pecan Loaf with a Touch of Coffee
A soft sourdough loaf with a ribbon of maple pecan swirl and a touch of coffee. Learn how to make it from scratch with clear steps and practical tips.
A


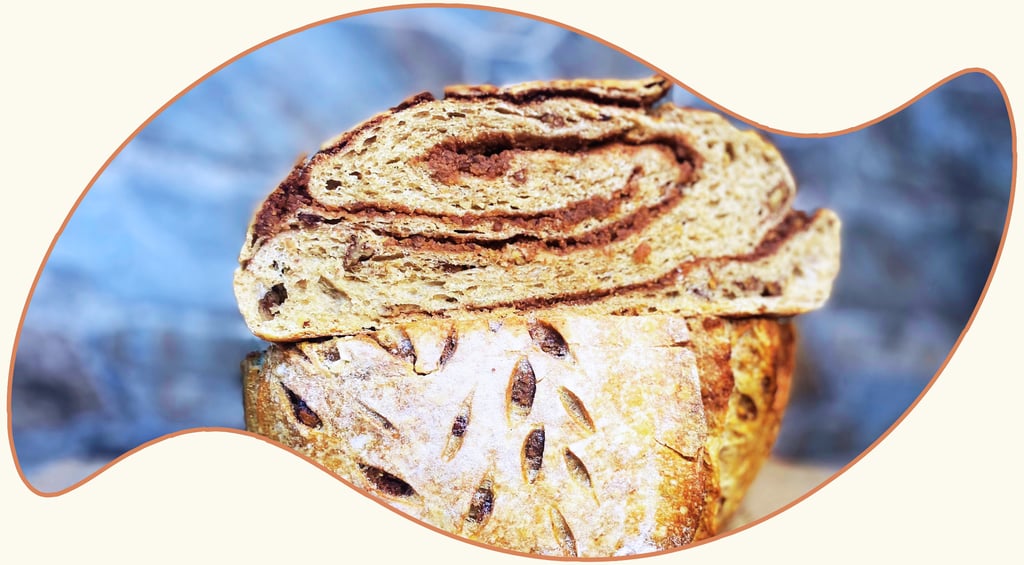
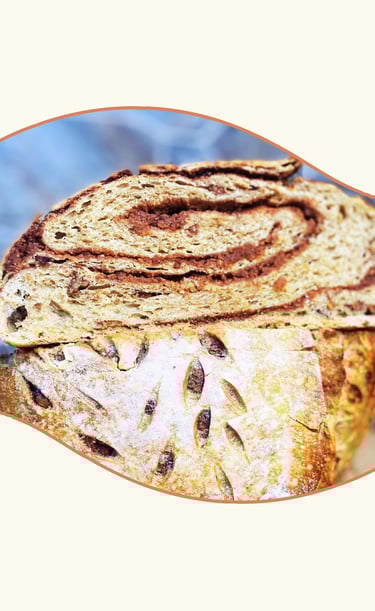
There is something incredibly comforting about the combination of maple syrup, toasted pecans and the warm aroma of freshly brewed coffee. All those flavours come together in this sourdough loaf, with a beautiful swirl that runs through the crumb like a ribbon of flavour.
In this guide you will find every step exactly as I made it, along with notes, tips and visual references so you can follow the process with confidence and make this loaf at home.
This recipe takes time, but every minute is worth it.
Ingredients
For the maple pecan paste
50 g maple syrup
100 g pecans
20 g water
½ teaspoon cinnamon
A pinch of salt
For the dough
350 g bread flour
150 g whole wheat flour
270 g water
50 ml coffee, brewed earlier and cooled
100 g sourdough starter
20 g additional water
10 g maple syrup
½ teaspoon nutmeg
½ teaspoon cinnamon
10 g salt
Around 70 g chopped pecans
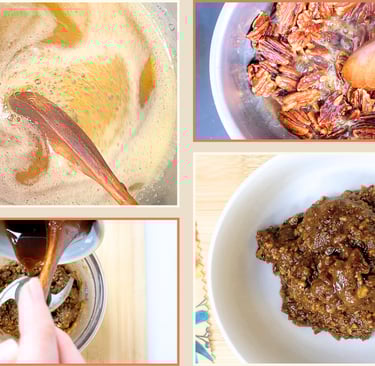
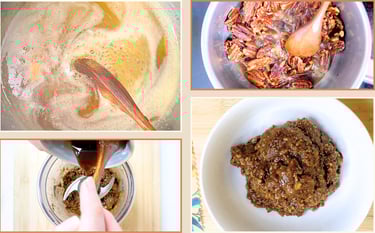
Prepare the maple pecan paste
Place 50 g of maple syrup in a saucepan over medium heat.
When it starts to bubble, add 100 g pecans and stir constantly until the maple syrup thickens and reduces.
Remove from heat and let it cool slightly so it is warm, not hot.
Blend until it forms a thick paste.
Add 20 g of water to the same saucepan and stir to dissolve the maple syrup left on the sides and bottom.
Pour that into the blended mixture and add half teaspoon cinnamon and a pinch of salt.
Blend again until you have a workable, spreadable paste.

Prepare the coffee
Brew 50 ml of liquid coffee without sugar a few hours in advance and let it cool completely.
Any coffee works; the important thing is that it is cold before mixing it into the dough.
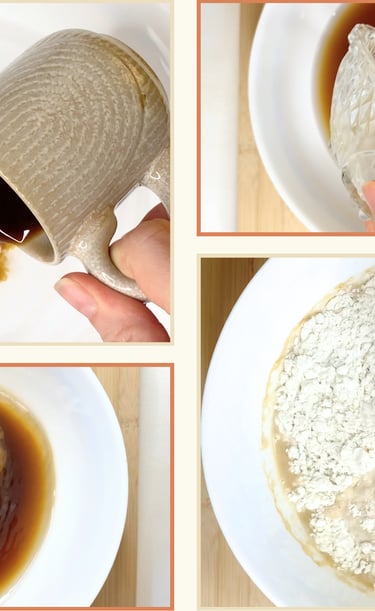
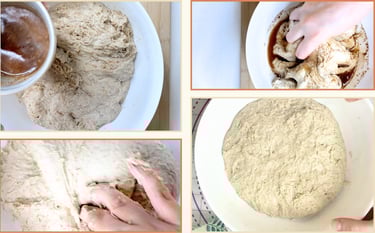
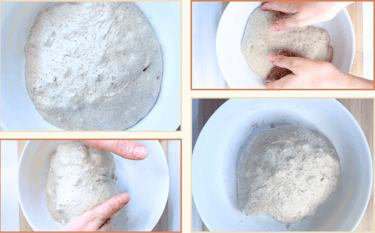
Mix the dough
Combine the water with the cooled coffee in a large bowl. The coffee must be fully cold so it does not interfere with fermentation.
Add 100 g sourdough starter and mix until it dissolves.
Add the flours in two additions and mix until all the dry spots disappear. The dough should come together as a rough, slightly uneven mass. It does not need to be smooth at this stage.
Cover the bowl and let it autolyse for one hour. During this time, do not knead or touch the dough.
Why autolyse is important:
Autolyse allows the flour to hydrate fully before adding salt, spices or kneading. During this rest the gluten begins to develop naturally, which makes the dough smoother, easier to handle and less likely to tear when you laminate it. It also improves flavour and reduces the amount of kneading needed later.
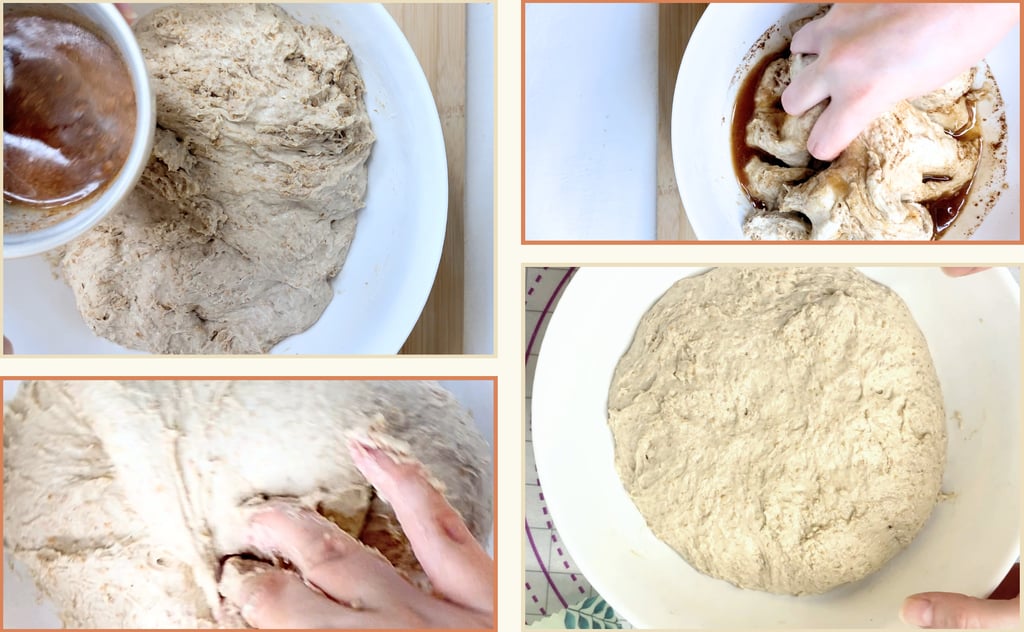
Before the hour ends prepare a small liquid mixture in a separate bowl. Combine the additional water, maple syrup, nutmeg, cinnamon and salt. Stir until everything is fully dissolved. Preparing it separately helps the flavours and salt distribute evenly.
After the autolyse pour this liquid over the dough and fold it in until fully absorbed.
Once integrated knead for eight to ten minutes until the dough feels smoother and stronger.
Cover the bowl and let it rest for twenty minutes so the gluten relaxes before the first lamination.
Are you learning to bake your first sourdough breads?
Take a look at Sourdough Made Simple: A Beginner’s Guide to Your First Loaf , and follow every step with confidence.
Looking for sustainable kitchen inspiration?
Read Swap Plastic for Beeswax: The Kitchen Upgrade You Didn’t Know You Needed
and discover how small changes can make a big difference.


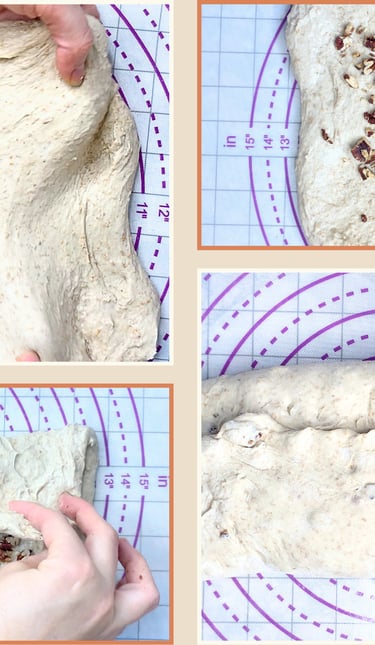
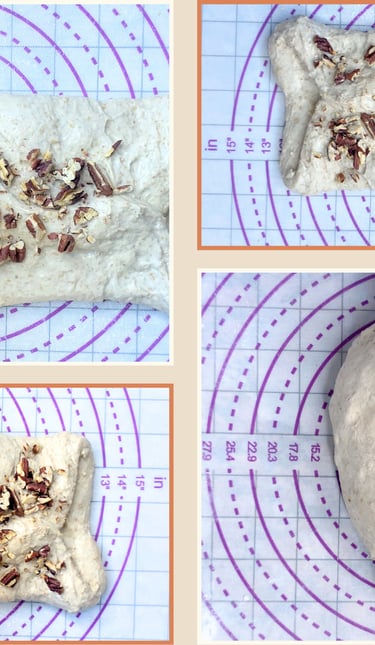
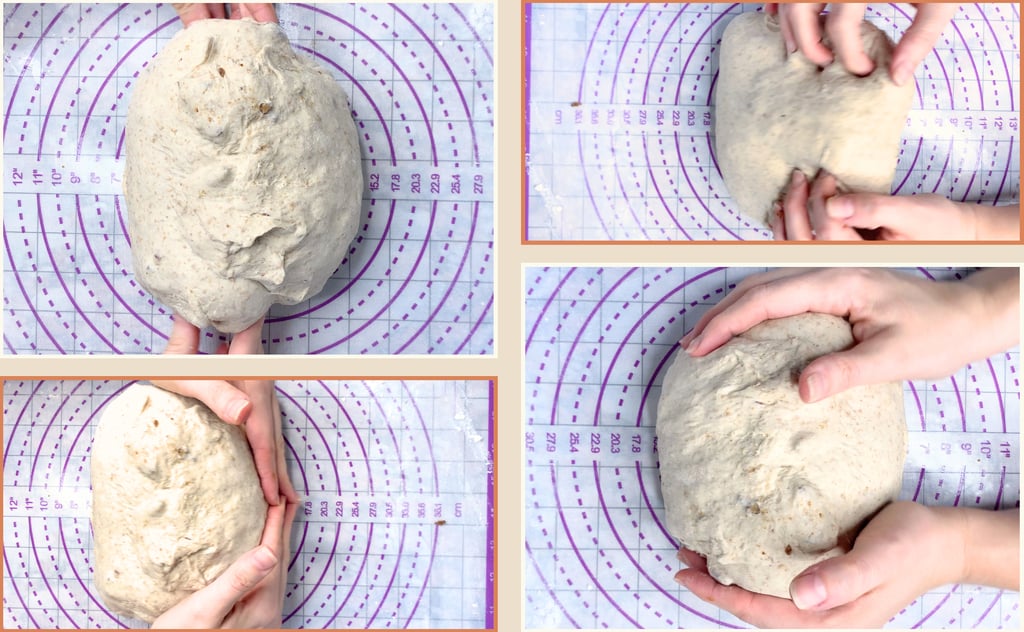
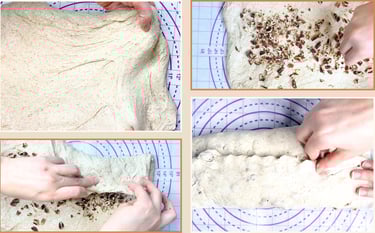
First lamination and adding the chopped pecans
After the twenty-minute rest, lightly moisten your hands and laminate the dough.
Gently stretch it into a large thin sheet by pulling from the centre toward the edges. At this point the dough does not have much air yet, but it has begun to build structure, so it still needs to be handled with care to keep the gluten intact.
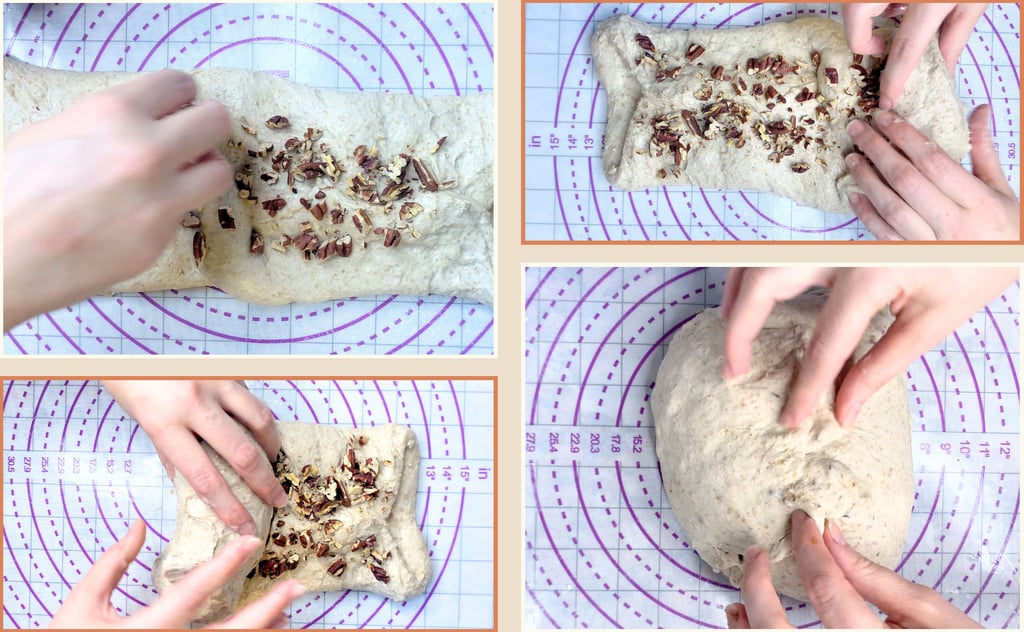
Scatter your chopped pecans along a central strip, leaving space on both sides. The goal here is not to create a swirl. This first lamination is simply to distribute the pecans throughout the dough so you get pieces in every bite. The folds that come later will spread them even more.
Bring the left side of the dough to the centre.
Bring the right side to the centre so both edges meet.
Pinch the seam to seal.
If you want a stronger pecan presence you can sprinkle a little more on top of the seam.
Starting from the bottom edge, roll the dough upward until you reach the top.
Pinch the seam and the ends to keep everything enclosed.
Let the dough rest twenty to twenty five minutes so the gluten can relax before the folding steps.
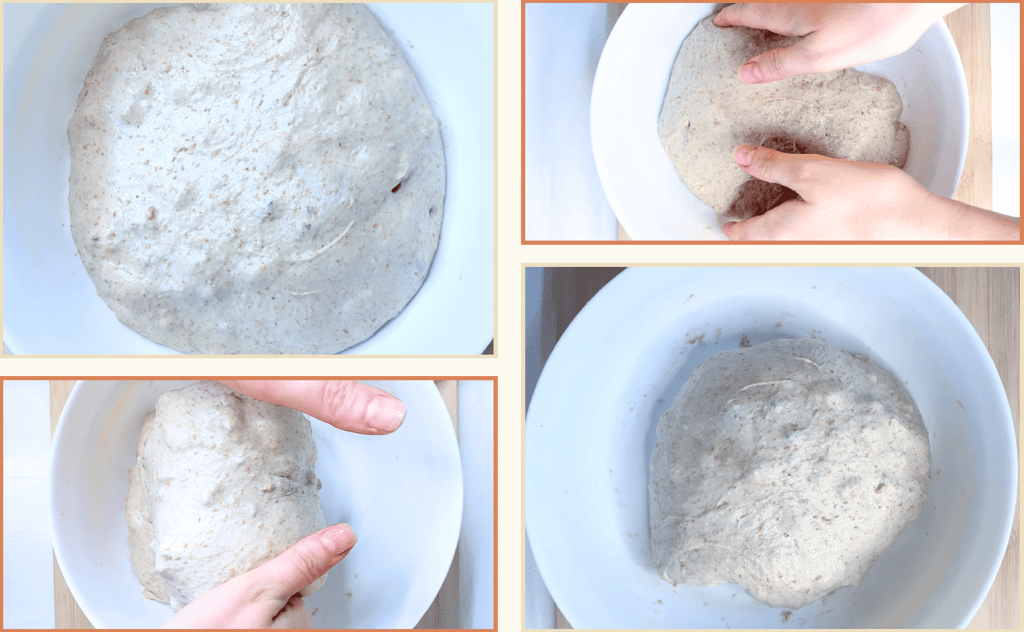
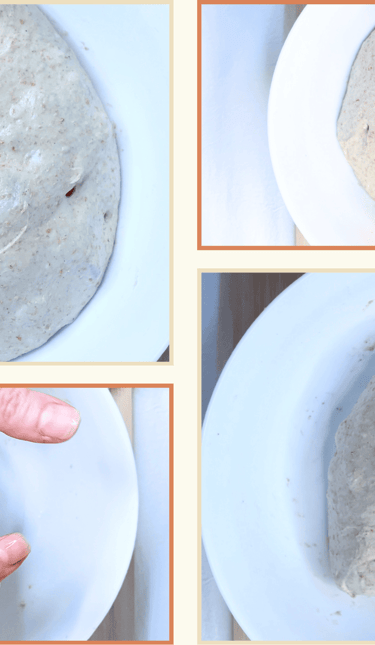
After the short rest, it’s time for the first fold.
Lightly wet your hands and slide them under one side of the dough. Lift it up until it stretches naturally, then fold that side toward the center. Rotate the bowl a quarter turn and repeat. Do this four times total, once for each “side” of the dough, until it looks more gathered and slightly tighter.
Cover and let it rest for about forty minutes.
Come back for the second fold. Lift from the sides again, let the dough hang for a moment so it stretches, then fold it back toward the center. Keep everything soft and controlled. You’re building strength without knocking out the air.
Rest for another forty minutes.
Do the third fold the exact same way
After this final fold, the dough needs a longer rise. Let it ferment for about one and a half hours, or until it looks visibly fuller and has risen roughly sixty to seventy percent. You want a dough that feels alive, airy, and strong enough to handle the final lamination and shaping without tearing.
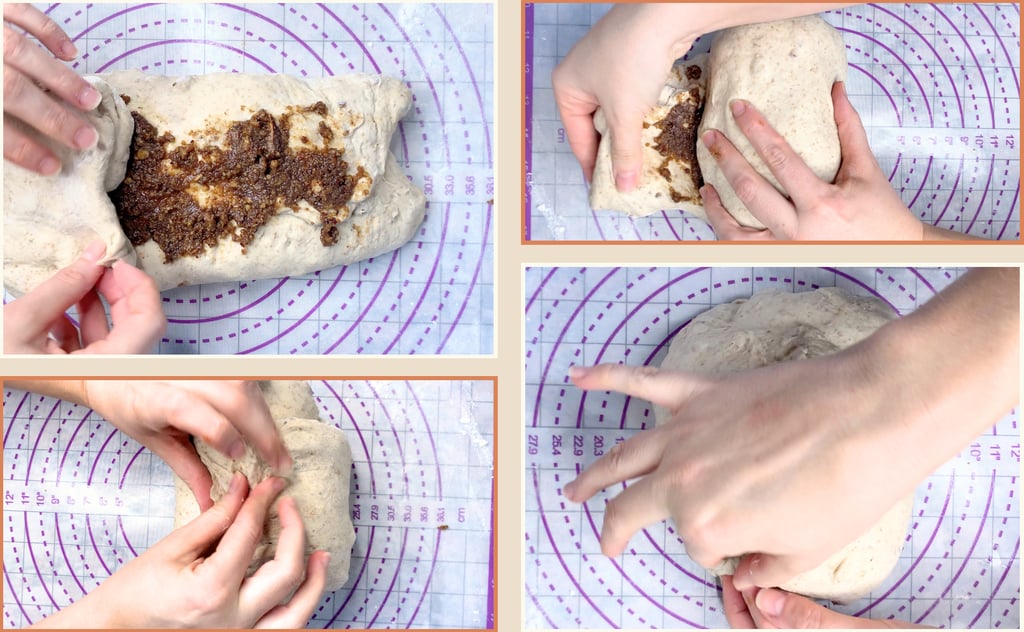

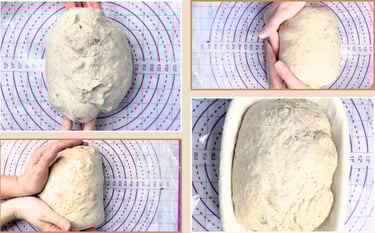
Second lamination and final swirl shaping
Turn the dough out gently onto your counter.
Wet your hands and the edges of the bowl so the dough can release on its own without tearing or losing unnecessary air. Let gravity do most of the work. Once it’s on the surface, gently stretch it from the center outward until you have a thin, even sheet. Avoid pulling too fast; slow, steady movements keep the gluten intact.
Spread the maple pecan paste in a central strip, leaving clean borders on both sides.
Bring the left side of the dough toward the center.
Bring the right side toward the center as well so both edges meet.
Pinch the seam so it seals properly.
Add a little more paste on top to intensify the swirl.
Starting from the bottom edge, roll the dough upward into a tight but gentle log.
When you reach the top, lift that upper edge slightly upward before sealing. This tiny lift adds a bit of tension to the outer layer without overworking the dough.
Pinch the seam along the log and pinch the sides so the filling stays neatly contained during proofing and baking.
To create soft surface tension, place both hands in front of the dough and pull it slightly toward you.
Then place your hands behind it and push it gently away.
These small movements help tighten the outer skin just enough to hold the shape, while keeping the swirl protected so it doesn’t tear or shift inside.
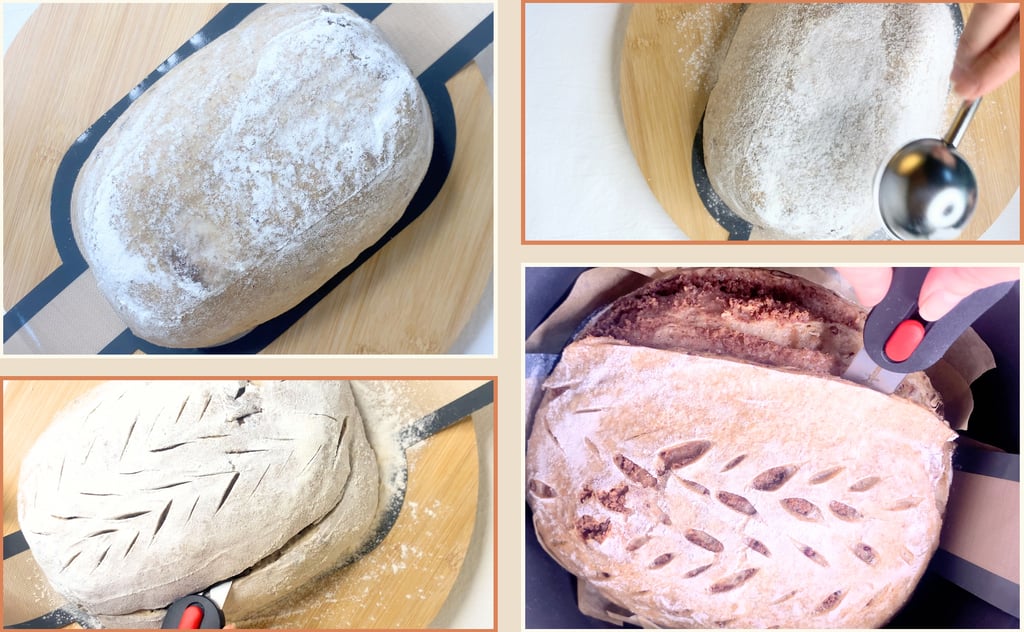
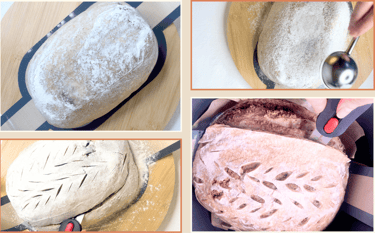
Once the loaf is shaped, prepare your banneton.
Dust it generously with a mix of bread flour and rice flour so the dough won’t stick during the overnight proof.
Place the dough into the banneton with the seam side up and the smooth top side down.
During the cold proof, the dough will relax and the seam will naturally seal and when you flip it before baking, the smooth side becomes the top crust ready for scoring.
Gently tuck the sides if needed, cover the banneton, and place it in the fridge for the overnight cold proof.
Baking
Preheat your oven to 250°C with the Dutch oven inside for thirty to forty minutes so it gets thoroughly hot.
When you’re ready to bake, take the dough out of the fridge, flour the surface lightly, and score with a sharp blade.
If you want the cuts to open even wider, leave the dough uncovered for about five minutes before baking.
Carefully place the loaf into the hot Dutch oven.
Slide a piece of parchment underneath, then add a few ice cubes under the paper to create extra steam.
Bake covered for about twenty minutes.
Around the fifteen-minute mark, quickly lift the lid, run the blade again over the main score to encourage a stronger ear, cover again, and let it finish the covered stage.
After the first twenty minutes, remove the lid and lower the temperature to 220°C.
Bake for another twenty-five minutes, or adjust the time depending on how fast your oven browns the crust. You want a deep golden top without burning the edges of the swirl.
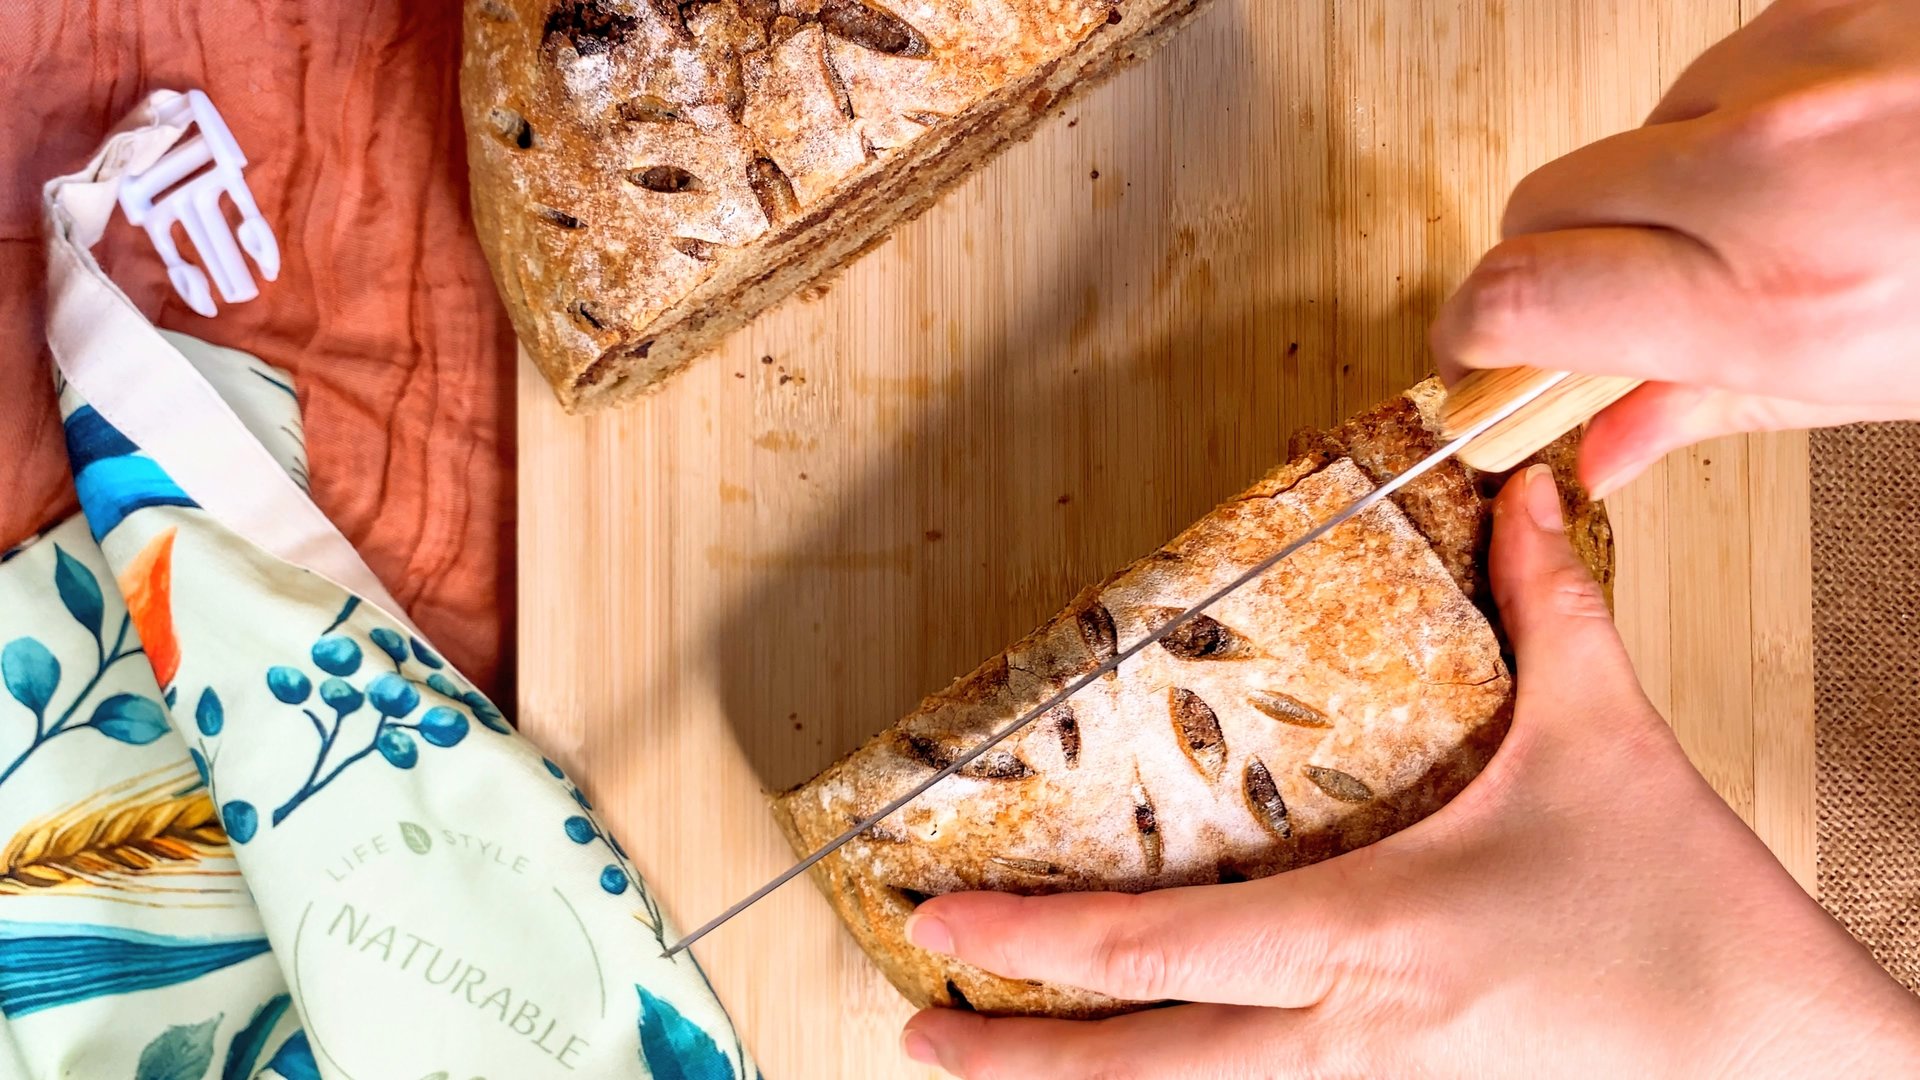
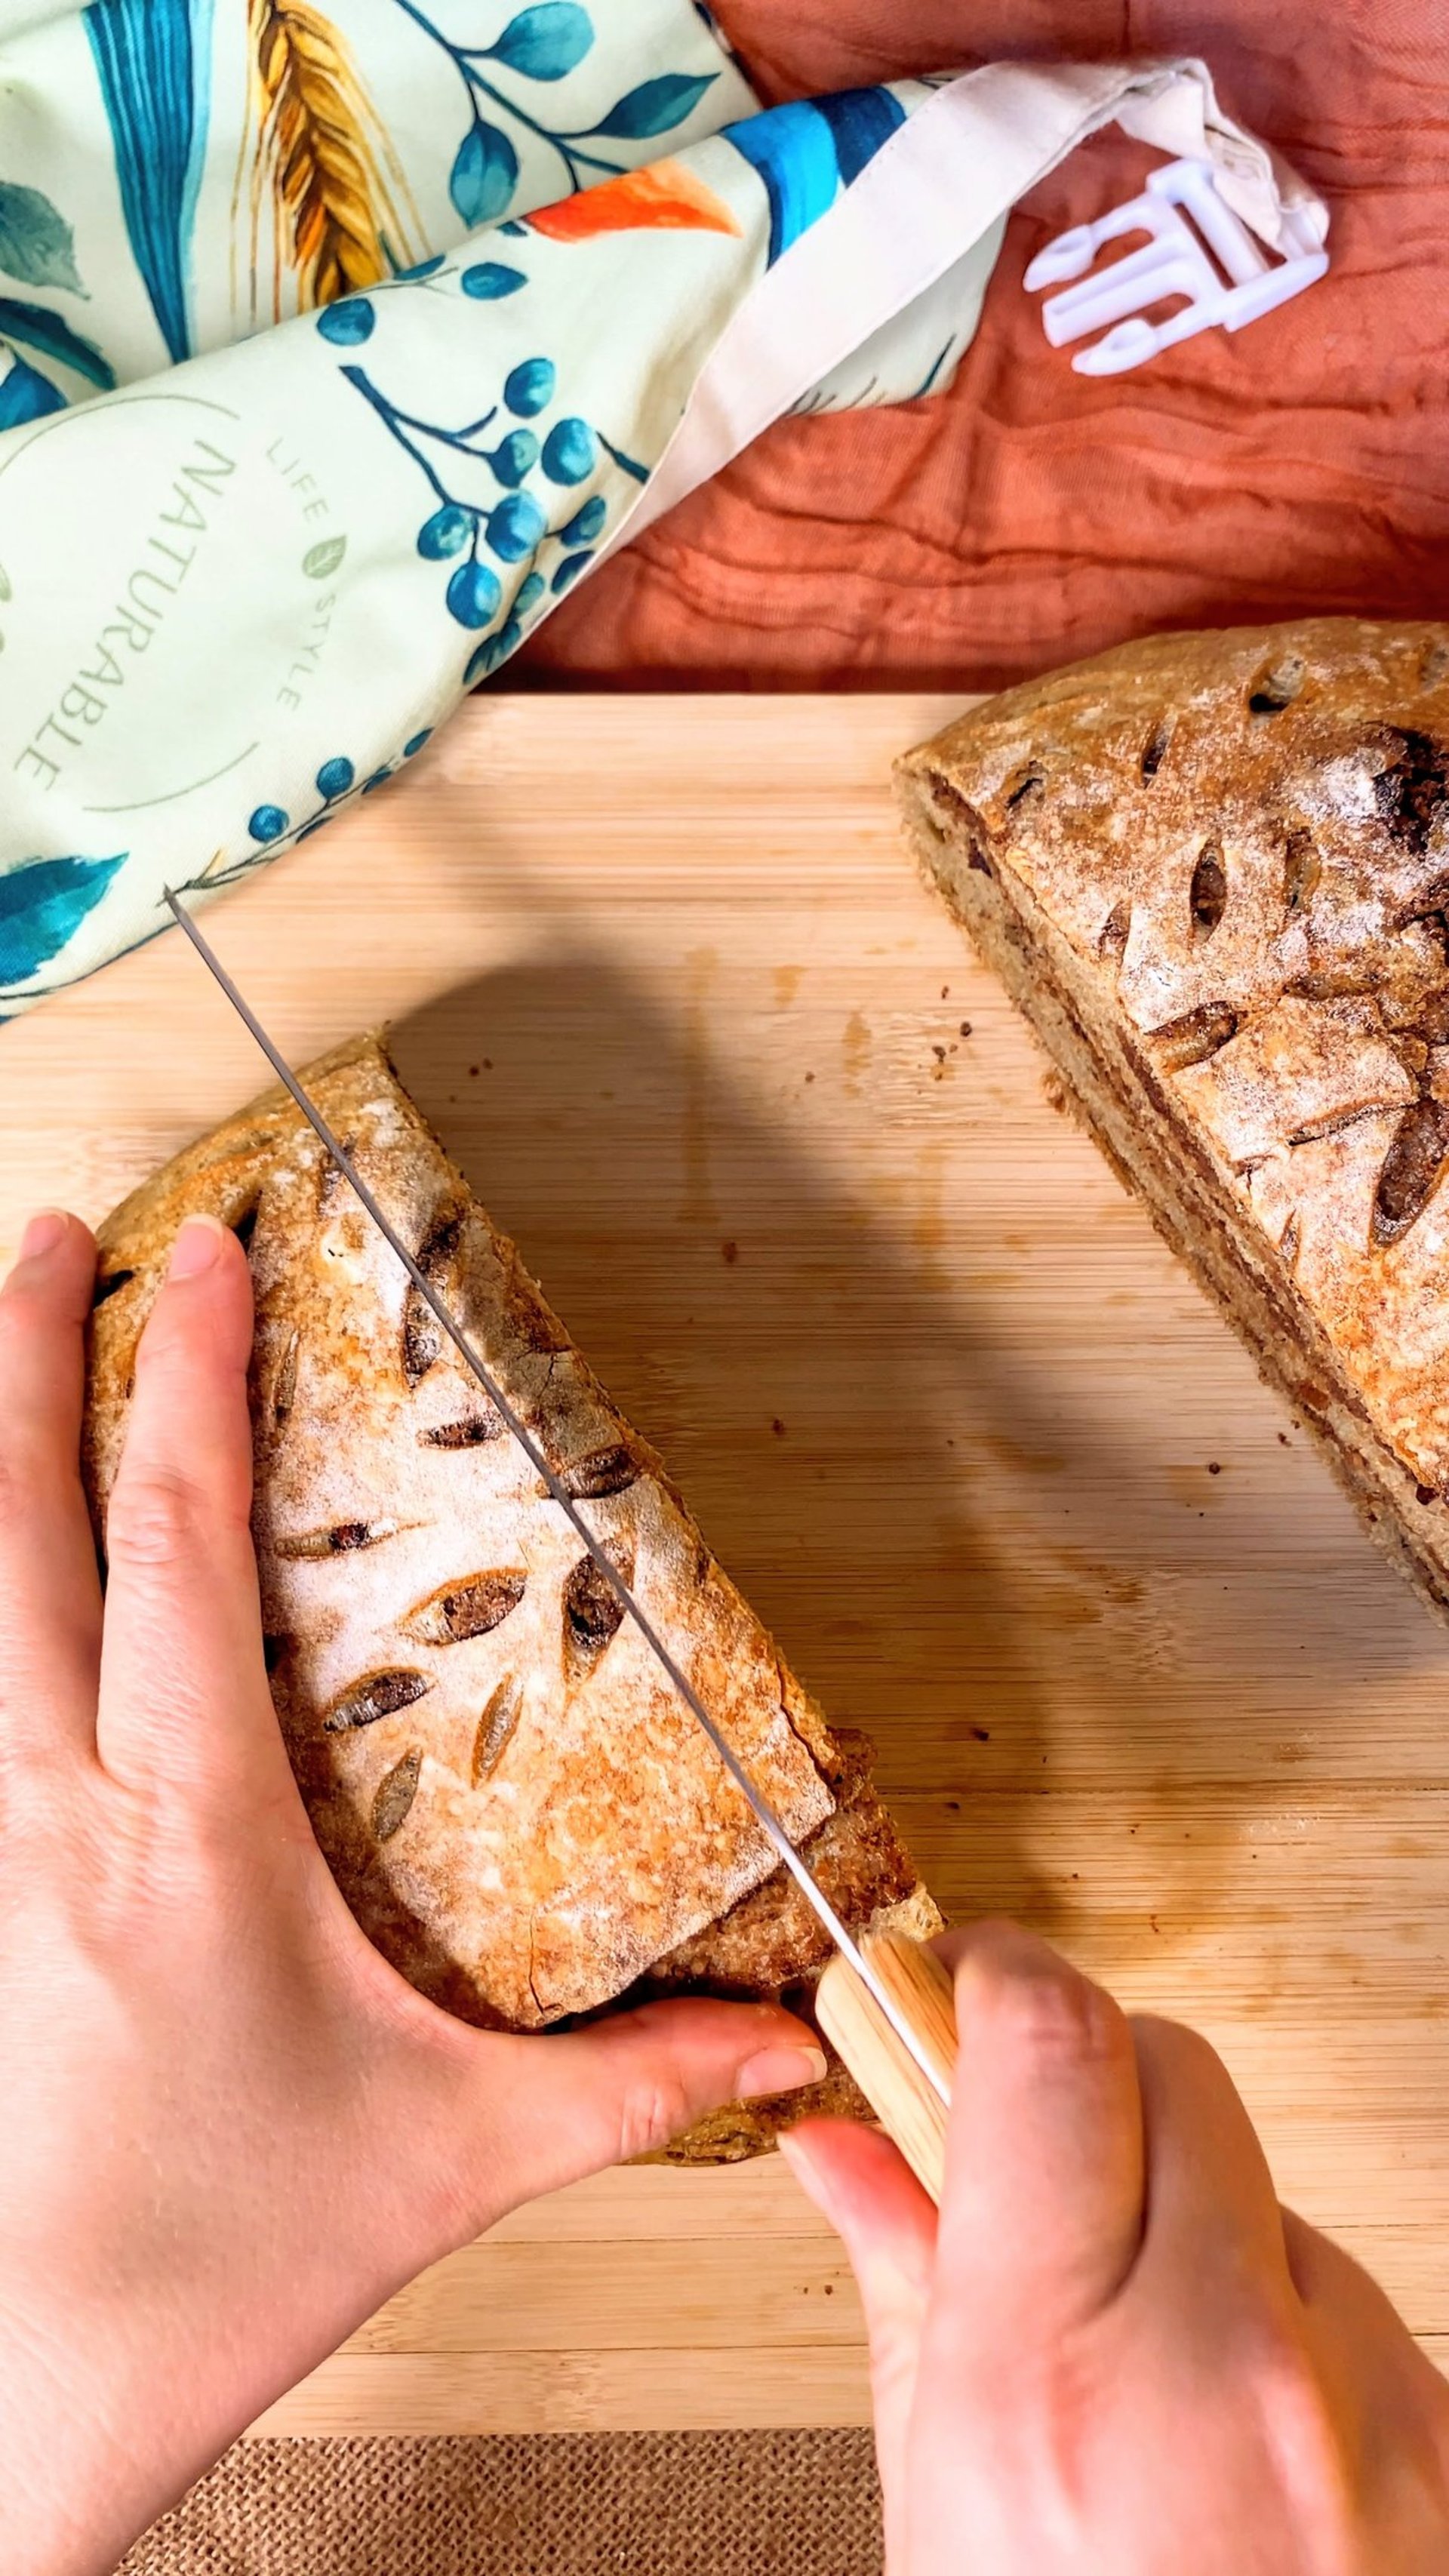
Let the loaf cool completely before slicing.
This is essential: the swirl needs time to set so the crumb stays clean and the layers don’t smear when you cut into it.
Checklist of Tips and Things to Keep in Mind
Always take your kitchen temperature into account; fermentation speeds up in warm rooms and slows down in cooler ones.
Follow the dough, not the clock.
Wet your hands when folding, laminating or handling the dough to prevent sticking.
Laminate gently to protect the gluten structure and avoid excessive degassing.
Stretch the dough from the center outward; this keeps the gluten network intact.
Keep fillings in a central strip so the dough seals easily during shaping.
If the dough feels tight or resists stretching, let it rest a few minutes before continuing.
Aim for a bulk rise of sixty to seventy percent before the final lamination.
Use the finger-dent test before baking; the indentation should return slowly.
Roll the dough gently when shaping and always pinch seams and sides so the swirl stays contained.
Dust the banneton generously, to prevent sticking.
Place the dough in the banneton seam-side up.
Leave the dough uncovered for five minutes after scoring if you want wider openings.
Cold proofing improves flavor, makes handling easier and keeps the swirl structure stable.
Adjust baking time if your oven browns quickly.
Extra Tips if You don’t Have All The Tools
These alternatives come from the beginner sourdough guide and work perfectly for this recipe.
If you don’t have a Dutch oven
Option one. Pizza stone + tray:
Preheat a pizza stone for at least thirty minutes.
Place your loaf on the stone and cover it with an inverted baking tray or roasting pan for the first twenty minutes.
Remove the cover and finish baking until golden.
Option two. Two baking trays:
Preheat one tray.
Place the loaf on the hot tray.
Cover it with another tray turned upside down for the first twenty minutes.
Remove the top tray and continue baking uncovered.
Important steam tip for Option 1 and Option 2:
To make sure your loaf gets enough steam without a Dutch oven, always do this:
Place a metal tray on the bottom of the oven during preheating.
Add hot water as soon as the bread goes in and close the door immediately to trap the steam.
This extra steam helps the loaf expand and the scores open properly.
If you don’t have a banneton:
Use a bowl lined with a towel dusted generously with rice flour.
Rice flour prevents sticking far better than wheat flour.
If you don’t have a scoring blade:
Use a sharp knife or a thin single-edge razor blade (the type used for bread scoring) and moisten it lightly before scoring.
If your oven browns too fast:
Reduce the temperature slightly near the end or place a loose sheet of foil above the loaf.
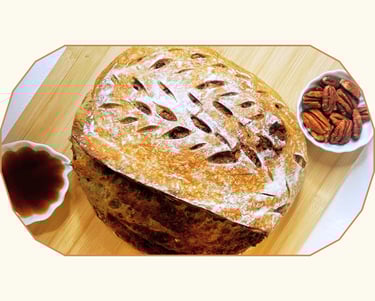
This loaf truly surprised me in the best way. The swirl, the aroma, the touch of coffee, everything comes together beautifully. If you want the full experience, toast a slice, add a little butter while it’s still warm and finish with a light drizzle of maple syrup.
Enjoy every bite!
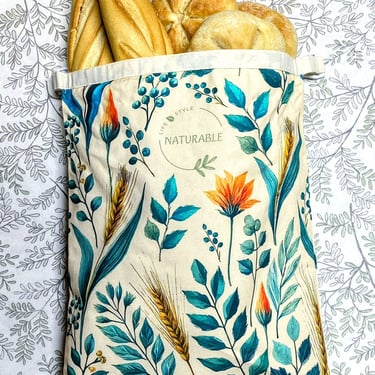
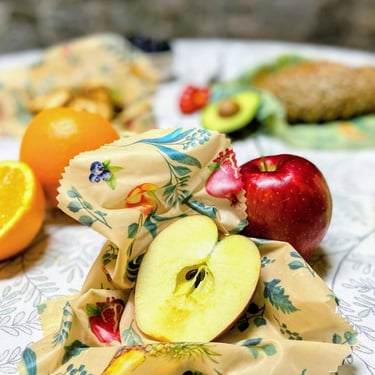
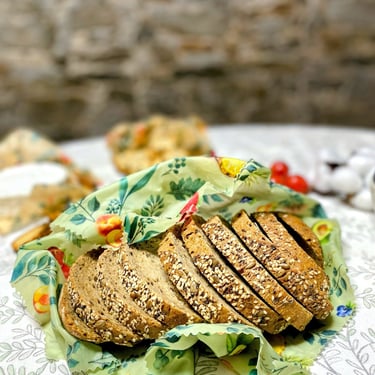
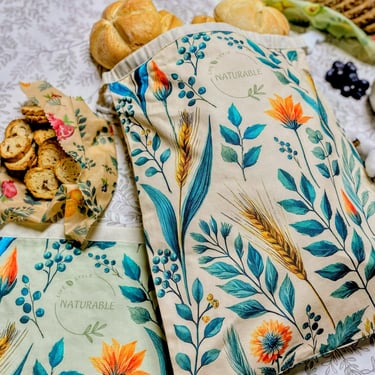
Have You Tried Our Beeswax Bags & Wraps?
A natural way to keep your food and bread fresh while reducing plastic in your kitchen.
Each set includes 2 reusable bread bags and 2 wraps, made from 100% cotton, beeswax, jojoba oil, and pine resin.
Simple, sustainable, and long-lasting.
Let’s Connect on Instagram

There is something incredibly comforting about the combination of maple syrup, toasted pecans and the warm aroma of freshly brewed coffee. All those flavours come together in this sourdough loaf, with a beautiful swirl that runs through the crumb like a ribbon of flavour.
In this guide you will find every step exactly as I made it, along with notes, tips and visual references so you can follow the process with confidence and make this loaf at home.
This recipe takes time, but every minute is worth it.
Ingredients
For the maple pecan paste
50 g maple syrup
100 g pecans
20 g water
½ teaspoon cinnamon
A pinch of salt
For the dough
350 g bread flour
150 g whole wheat flour
270 g water
50 ml coffee, brewed earlier and cooled
100 g sourdough starter
20 g additional water
10 g maple syrup
½ teaspoon nutmeg
½ teaspoon cinnamon
10 g salt
Around 70 g chopped pecans
Prepare the maple pecan paste
Place 50 g of maple syrup in a saucepan over medium heat.
When it starts to bubble, add 100 g pecans and stir constantly until the maple syrup thickens and reduces.
Remove from heat and let it cool slightly so it is warm, not hot.
Blend until it forms a thick paste.
Add 20 g of water to the same saucepan and stir to dissolve the maple syrup left on the sides and bottom.
Pour that into the blended mixture and add half teaspoon cinnamon and a pinch of salt.
Blend again until you have a workable, spreadable paste.
Prepare the coffee
Brew 50 ml of liquid coffee without sugar a few hours in advance and let it cool completely.
Any coffee works; the important thing is that it is cold before mixing it into the dough.

Mix the dough
Combine the water with the cooled coffee in a large bowl. The coffee must be fully cold so it does not interfere with fermentation.
Add 100 g sourdough starter and mix until it dissolves.
Add the flours in two additions and mix until all the dry spots disappear. The dough should come together as a rough, slightly uneven mass. It does not need to be smooth at this stage.
Cover the bowl and let it autolyse for one hour. During this time, do not knead or touch the dough.
Why autolyse is important:
Autolyse allows the flour to hydrate fully before adding salt, spices or kneading. During this rest the gluten begins to develop naturally, which makes the dough smoother, easier to handle and less likely to tear when you laminate it. It also improves flavour and reduces the amount of kneading needed later.
Before the hour ends prepare a small liquid mixture in a separate bowl. Combine the additional water, maple syrup, nutmeg, cinnamon and salt. Stir until everything is fully dissolved. Preparing it separately helps the flavours and salt distribute evenly.
After the autolyse pour this liquid over the dough and fold it in until fully absorbed.
Once integrated knead for eight to ten minutes until the dough feels smoother and stronger.
Cover the bowl and let it rest for twenty minutes so the gluten relaxes before the first lamination.
Craving more cozy bakes?
Try our Sourdough Made Simple: A Beginner’s Guide to Your First Loaf , the perfect place to start your sourdough journey.
Looking for sustainable kitchen inspiration?
Read Swap Plastic for Beeswax: The Kitchen Upgrade You Didn’t Know You Needed and discover how small changes can make a big difference.
Starting from the bottom edge, roll the dough upward until you reach the top.
Pinch the seam and the ends to keep everything enclosed.
Let the dough rest twenty to twenty five minutes so the gluten can relax before the folding steps.

First lamination and adding the chopped pecans
After the twenty-minute rest, lightly moisten your hands and laminate the dough.
Gently stretch it into a large thin sheet by pulling from the centre toward the edges. At this point the dough does not have much air yet, but it has begun to build structure, so it still needs to be handled with care to keep the gluten intact.
Scatter your chopped pecans along a central strip, leaving space on both sides. The goal here is not to create a swirl. This first lamination is simply to distribute the pecans throughout the dough so you get pieces in every bite. The folds that come later will spread them even more.
Bring the left side of the dough to the centre.
Bring the right side to the centre so both edges meet.
Pinch the seam to seal.
If you want a stronger pecan presence you can sprinkle a little more on top of the seam.
After the short rest, it’s time for the first fold.
Lightly wet your hands and slide them under one side of the dough. Lift it up until it stretches naturally, then fold that side toward the center. Rotate the bowl a quarter turn and repeat. Do this four times total, once for each “side” of the dough, until it looks more gathered and slightly tighter.
Cover and let it rest for about forty minutes.
Come back for the second fold. Lift from the sides again, let the dough hang for a moment so it stretches, then fold it back toward the center. Keep everything soft and controlled. You’re building strength without knocking out the air.
Rest for another forty minutes.
Do the third fold the exact same way
After this final fold, the dough needs a longer rise. Let it ferment for about one and a half hours, or until it looks visibly fuller and has risen roughly sixty to seventy percent. You want a dough that feels alive, airy, and strong enough to handle the final lamination and shaping without tearing.

Second lamination and final swirl shaping
Turn the dough out gently onto your counter.
Wet your hands and the edges of the bowl so the dough can release on its own without tearing or losing unnecessary air. Let gravity do most of the work. Once it’s on the surface, gently stretch it from the center outward until you have a thin, even sheet. Avoid pulling too fast; slow, steady movements keep the gluten intact.
Spread the maple pecan paste in a central strip, leaving clean borders on both sides.
Bring the left side of the dough toward the center.
Bring the right side toward the center as well so both edges meet.
Pinch the seam so it seals properly.
Add a little more paste on top to intensify the swirl.
Starting from the bottom edge, roll the dough upward into a tight but gentle log.
When you reach the top, lift that upper edge slightly upward before sealing. This tiny lift adds a bit of tension to the outer layer without overworking the dough.
Pinch the seam along the log and pinch the sides so the filling stays neatly contained during proofing and baking.
To create soft surface tension, place both hands in front of the dough and pull it slightly toward you.
Then place your hands behind it and push it gently away.
These small movements help tighten the outer skin just enough to hold the shape, while keeping the swirl protected so it doesn’t tear or shift inside.
Prepare your banneton
Dust it generously with a mix of bread flour and rice flour so the dough won’t stick during the overnight proof.
Place the dough into the banneton with the seam side up and the smooth top side down.
During the cold proof, the dough will relax and the seam will naturally seal and when you flip it before baking, the smooth side becomes the top crust ready for scoring.
Gently tuck the sides if needed, cover the banneton, and place it in the fridge for the overnight cold proof.
Baking
Preheat your oven to 250°C with the Dutch oven inside for thirty to forty minutes so it gets thoroughly hot.
When you’re ready to bake, take the dough out of the fridge, flour the surface lightly, and score with a sharp blade.
If you want the cuts to open even wider, leave the dough uncovered for about five minutes before baking.
Carefully place the loaf into the hot Dutch oven.
Slide a piece of parchment underneath, then add a few ice cubes under the paper to create extra steam.
Bake covered for about twenty minutes.
Around the fifteen-minute mark, quickly lift the lid, run the blade again over the main score to encourage a stronger ear, cover again, and let it finish the covered stage.
After the first twenty minutes, remove the lid and lower the temperature to 220°C.
Bake for another twenty-five minutes, or adjust the time depending on how fast your oven browns the crust. You want a deep golden top without burning the edges of the swirl.
Let the loaf cool completely before slicing.
This is essential: the swirl needs time to set so the crumb stays clean and the layers don’t smear when you cut into it.
Always take your kitchen temperature into account; fermentation speeds up in warm rooms and slows down in cooler ones.
Follow the dough, not the clock.
Wet your hands when folding, laminating or handling the dough to prevent sticking.
Laminate gently to protect the gluten structure and avoid excessive degassing.
Stretch the dough from the center outward; this keeps the gluten network intact.
Keep fillings in a central strip so the dough seals easily during shaping.
If the dough feels tight or resists stretching, let it rest a few minutes before continuing.
Aim for a bulk rise of sixty to seventy percent before the final lamination.
Use the finger-dent test before baking; the indentation should return slowly.
Roll the dough gently when shaping and always pinch seams and sides so the swirl stays contained.
Dust the banneton generously, to prevent sticking.
Place the dough in the banneton seam-side up.
Leave the dough uncovered for five minutes after scoring if you want wider openings.
Cold proofing improves flavor, makes handling easier and keeps the swirl structure stable.
Adjust baking time if your oven browns quickly.
Checklist of Tips and Things to Keep in Mind
Extra Tips if You don’t Have All The Tools
These alternatives come from the beginner sourdough guide and work perfectly for this recipe.
If you don’t have a Dutch oven
Option one. Pizza stone + tray:
Preheat a pizza stone for at least thirty minutes.
Place your loaf on the stone and cover it with an inverted baking tray or roasting pan for the first twenty minutes.
Remove the cover and finish baking until golden.
Option two. Two baking trays:
Preheat one tray.
Place the loaf on the hot tray.
Cover it with another tray turned upside down for the first twenty minutes.
Remove the top tray and continue baking uncovered.
Important steam tip for Option 1 and Option 2:
To make sure your loaf gets enough steam without a Dutch oven, always do this:
Place a metal tray on the bottom of the oven during preheating.
Add hot water as soon as the bread goes in and close the door immediately to trap the steam.
This extra steam helps the loaf expand and the scores open properly.
If you don’t have a banneton:
Use a bowl lined with a towel dusted generously with rice flour.
Rice flour prevents sticking far better than wheat flour.
If you don’t have a scoring blade:
Use a sharp knife or a thin single-edge razor blade (the type used for bread scoring) and moisten it lightly before scoring.
If your oven browns too fast:
Reduce the temperature slightly near the end or place a loose sheet of foil above the loaf.
This loaf truly surprised me in the best way. The swirl, the aroma, the touch of coffee, everything comes together beautifully. If you want the full experience, toast a slice, add a little butter while it’s still warm and finish with a light drizzle of maple syrup. Enjoy every bite!
Have You Tried Our Beeswax Bags & Wraps?
A natural way to keep your food and bread fresh while reducing plastic in your kitchen.
Each set includes 2 reusable bread bags and 2 wraps, made from 100% cotton, beeswax, jojoba oil, and pine resin.
Simple, sustainable, and long-lasting.
Let’s Connect on Instagram
Subscribe to Our Newsletter
Join the Naturable Blog! Stay updated with our tips, kitchen hacks, and much more
Subscribe to Our Newsletter
Join the Naturable Blog! Stay updated with our tips, kitchen hacks, and much more
Stay connected! Follow us for tips, updates, and a little extra inspiration for your home and kitchen.
Have a question or need assistance?
Feel free to contact us!
© 2025. Naturable – A brand of Horizon Origin LLC