Naturally fresh, beautifully stored

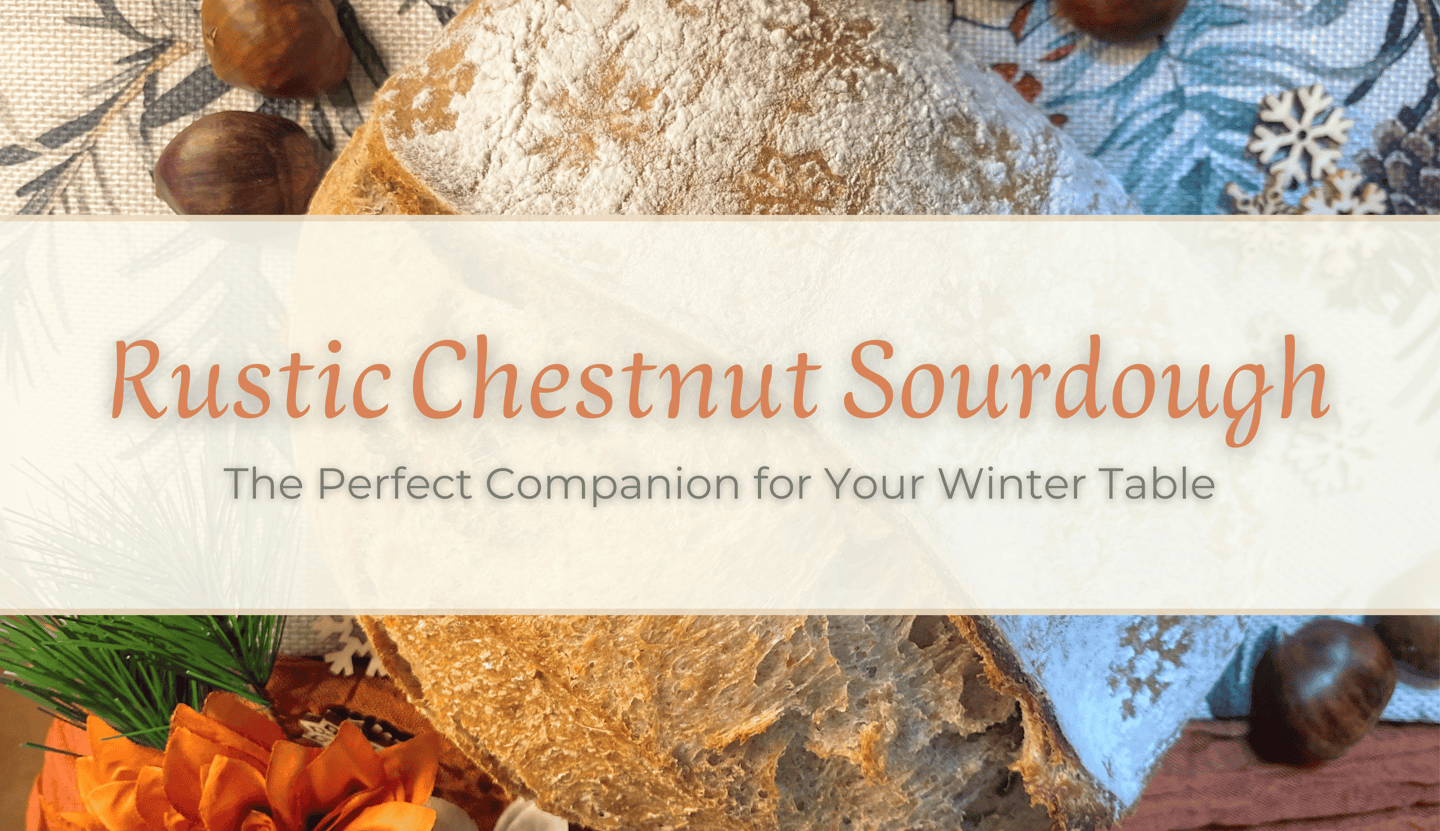
Rustic Chestnut Sourdough: The Perfect Companion for Your Winter Table
A gentle and cozy sourdough made with real chestnut purée, creating a soft, tender crumb and an earthy winter aroma. This loaf is perfect for buttered toast, seasonal dishes and slow mornings at home. If you enjoy rustic breads with depth and warmth, this recipe brings all the comfort of winter in every slice.
A

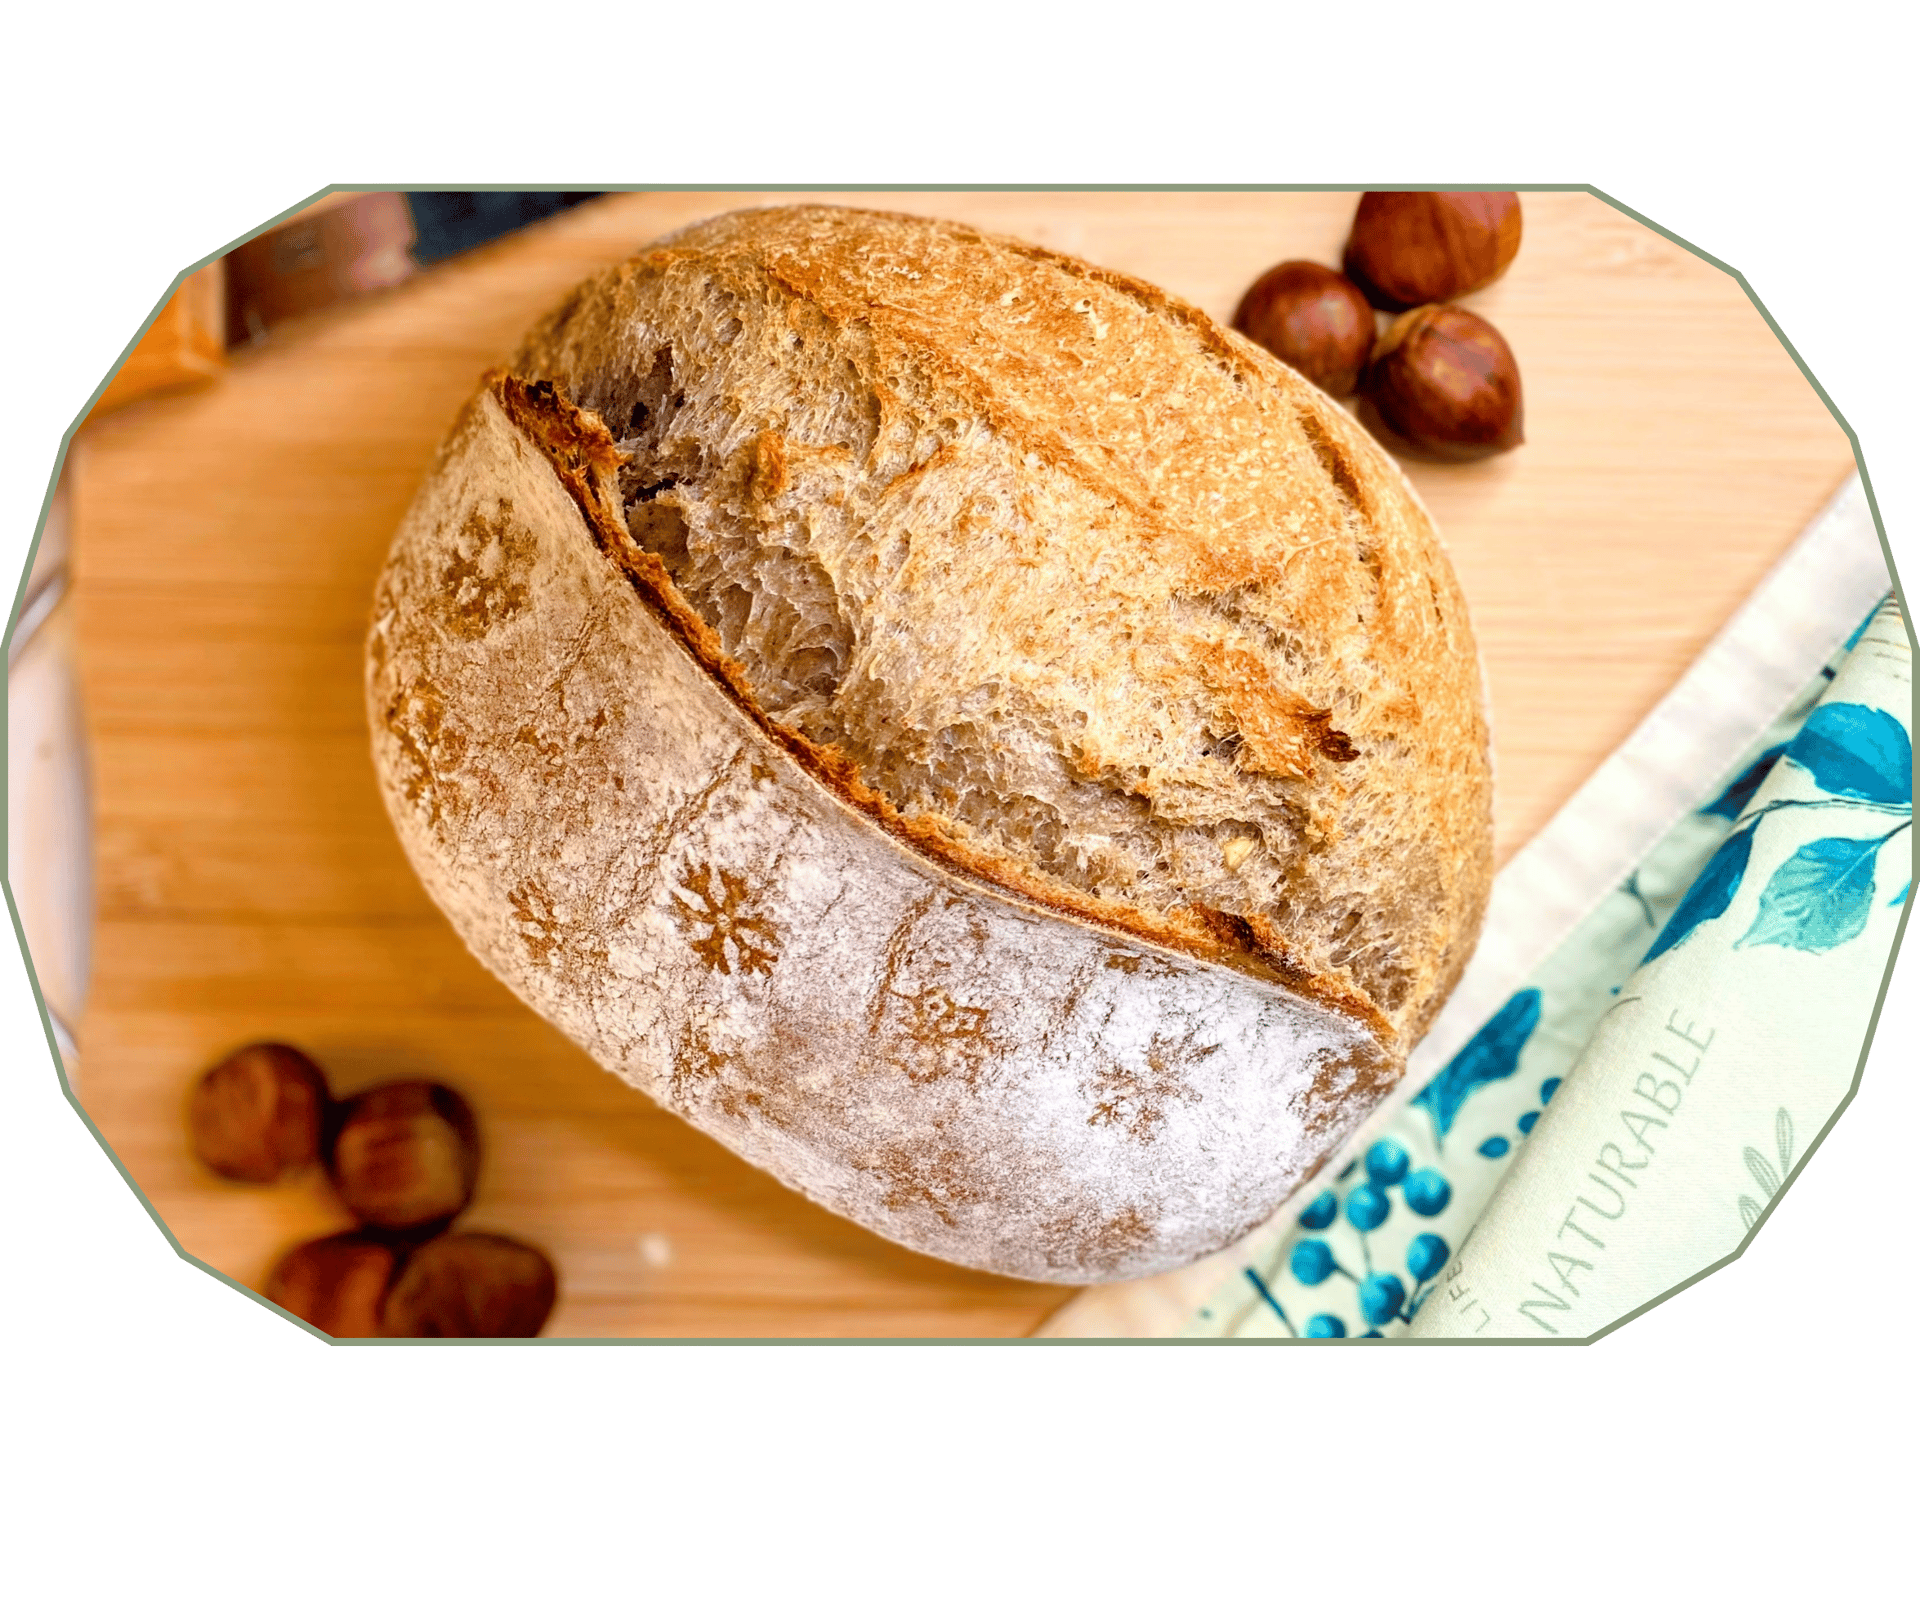
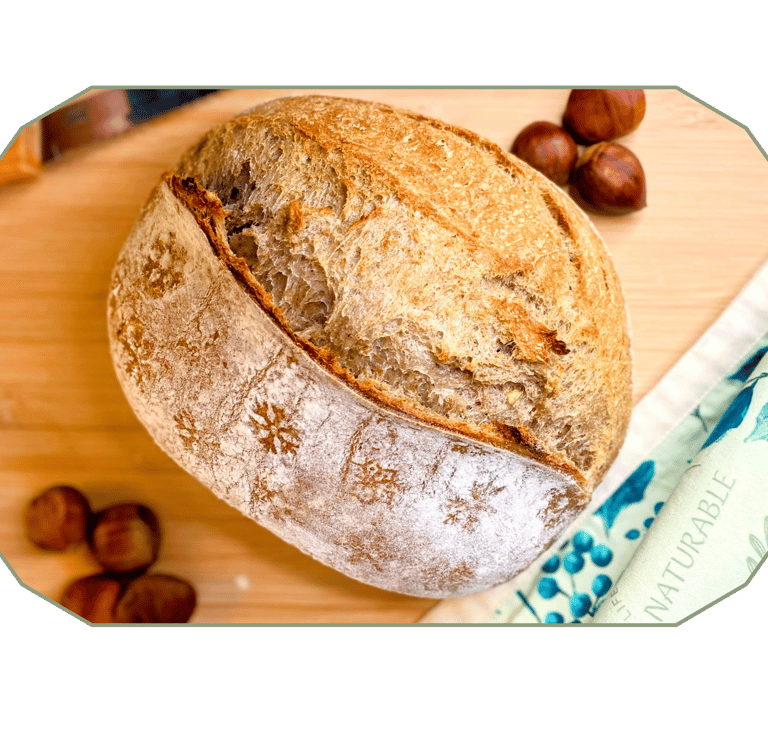
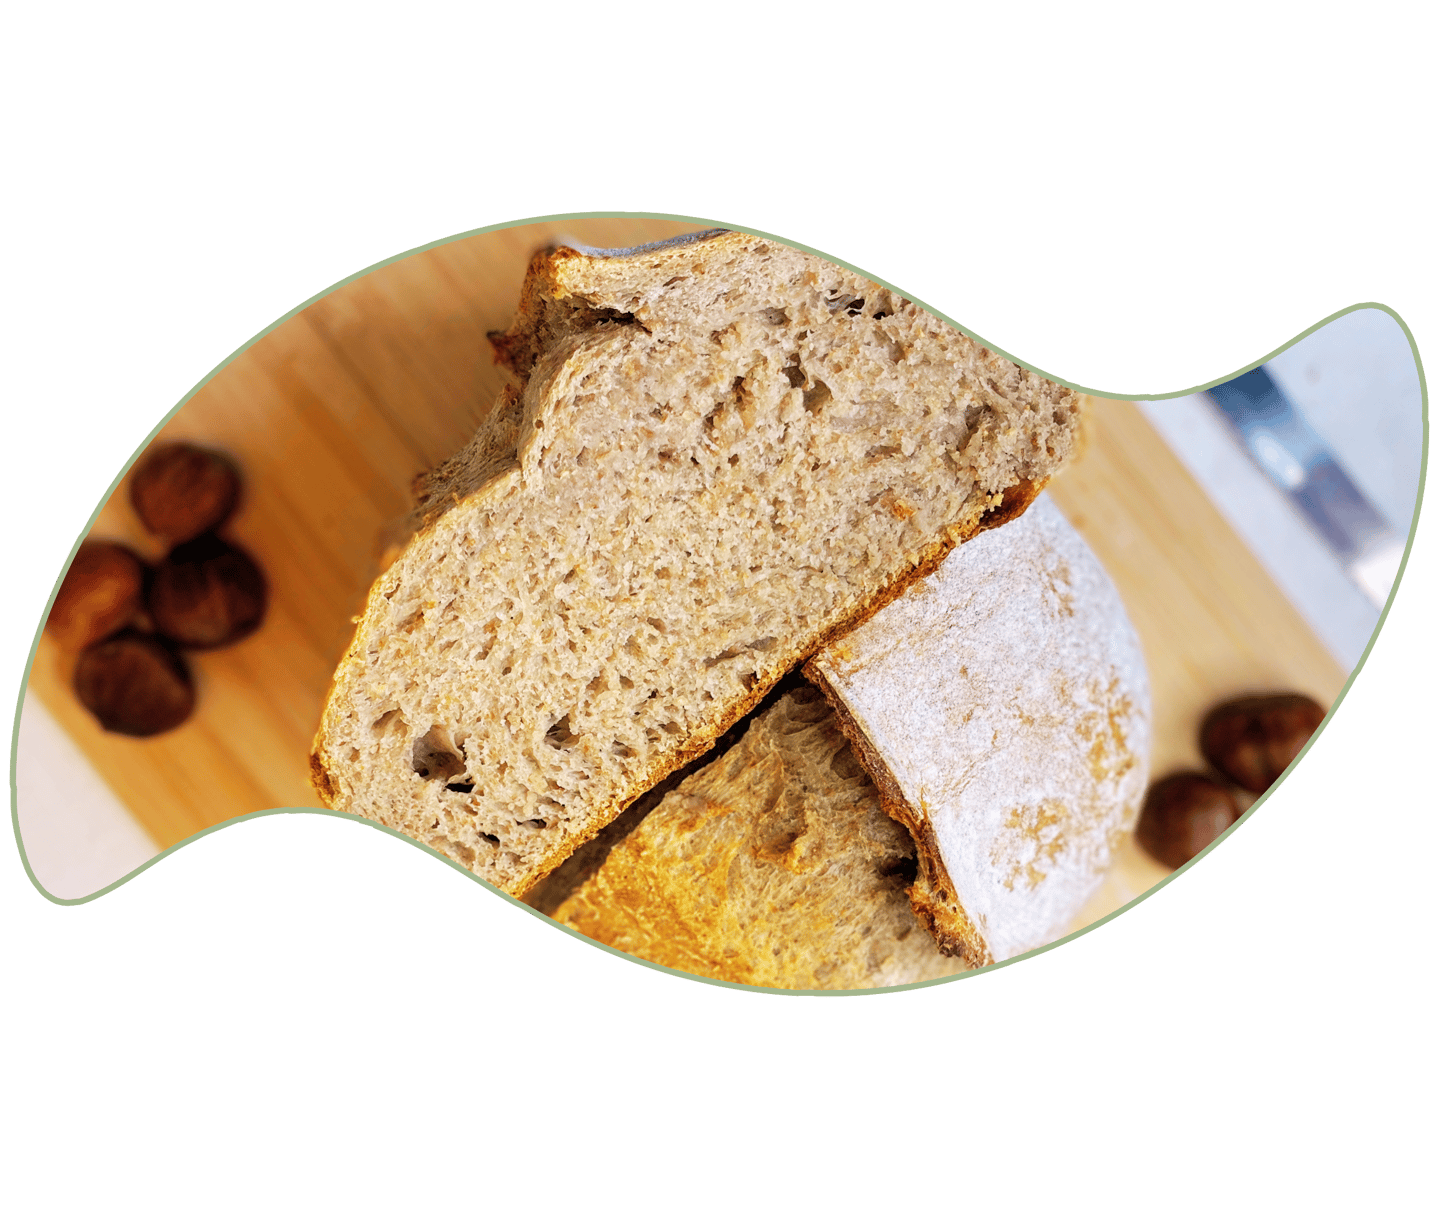
This winter loaf brings together the natural softness of chestnut and the depth of a rustic sourdough. The crumb stays tender and slightly moist, the crust bakes soft and warm, and the flavor is cozy and balanced without tipping into sweetness. It’s a perfect cold-season bread, especially for buttered toast, slow winter breakfasts or as a gentle companion to your favorite seasonal dishes. The chestnut purée adds a beautiful texture and a subtle character without overpowering the loaf.
Ingredients
Dough
350 g strong bread flour
150 g whole wheat or whole spelt flour
280 g water
130 g homemade chestnut purée
100 g active sourdough starter
10 g honey
8 g salt
Pinch of nutmeg
Pinch of cinnamon
Chestnut purée
Roasted and peeled chestnuts
20 g hot water
20 g hot milk
Optional
A few drops of extra water if the purée is too dense
A little more honey for a rounder flavor
Tools you will need
1 large bowl
1 small bowl
A chestnut knife or a sharp knife
Hand blender or food processor
Spatula
Dough scraper
Oval banneton
A clean kitchen towel
A Dutch oven
A good alternative is to place an extra oven tray on the top rack and use a small metal dish filled with water or a few ice cubes to create steam during the first part of the bake.
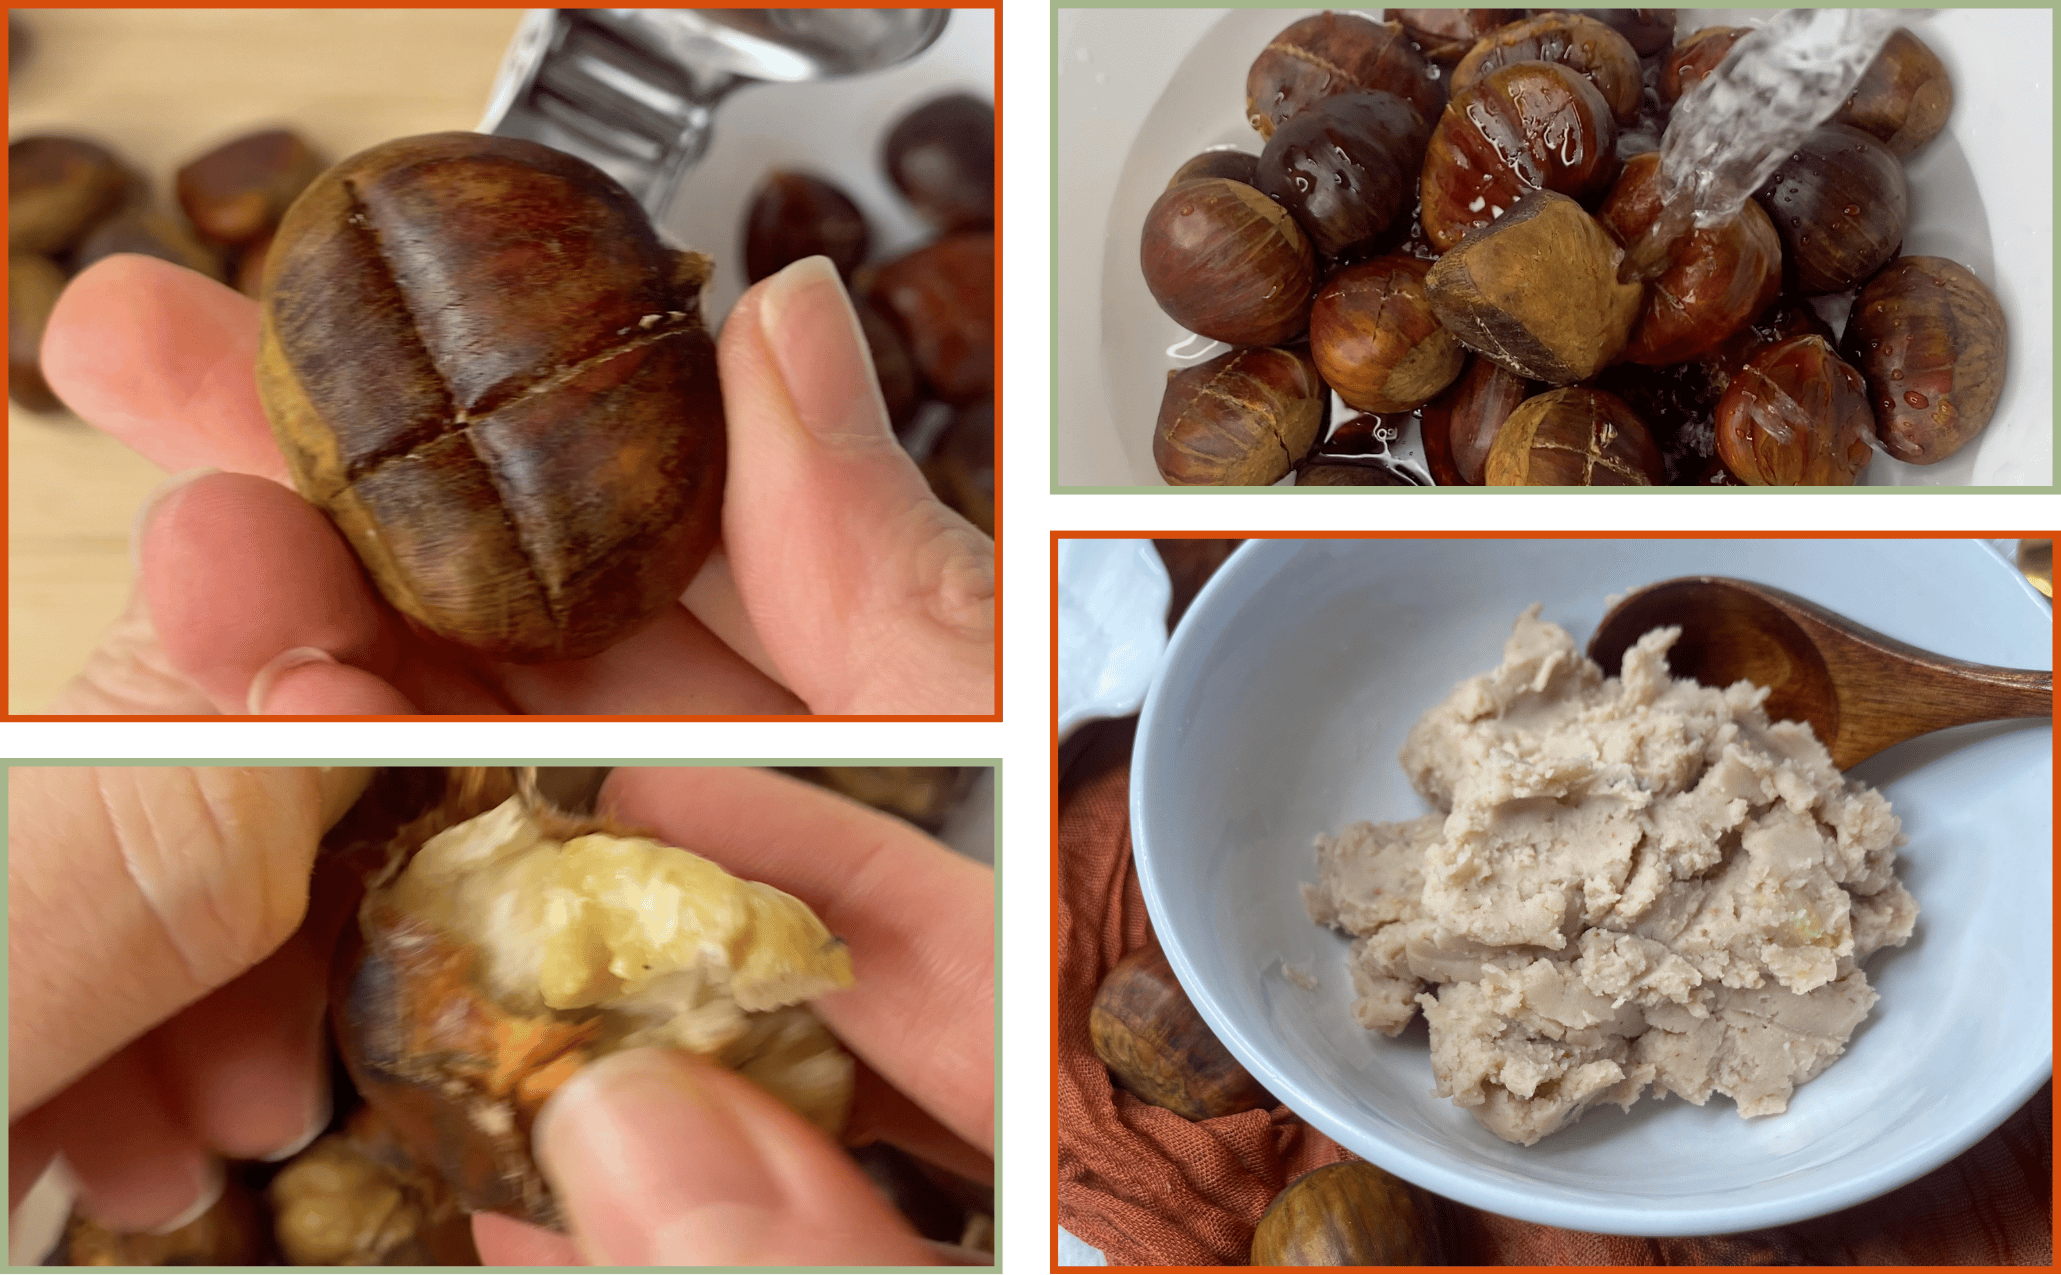
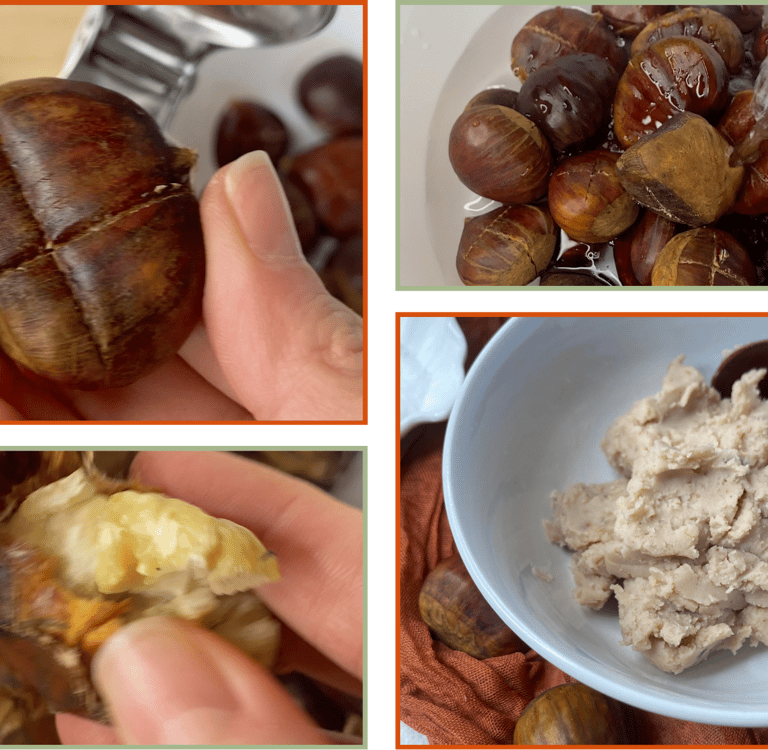
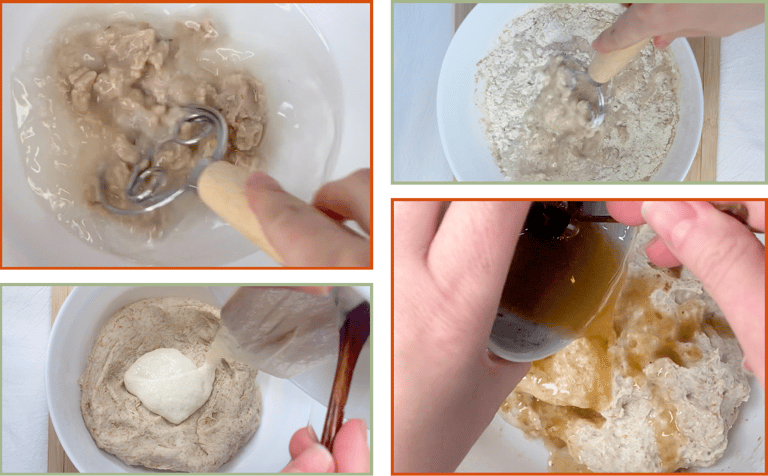
Prepare the chestnuts and make the purée
Score each chestnut with a deep X, soak them for 10 minutes, then roast at 210°C for 20–25 minutes. Peel while warm, then place them in a bowl with 20 g of hot water and 20 g of hot milk. Cover for a few minutes so they rehydrate, then blend into a thick, smooth purée.
Step by Step

Mix the purée, water and flours
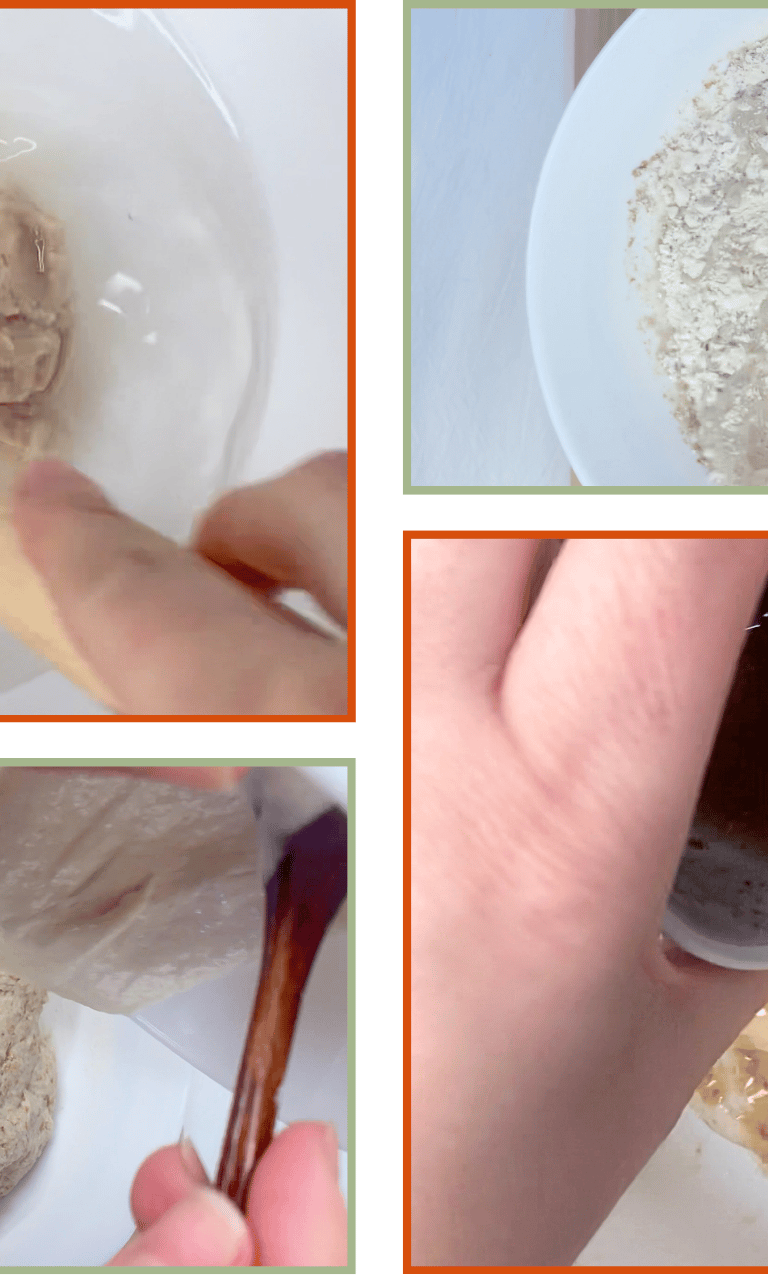
Whisk the 130 g of chestnut purée into the 280 g of water. Add the flours and mix until no dry spots remain. Cover and let the dough rest for 60 minutes.
You can add the sourdough starter at this stage if you prefer a simpler process, and the loaf will still turn out well. In this recipe, it’s added after the autolyse so the mixture of flour, water and purée can hydrate first. Chestnut creates a naturally dense mix, and the rest period helps loosen and soften the dough before adding the starter. The difference is small, but folding the starter in later usually gives a more even integration in doughs that include purée.


Note: This folding method is simply an alternative to the classic stretch-and-fold. It’s a more controlled movement, which can feel easier to handle when working with doughs that include purée or ingredients that change the initial texture. The idea is to rotate folding techniques so each recipe explores something new. It was the first time applying this method to a chestnut dough, and the gluten developed well and the loaf held its shape beautifully.
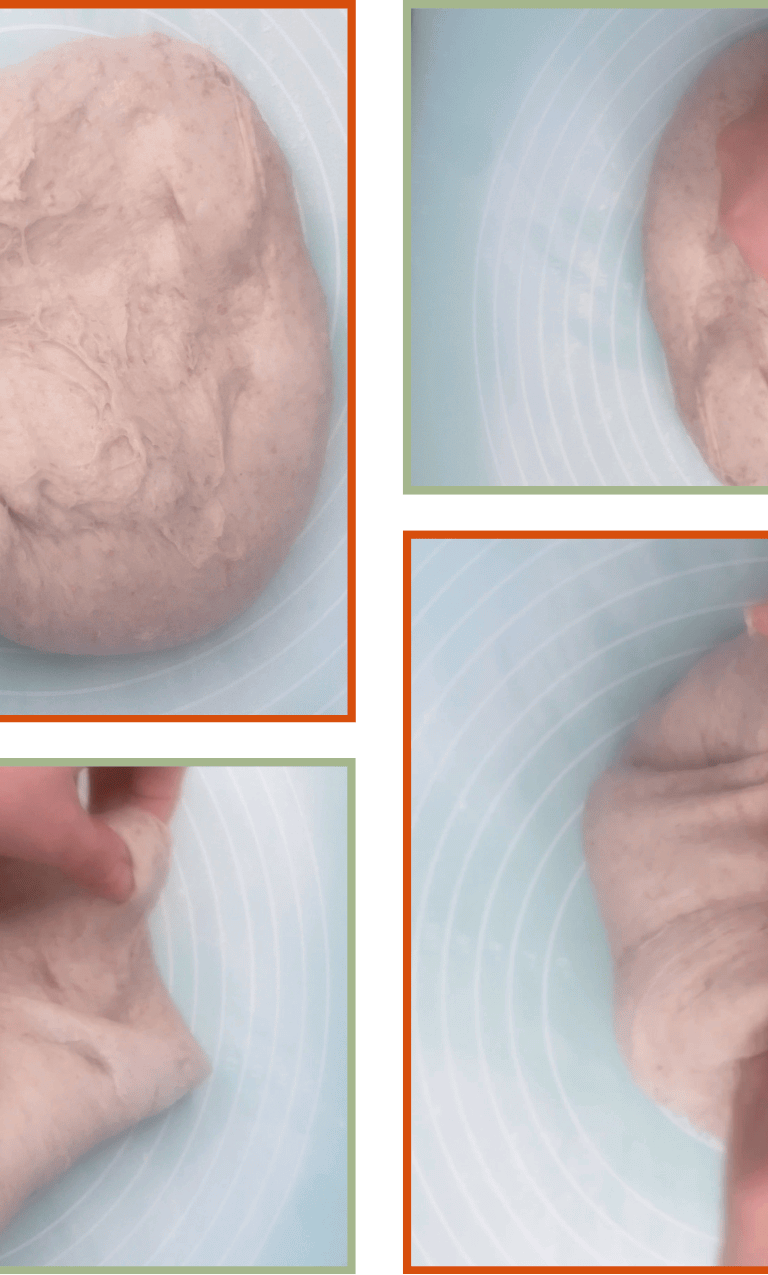
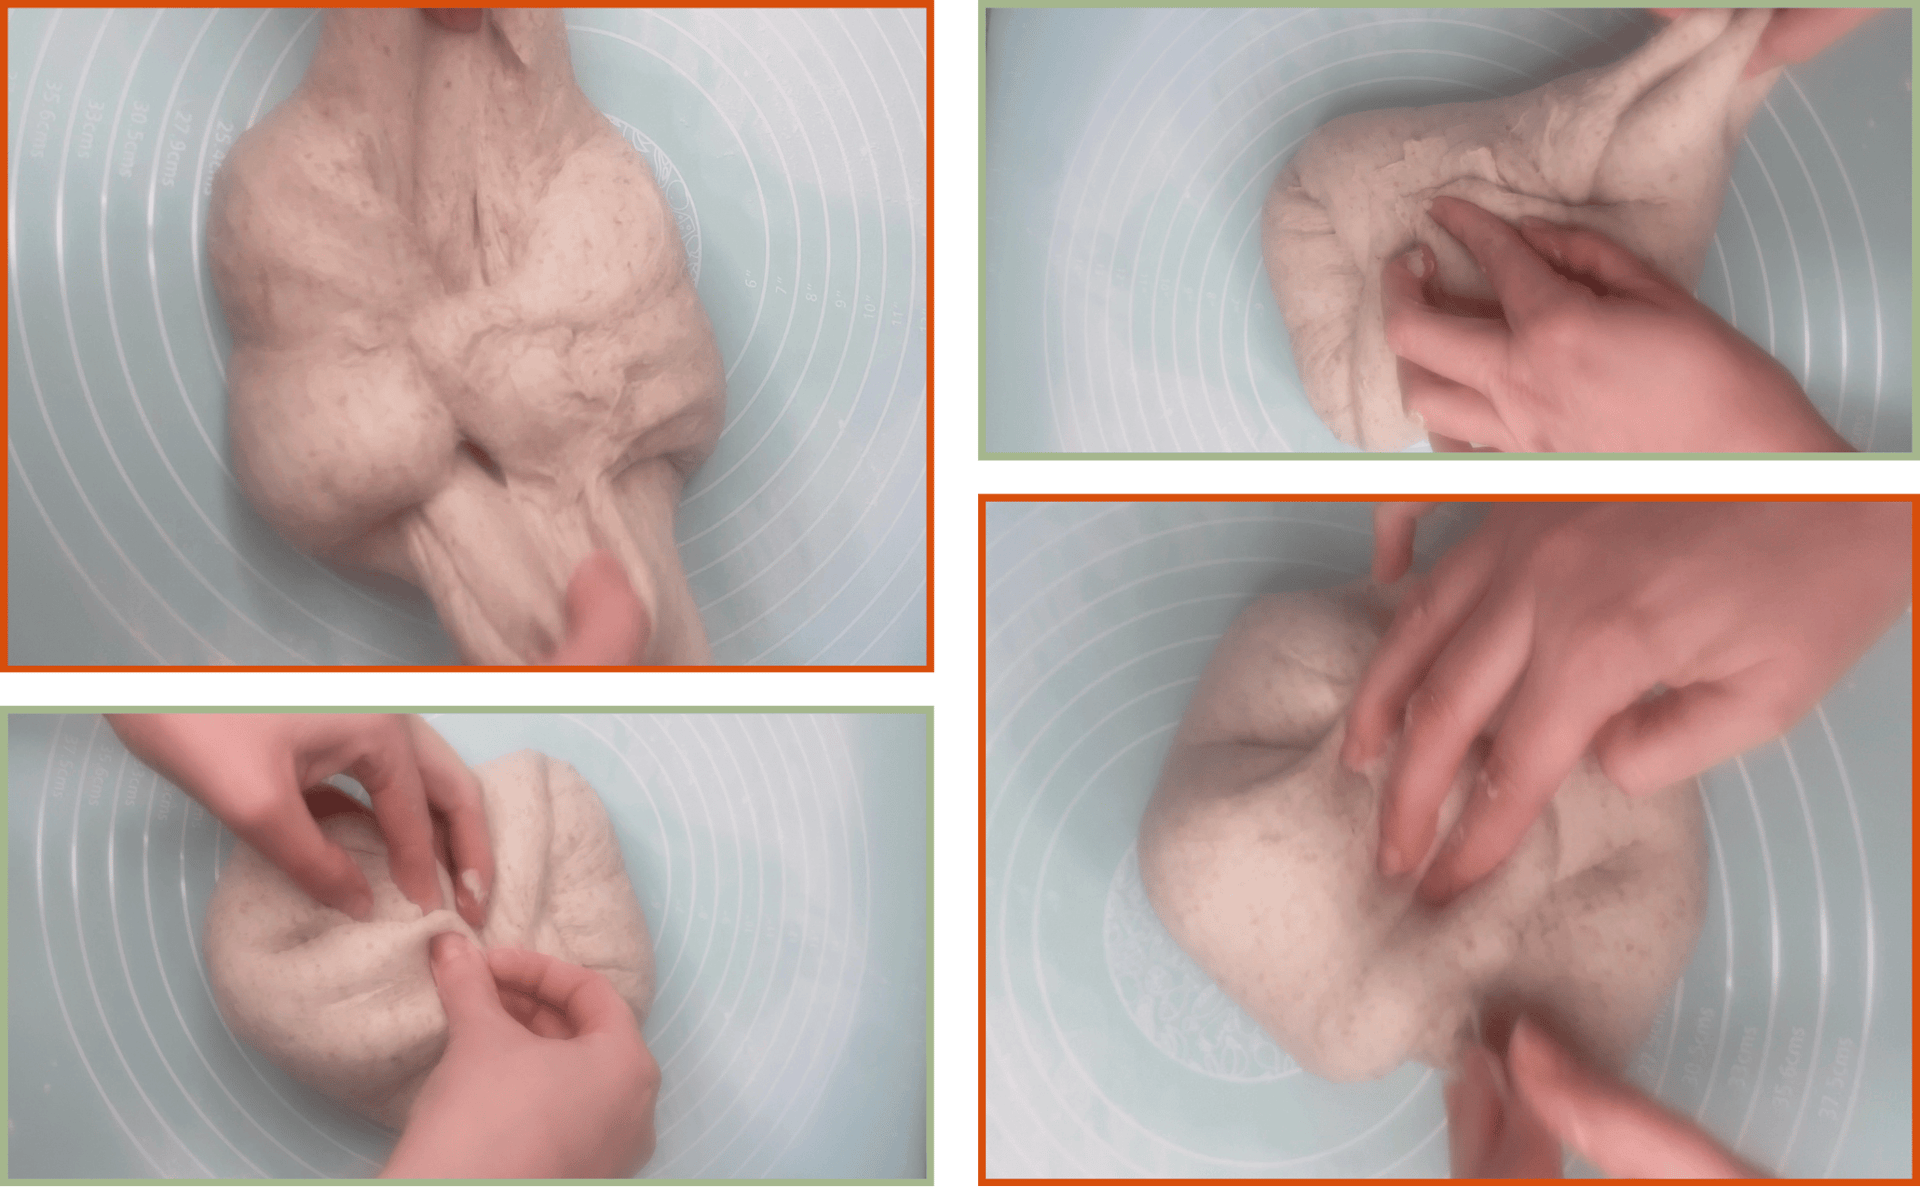
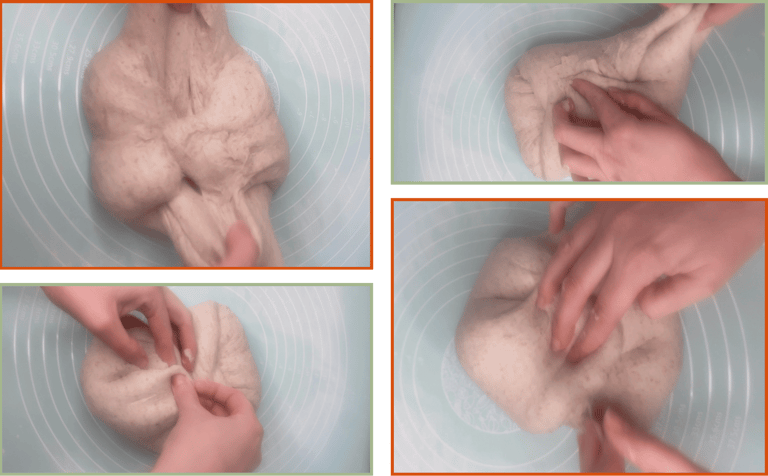
Shaping
Turn the dough out onto a lightly floured or lightly damp surface. Gently stretch it from the center outwards without flattening it.
Lower folds
Bring the bottom left corner toward the center, then the bottom right corner. Lift the bottom edge from the center and fold it upward toward the middle.
Upper folds
Bring the top left corner toward the center, then the top right corner. Fold the top central edge down toward the middle.
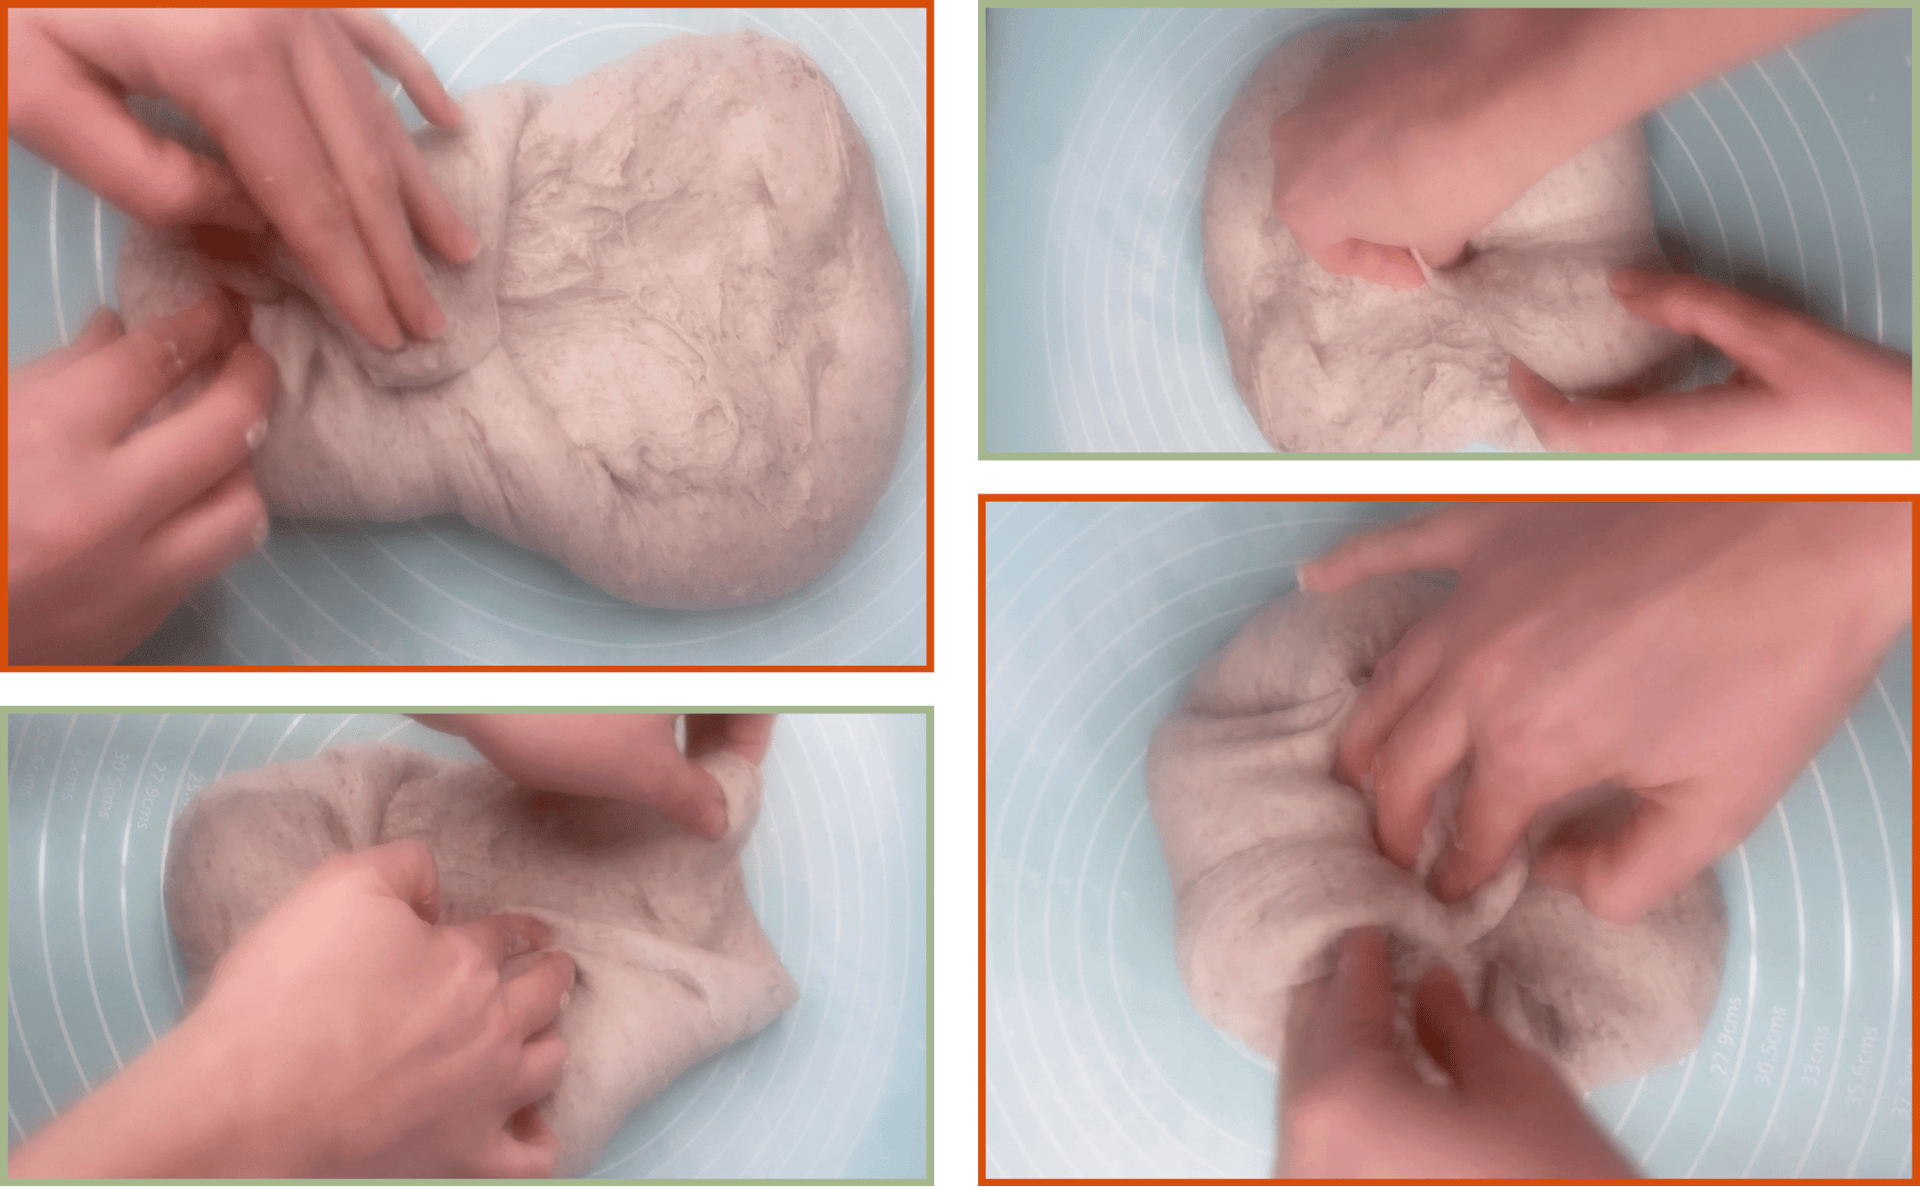
Folds during bulk fermentation
Perform three sets of folds, spaced 40 minutes apart.
Instead of using the classic stretch-and-fold, this recipe uses a short, controlled motion: lift the very edge of the dough with your fingertips and fold it toward the center. Repeat this movement 3–4 times in each set.
After the third set of folds, let the dough rise until it increases by about 60–70 percent. Depending on the temperature of your kitchen and the dough itself, this may take more or less time. In my kitchen, at around 24°C, it took roughly 2.5 to 3 hours.
Side folds
Fold the left side toward the center, then the right side.
Tensioning
Fold the corners in once more to build gentle tension.
Explore these cozy seasonal recipes and fill your kitchen with warm, festive aromas.
Try our Winter Orange Sourdough with a Touch of Honey and Rosemary. A comforting loaf that brings soft citrus notes to your winter baking.
Or bake our Caramelized Panela Holiday Cookies: Buttery Christmas Cookies with a Touch of Lemon. Golden, melt-in-your-mouth cookies with a delicate citrus twist.

Rolling
Take the dough from the bottom edge, fold it over itself, and roll it toward you while gently dragging and turning it to create surface tension.
Seal and place in banneton
Pinch the sides to seal, then place the dough seam-side-up in the oval banneton.
Final proof
Cover the shaped loaf and refrigerate it for a slow, cold proof. It can rest overnight or for several hours. The cold fermentation helps stabilize the dough, improves its shape during baking and develops a deeper, cleaner flavor.
The dough continues to rise slowly in the fridge, so it’s important that it enters the cold stage with good tension and a fully completed bulk. The loaf can be baked straight from the fridge the next day, which also helps achieve a cleaner, sharper ear.
Note: If you prefer a simpler approach, you can use ready-made chestnut purée. Choose one without added sugar and made only from chestnuts (or chestnuts and water). Roasted chestnut purée gives the best flavor. Avoid sweetened chestnut spreads or crème de marrons, which are not suitable for rustic bread.
Add the starter, honey, salt and spices
Add the 100 g of active starter and mix until incorporated. Dissolve the honey, salt, nutmeg and cinnamon in 15 g of water, pour it into the dough and knead for about 8 minutes, until the dough becomes uniform and cohesive.
Note: Right after adding the starter, honey, salt and spices, the dough may look wetter, looser or even slightly broken. This is completely normal for doughs that include purées. With resting, folds and shaping, the gluten structure returns and the dough becomes strong and stable again.


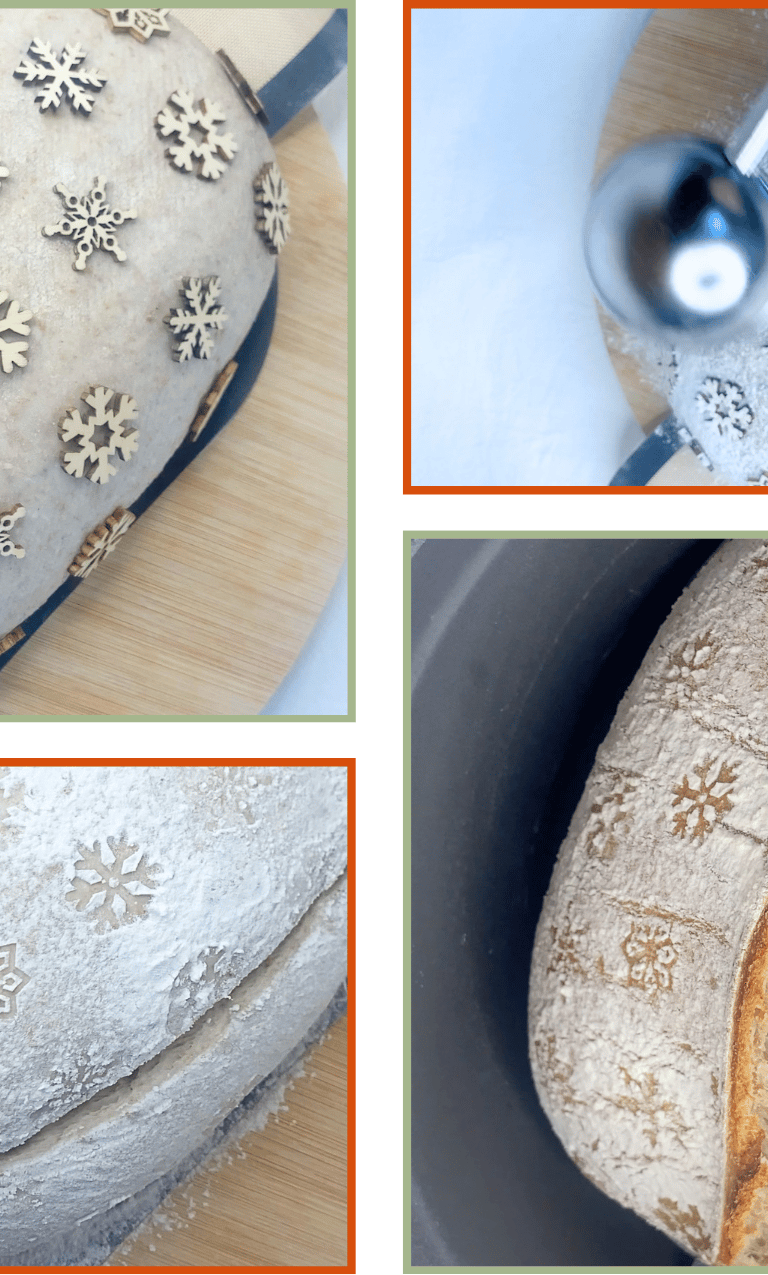
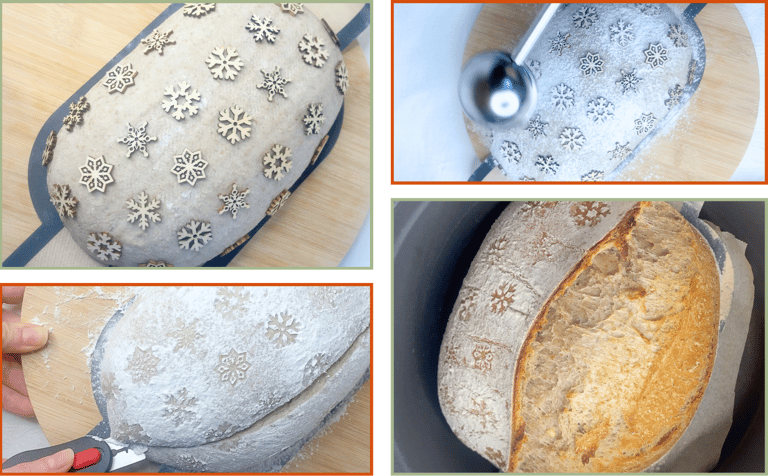
Decoration
If you want to decorate your loaf, do it right before scoring.
For this bread, I used small snowflake flakes that work like tiny stencils. I lightly misted the surface of the dough, placed the snowflakes on top and dusted the loaf with rice flour.
Rice flour is perfect for this kind of decoration because:
It gives a much sharper contrast.
It doesn’t disappear in the oven.
It leaves a clean, well-defined pattern.
Once the dough was dusted, I simply lifted the snowflakes off and the design remained on the surface.
You can follow this method or use any decoration style you prefer.
Scoring
Once your decoration is ready, score the loaf with a very sharp blade to control how it will open in the oven.
A long cut along one side works especially well for this rustic style and gives you a clean, controlled ear.
If you prefer a simpler look, a single central score is more than enough.
Baking
Preheat the oven to 250°C with the Dutch oven inside for about 30 minutes.
If you’re not using a Dutch oven, preheat the baking tray you’ll use for the loaf and place a small metal dish on the bottom rack. Fill it with water or a few ice cubes to create steam. Also place an extra oven tray on the upper rack to prevent the crust from setting too quickly.
Bake with steam for the first 20 minutes, either inside the closed Dutch oven or using the steam setup.
Then remove the lid or the upper tray and continue baking for another 20–25 minutes until the loaf is nicely browned.
Let the bread cool completely before slicing so the crumb can set properly.
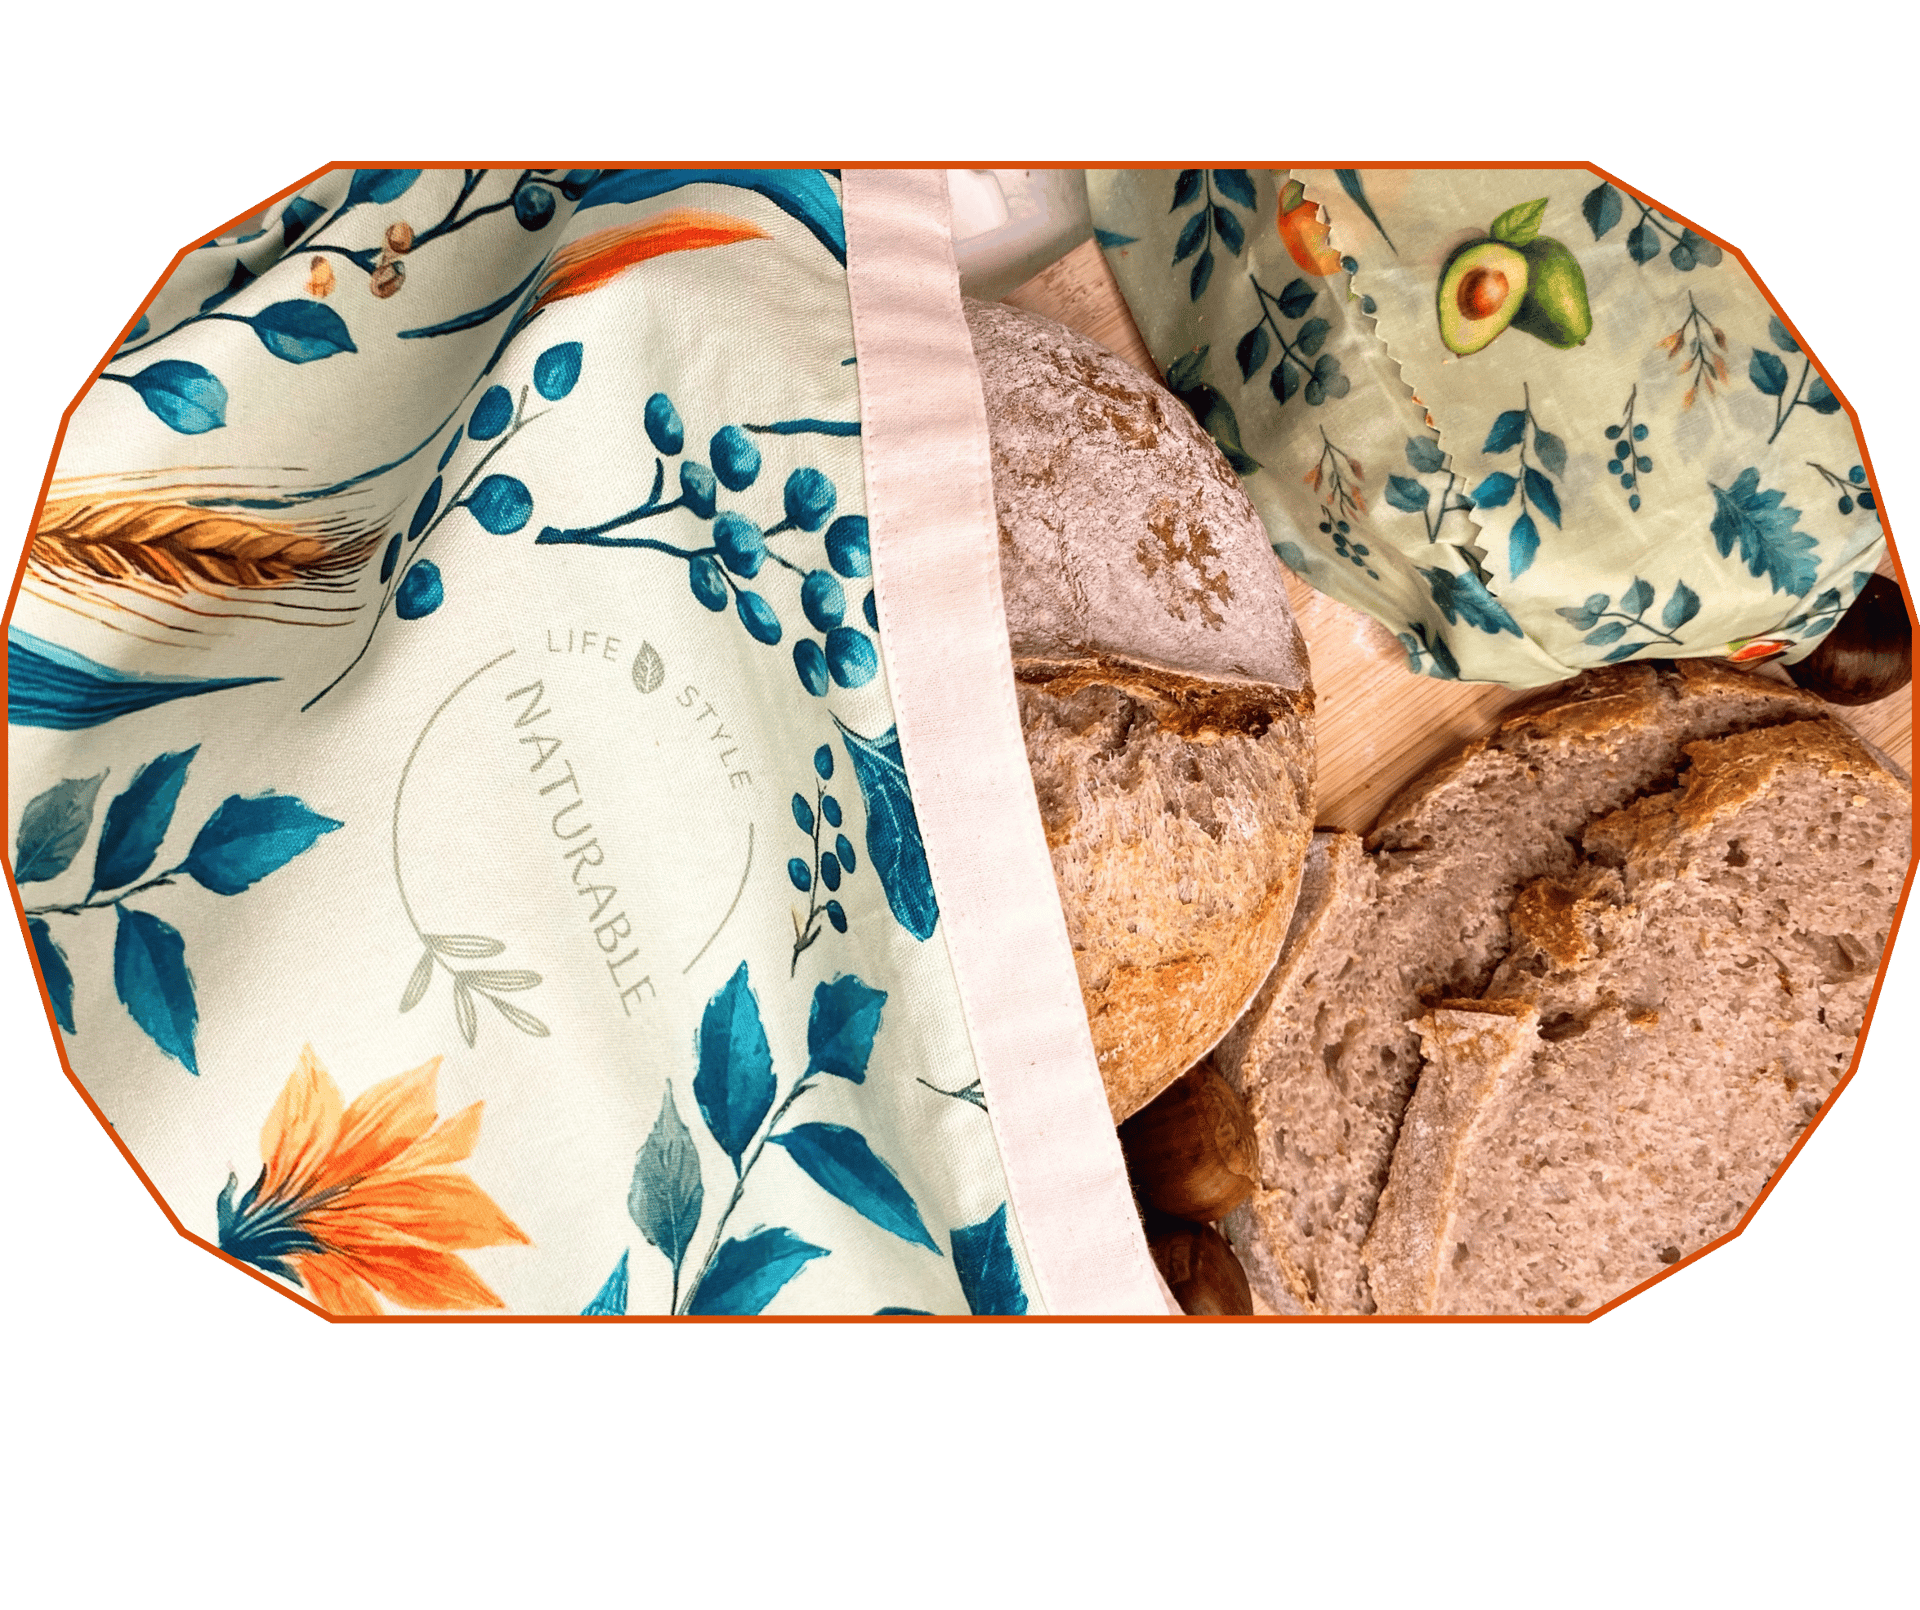
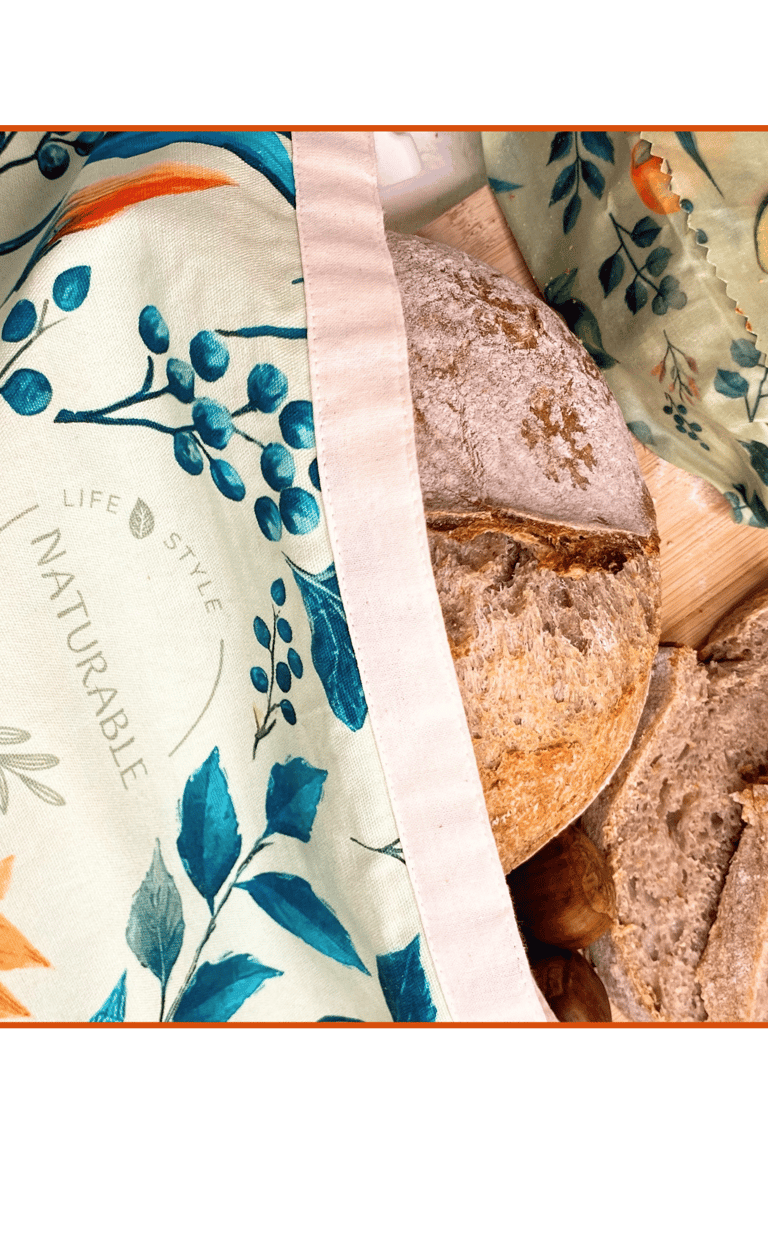
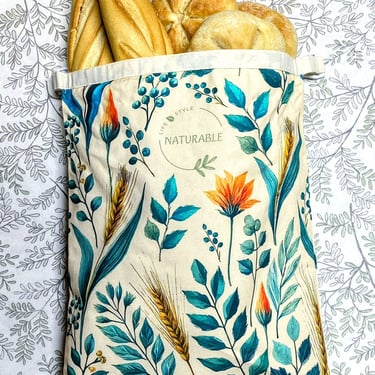
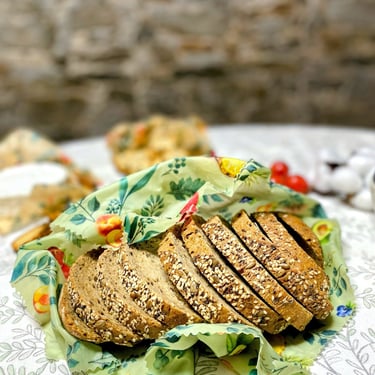
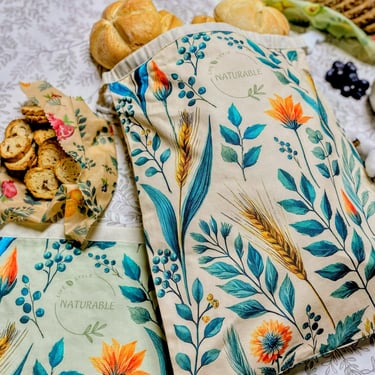
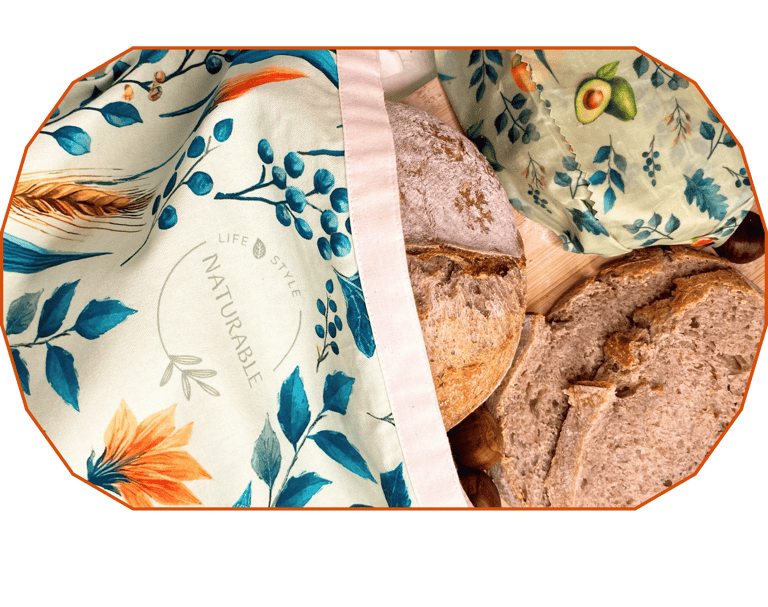
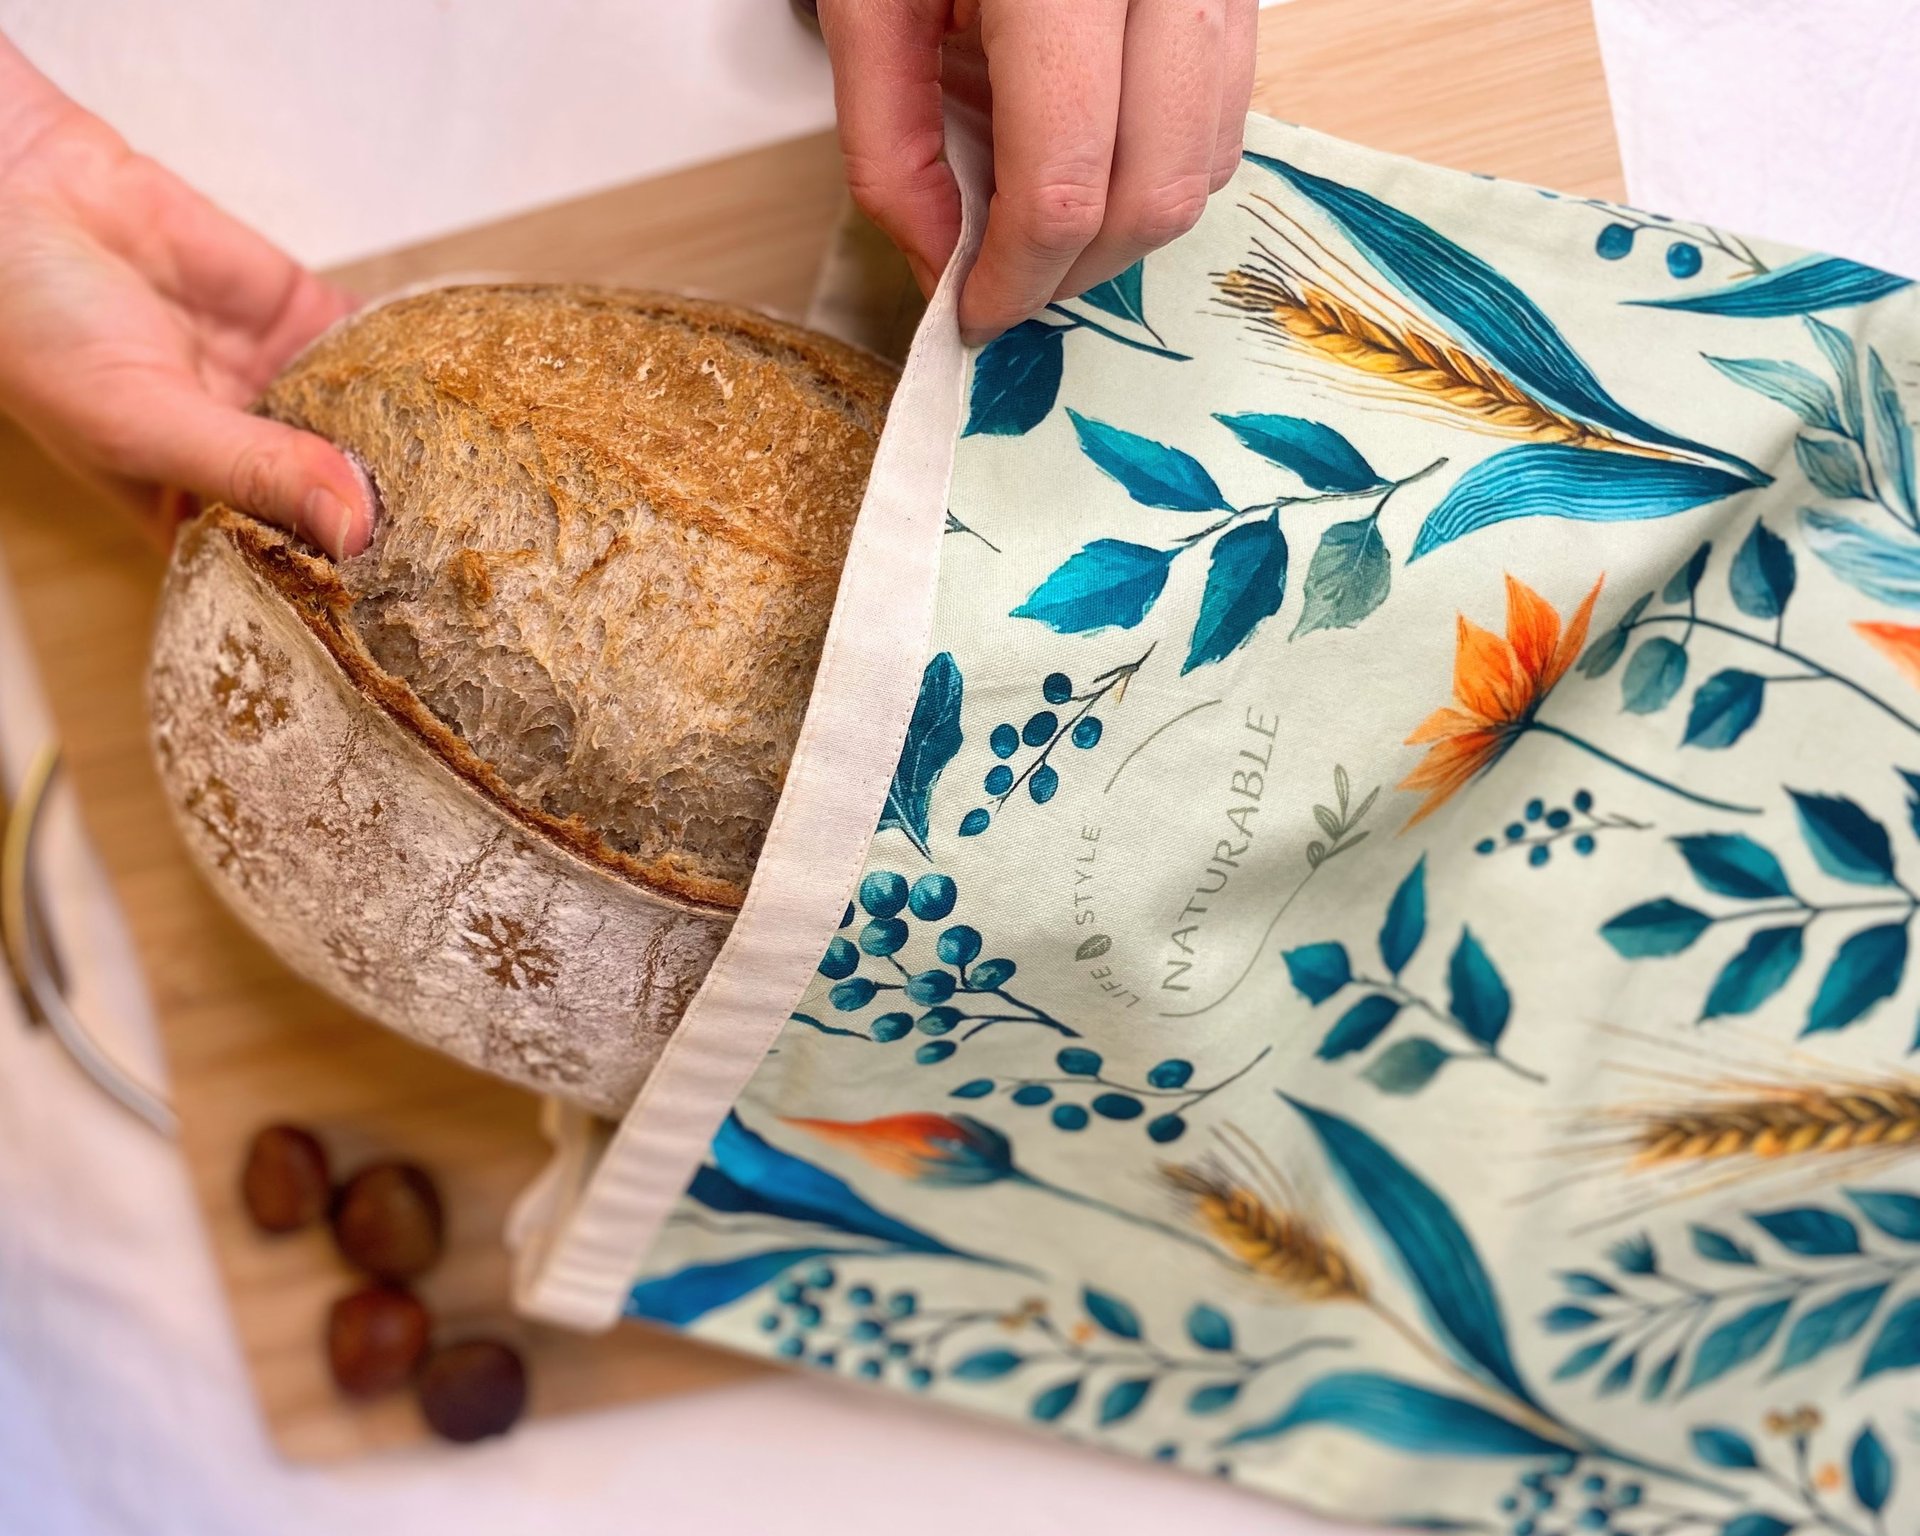
Keep It Fresh the Naturable Way
Do you want your Rustic Chestnut Sourdough to stay fresh for longer?
Our Naturable bread bags and beeswax wraps are the perfect way to store it without plastic.
You can keep the whole loaf in the bread bag, or slice it and wrap the pieces in the beeswax wraps. Your bread will stay soft and fresh for 5 to 6 days, and after that we recommend storing it in the fridge.
You can also freeze the loaf, sliced or whole, using our bags. They’re completely freezer safe and keep your bread protected while preserving its aroma and texture.
Do you not have your Naturable set yet? You can get yours here!
Final Notes
Chestnuts are naturally dry, so the purée adds softness and depth but doesn’t hydrate the dough the same way fruit would.
It’s normal for the purée to thicken the mix. If it feels too dense, a few drops of hot water are enough to adjust it.
After adding the starter, honey, salt and spices, the dough may feel sticky, loose or slightly unstable, but this is expected. With folds and resting, it strengthens again.
The honey doesn’t make the loaf sweet. It only rounds out the chestnut’s flavor.
A well-tensioned shape is essential for a tall loaf, and the chestnut purée helps the crumb stay tender for longer, making the bread especially lovely the next day.

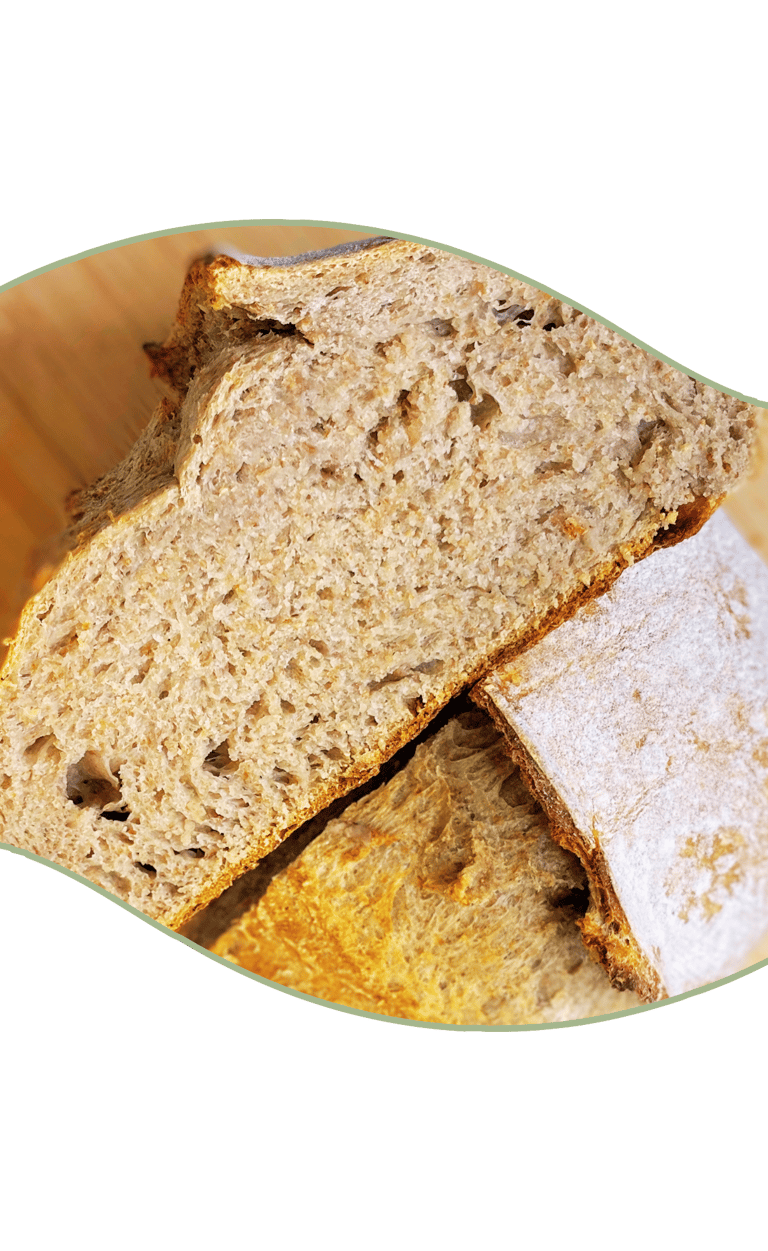
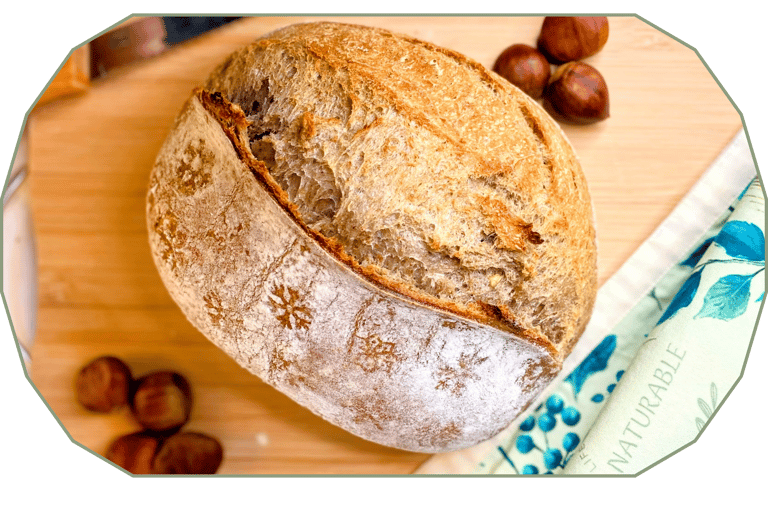
A warm and comforting winter loaf with a subtle chestnut aroma and a tender crumb that holds beautifully.
Perfect for cozy mornings, buttered toast, and any winter table.
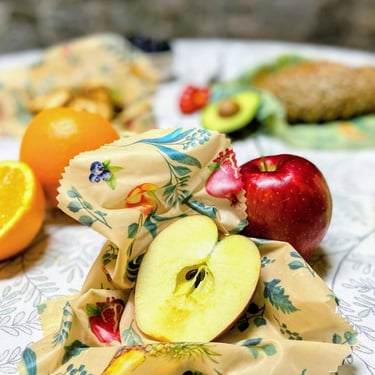
Have You Tried Our Beeswax Bags & Wraps?
A natural way to keep your food and bread fresh while reducing plastic in your kitchen.
Each set includes 2 reusable bread bags and 2 wraps, made from 100% cotton, beeswax, jojoba oil, and pine resin.
Simple, sustainable, and long-lasting.
Let’s Connect on Instagram

This winter loaf brings together the natural softness of chestnut and the depth of a rustic sourdough. The crumb stays tender and slightly moist, the crust bakes soft and warm, and the flavor is cozy and balanced without tipping into sweetness. It’s a perfect cold-season bread, especially for buttered toast, slow winter breakfasts or as a gentle companion to your favorite seasonal dishes. The chestnut purée adds a beautiful texture and a subtle character without overpowering the loaf.
Ingredients
Dough
350 g strong bread flour
150 g whole wheat or whole spelt flour
280 g water
130 g homemade chestnut purée
100 g active sourdough starter
10 g honey
8 g salt
Pinch of nutmeg
Pinch of cinnamon
Chestnut purée
Roasted and peeled chestnuts
20 g hot water
20 g hot milk
Optional
A few drops of extra water if the purée is too dense
A little more honey for a rounder flavor
Tools you will need
1 large bowl
1 small bowl
A chestnut knife or a sharp knife
Hand blender or food processor
Spatula
Dough scraper
Oval banneton
A clean kitchen towel
A Dutch oven
A good alternative is to place an extra oven tray on the top rack and use a small metal dish filled with water or a few ice cubes to create steam during the first part of the bake.
Explore these cozy seasonal recipes and fill your kitchen with warm, festive aromas.
Try our Winter Orange Sourdough with a Touch of Honey and Rosemary. A comforting loaf that brings soft citrus notes to your winter baking.
Or bake our Caramelized Panela Holiday Cookies: Buttery Christmas Cookies with a Touch of Lemon. Golden, melt-in-your-mouth cookies with a delicate citrus twist.

Step by Step
Prepare the chestnuts and make the purée
Score each chestnut with a deep X, soak them for 10 minutes, then roast at 210°C for 20–25 minutes. Peel while warm, then place them in a bowl with 20 g of hot water and 20 g of hot milk. Cover for a few minutes so they rehydrate, then blend into a thick, smooth purée.
Note: If you prefer a simpler approach, you can use ready-made chestnut purée. Choose one without added sugar and made only from chestnuts (or chestnuts and water). Roasted chestnut purée gives the best flavor. Avoid sweetened chestnut spreads or crème de marrons, which are not suitable for rustic bread.

Mix the purée, water and flours
Whisk the 130 g of chestnut purée into the 280 g of water. Add the flours and mix until no dry spots remain. Cover and let the dough rest for 60 minutes.
You can add the sourdough starter at this stage if you prefer a simpler process, and the loaf will still turn out well. In this recipe, it’s added after the autolyse so the mixture of flour, water and purée can hydrate first. Chestnut creates a naturally dense mix, and the rest period helps loosen and soften the dough before adding the starter. The difference is small, but folding the starter in later usually gives a more even integration in doughs that include purée.
Add the starter, honey, salt and spices
Add the 100 g of active starter and mix until incorporated. Dissolve the honey, salt, nutmeg and cinnamon in 15 g of water, pour it into the dough and knead for about 8 minutes, until the dough becomes uniform and cohesive.
Note: Right after adding the starter, honey, salt and spices, the dough may look wetter, looser or even slightly broken. This is completely normal for doughs that include purées. With resting, folds and shaping, the gluten structure returns and the dough becomes strong and stable again.
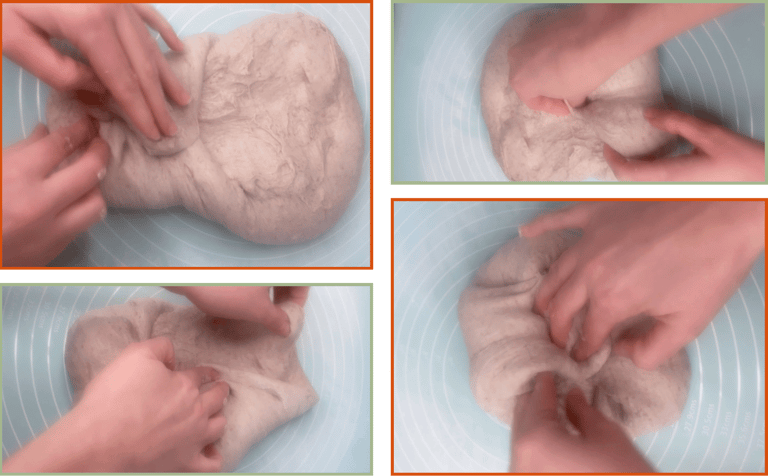
Folds during bulk fermentation
Perform three sets of folds, spaced 40 minutes apart.
Instead of using the classic stretch-and-fold, this recipe uses a short, controlled motion: lift the very edge of the dough with your fingertips and fold it toward the center. Repeat this movement 3–4 times in each set.
After the third set of folds, let the dough rise until it increases by about 60–70 percent. Depending on the temperature of your kitchen and the dough itself, this may take more or less time. In my kitchen, at around 24°C, it took roughly 2.5 to 3 hours.
Note: This folding method is simply an alternative to the classic stretch-and-fold. It’s a more controlled movement, which can feel easier to handle when working with doughs that include purée or ingredients that change the initial texture. The idea is to rotate folding techniques so each recipe explores something new. It was the first time applying this method to a chestnut dough, and the gluten developed well and the loaf held its shape beautifully.
Shaping
Turn the dough out onto a lightly floured or lightly damp surface. Gently stretch it from the center outwards without flattening it.
Lower folds
Bring the bottom left corner toward the center, then the bottom right corner. Lift the bottom edge from the center and fold it upward toward the middle.
Upper folds
Bring the top left corner toward the center, then the top right corner. Fold the top central edge down toward the middle.
Side folds
Fold the left side toward the center, then the right side.
Tensioning
Fold the corners in once more to build gentle tension.

Rolling
Take the dough from the bottom edge, fold it over itself, and roll it toward you while gently dragging and turning it to create surface tension.
Seal and place in banneton
Pinch the sides to seal, then place the dough seam-side-up in the oval banneton.
Final proof
Cover the shaped loaf and refrigerate it for a slow, cold proof. It can rest overnight or for several hours. The cold fermentation helps stabilize the dough, improves its shape during baking and develops a deeper, cleaner flavor.
The dough continues to rise slowly in the fridge, so it’s important that it enters the cold stage with good tension and a fully completed bulk. The loaf can be baked straight from the fridge the next day, which also helps achieve a cleaner, sharper ear.
Decoration
If you want to decorate your loaf, do it right before scoring.
For this bread, I used small snowflake flakes that work like tiny stencils. I lightly misted the surface of the dough, placed the snowflakes on top and dusted the loaf with rice flour.
Rice flour is perfect for this kind of decoration because:
It gives a much sharper contrast.
It doesn’t disappear in the oven.
It leaves a clean, well-defined pattern.
Once the dough was dusted, I simply lifted the snowflakes off and the design remained on the surface.
You can follow this method or use any decoration style you prefer.
Scoring
Once your decoration is ready, score the loaf with a very sharp blade to control how it will open in the oven.
A long cut along one side works especially well for this rustic style and gives you a clean, controlled ear.
If you prefer a simpler look, a single central score is more than enough.
Baking
Preheat the oven to 250°C with the Dutch oven inside for about 30 minutes.
If you’re not using a Dutch oven, preheat the baking tray you’ll use for the loaf and place a small metal dish on the bottom rack. Fill it with water or a few ice cubes to create steam. Also place an extra oven tray on the upper rack to prevent the crust from setting too quickly.
Bake with steam for the first 20 minutes, either inside the closed Dutch oven or using the steam setup.
Then remove the lid or the upper tray and continue baking for another 20–25 minutes until the loaf is nicely browned.
Let the bread cool completely before slicing so the crumb can set properly.
Keep It Fresh
the Naturable Way
Do you want your Rustic Chestnut Sourdough to stay fresh for longer?
Our Naturable bread bags and beeswax wraps are the perfect way to store it without plastic.
You can keep the whole loaf in the bread bag, or slice it and wrap the pieces in the beeswax wraps. Your bread will stay soft and fresh for 5 to 6 days, and after that we recommend storing it in the fridge.
You can also freeze the loaf, sliced or whole, using our bags. They’re completely freezer safe and keep your bread protected while preserving its aroma and texture.
Do you not have your Naturable set yet? You can get yours here!

Final Notes
Chestnuts are naturally dry, so the purée adds softness and depth but doesn’t hydrate the dough the same way fruit would.
It’s normal for the purée to thicken the mix. If it feels too dense, a few drops of hot water are enough to adjust it.
After adding the starter, honey, salt and spices, the dough may feel sticky, loose or slightly unstable, but this is expected. With folds and resting, it strengthens again.
The honey doesn’t make the loaf sweet. It only rounds out the chestnut’s flavor.
A well-tensioned shape is essential for a tall loaf, and the chestnut purée helps the crumb stay tender for longer, making the bread especially lovely the next day.
A warm and comforting winter loaf with a subtle chestnut aroma and a tender crumb that holds beautifully. Perfect for cozy mornings, buttered toast, and any winter table.
Have You Tried Our Beeswax Bags & Wraps?
A natural way to keep your food and bread fresh while reducing plastic in your kitchen.
Each set includes 2 reusable bread bags and 2 wraps, made from 100% cotton, beeswax, jojoba oil, and pine resin.
Simple, sustainable, and long-lasting.
Let’s Connect on Instagram
Subscribe to Our Newsletter
Join the Naturable Blog! Stay updated with our tips, kitchen hacks, and much more

Subscribe to Our Newsletter
Join the Naturable Blog! Stay updated with our tips, kitchen hacks, and much more
Stay connected! Follow us for tips, updates, and a little extra inspiration for your home and kitchen.
Have a question or need assistance?
Feel free to contact us!
© 2025. Naturable – A brand of Horizon Origin LLC