Naturally fresh, beautifully stored

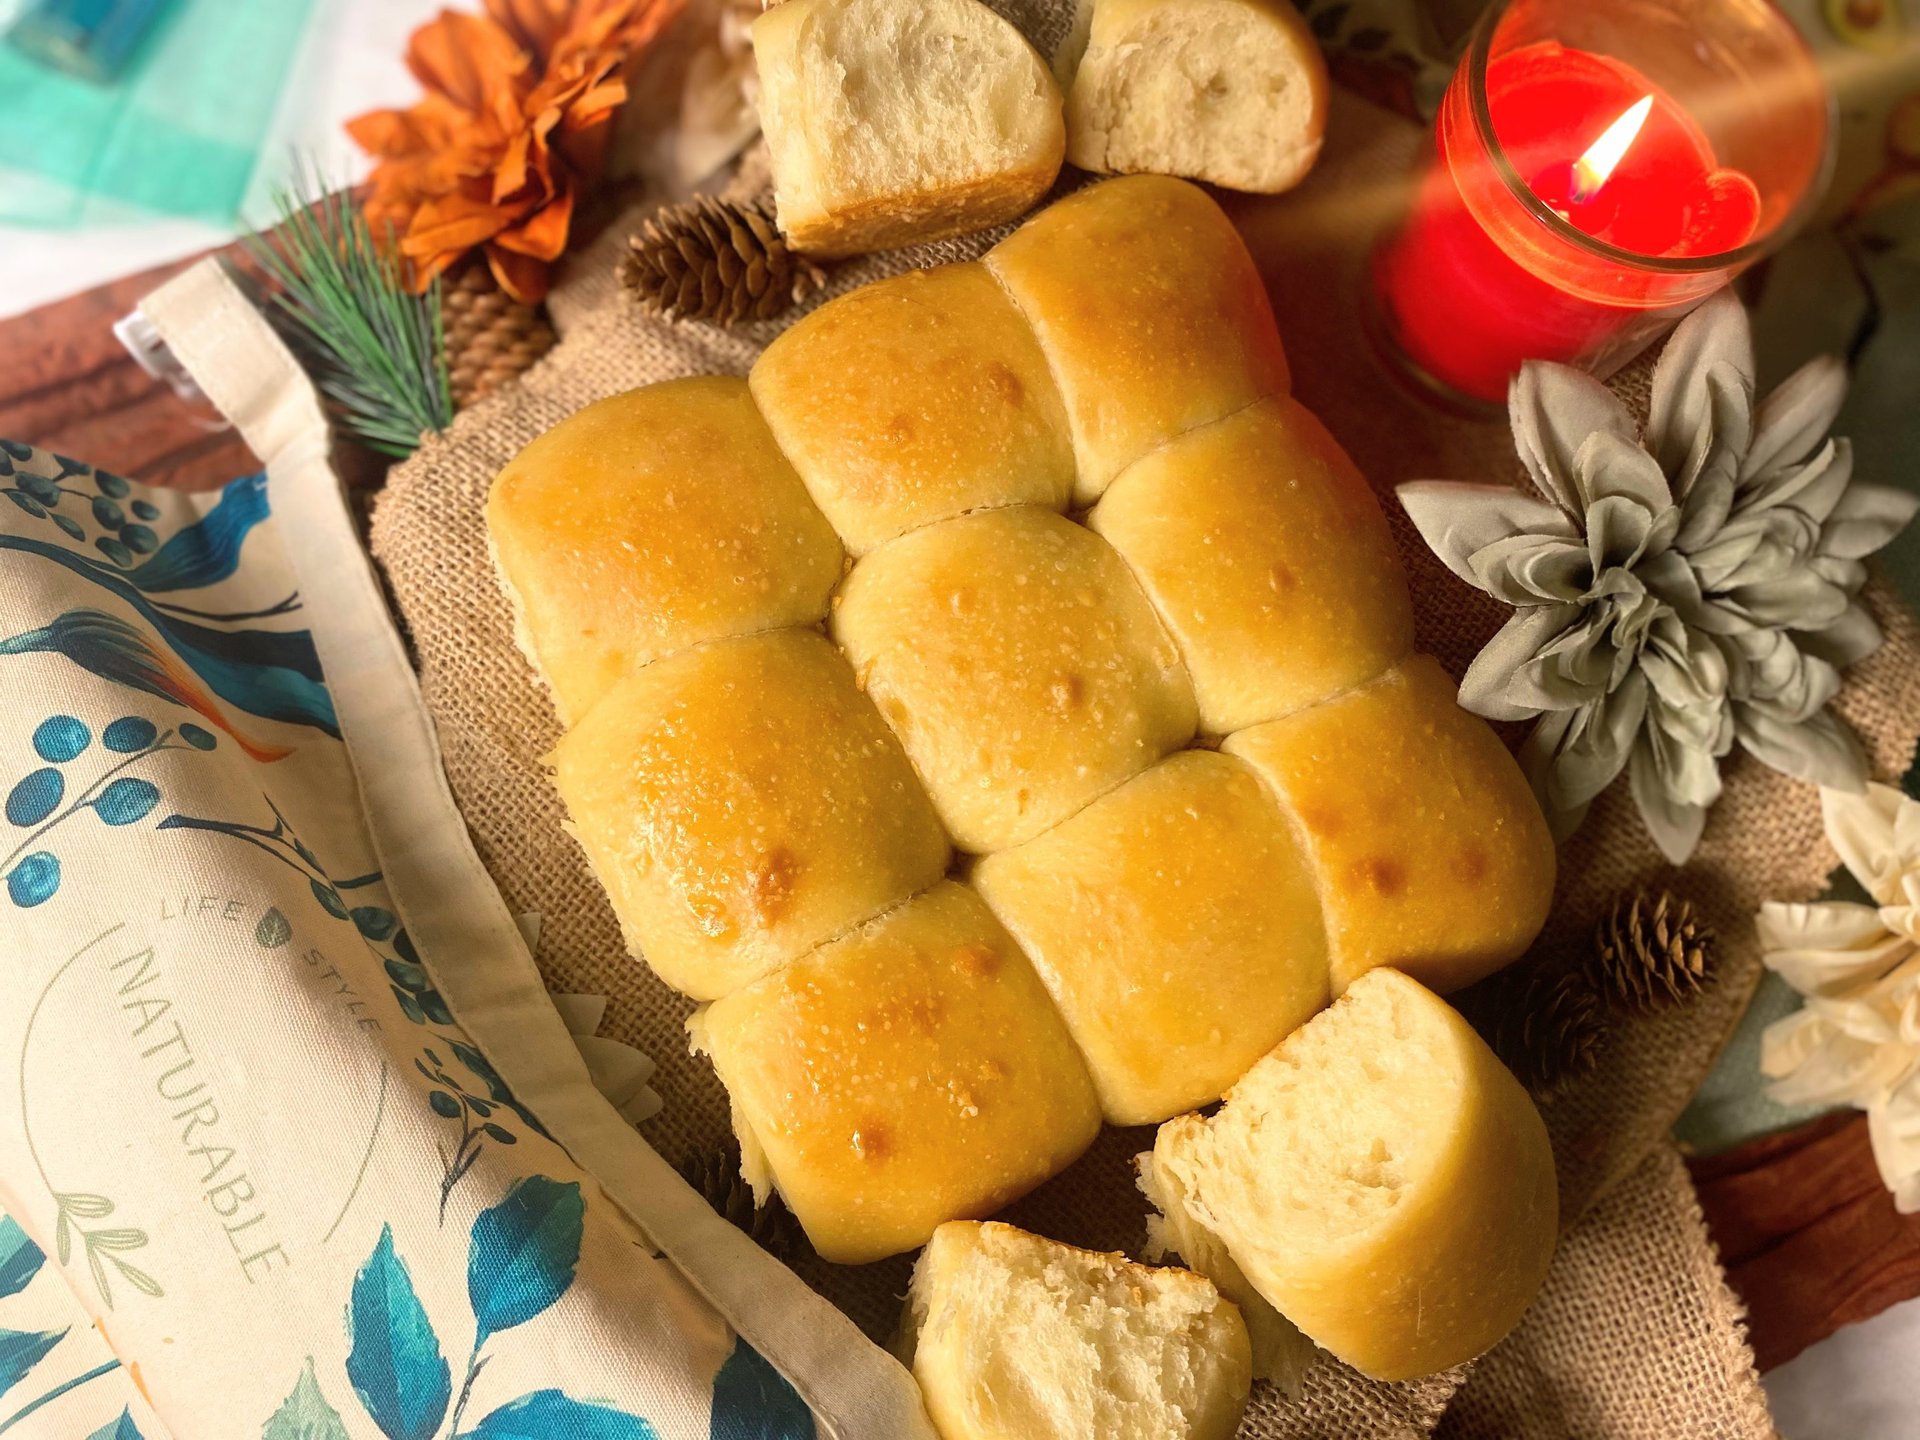
Sourdough Pull Apart Dinner Rolls
Soft, buttery and naturally leavened, these pull apart rolls are the perfect warm side for holiday dinners and cozy evenings.
A


Soft, fluffy and perfect for holiday meals.
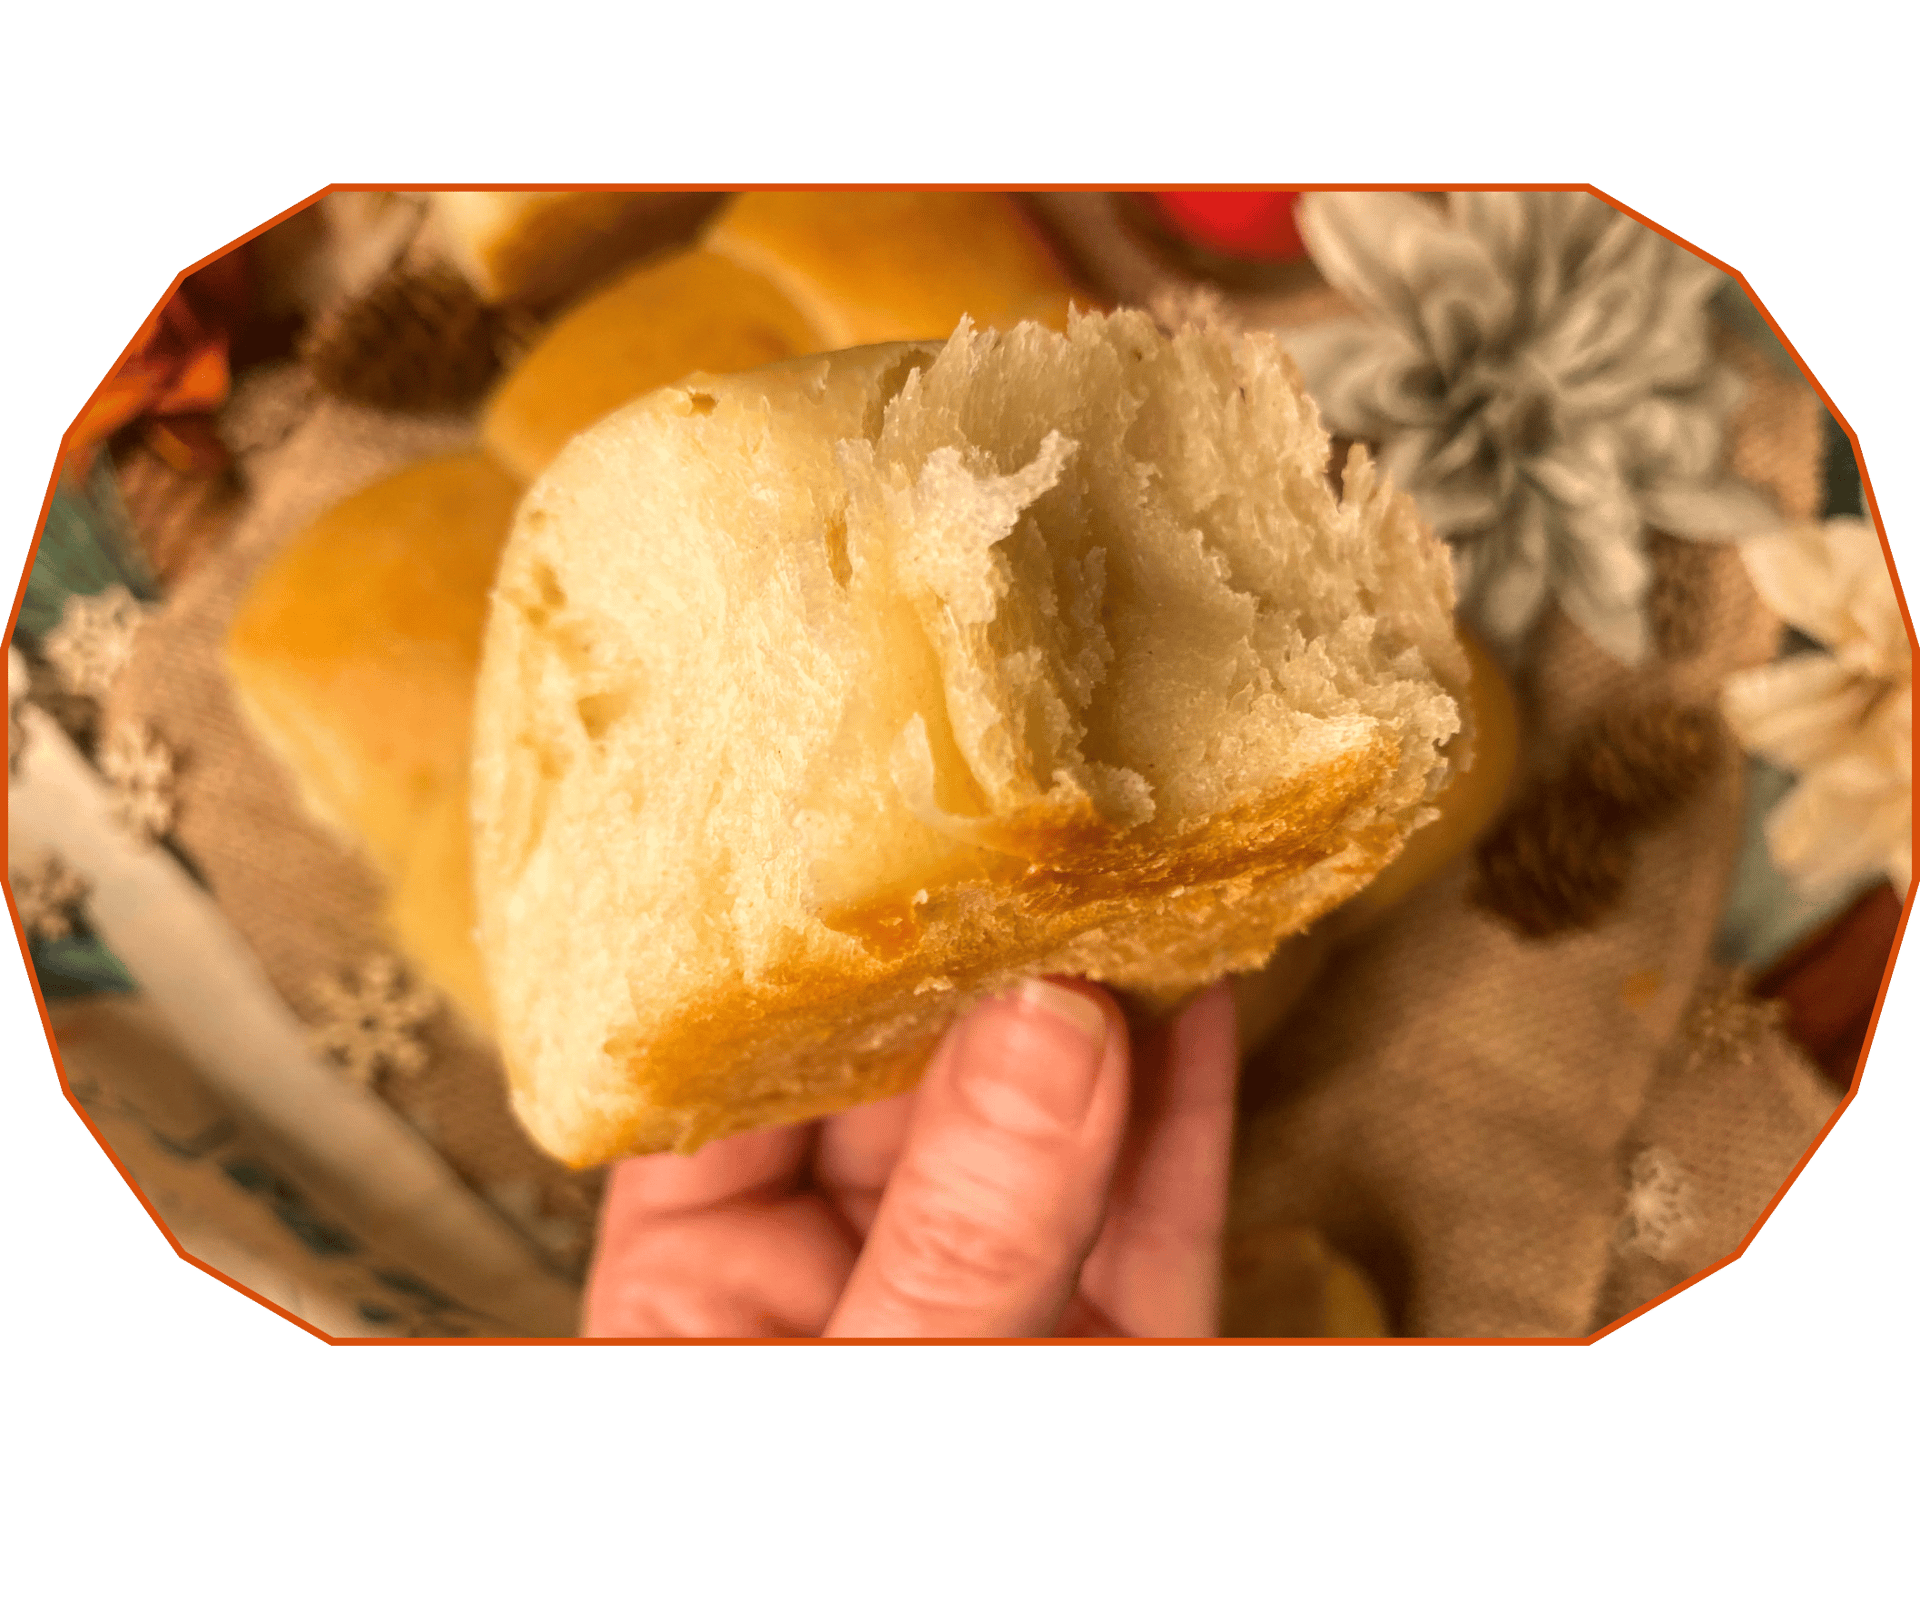
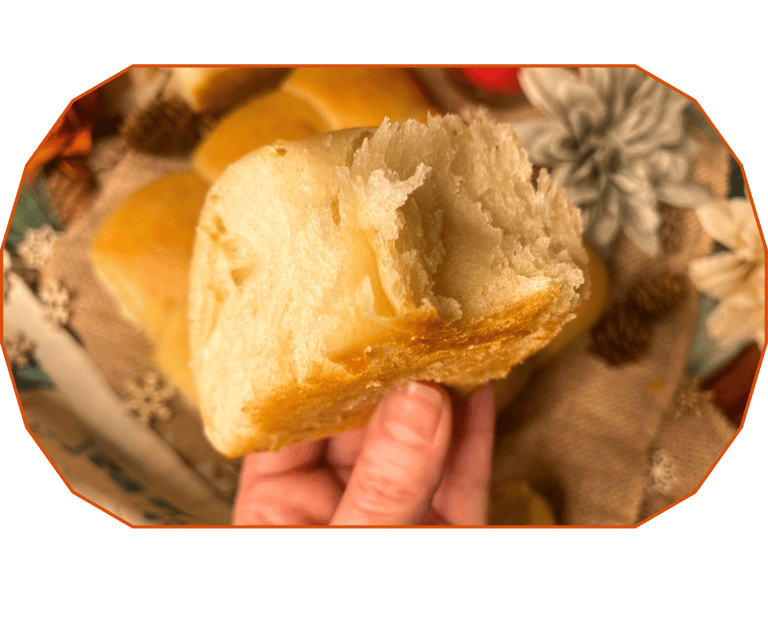
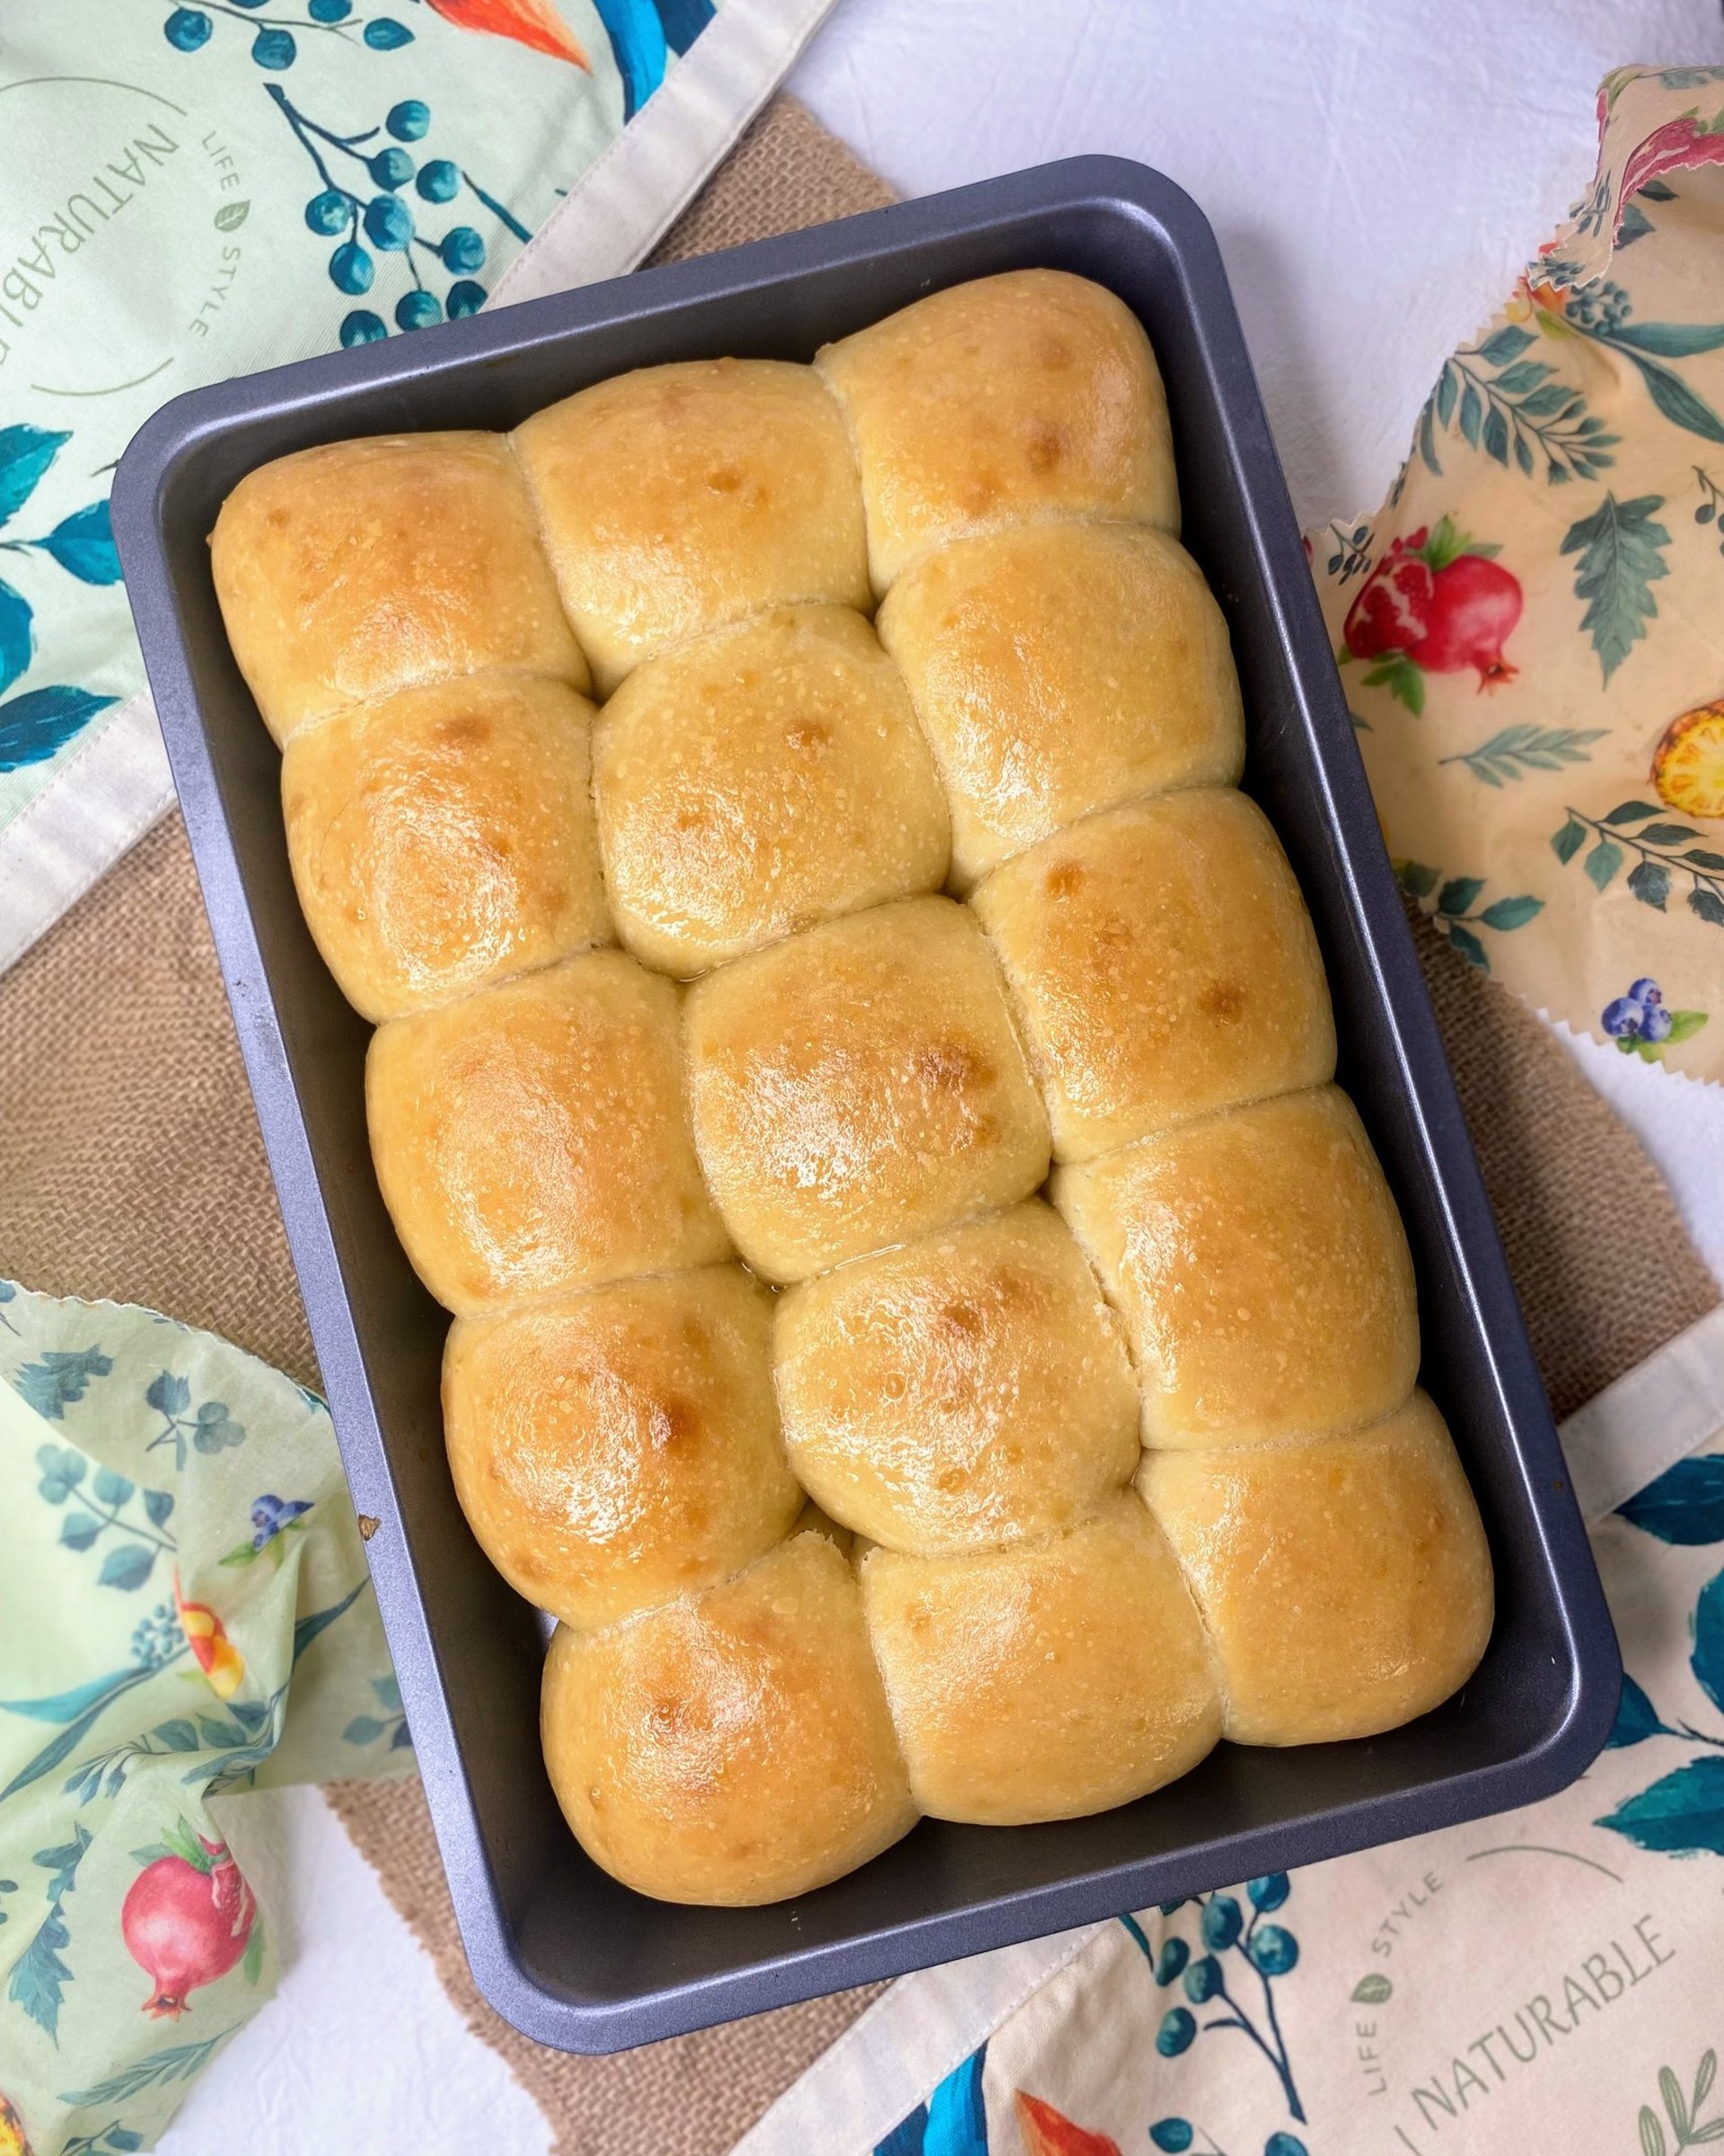
These sourdough pull apart dinner rolls are soft, fluffy and gently sweet. The dough is enriched with milk, egg, butter and a touch of honey, and the rolls bake into a golden pillow that pulls apart easily. They are perfect for holiday dinners, cozy weekends or any meal that needs a warm bread basket.
You can make the dough with a stand mixer or by hand. I will explain both options.


Ingredients
150 g bread flour
300 g all purpose flour
220 g warm milk, about body temperature
100 g active sourdough starter
40 g honey
10 g salt
1 egg
65 g butter, softened
Tools you will need
Large mixing bowl
Digital scale
Measuring jug for the milk
Spatula or wooden spoon
Stand mixer with paddle and dough hook attachments, optional
Dough scraper, helpful but optional
Non stick baking tray, or tray lightly greased
Pastry brush for milk or egg wash
Kitchen towel to cover the dough
Cooling rack
Mix the dough
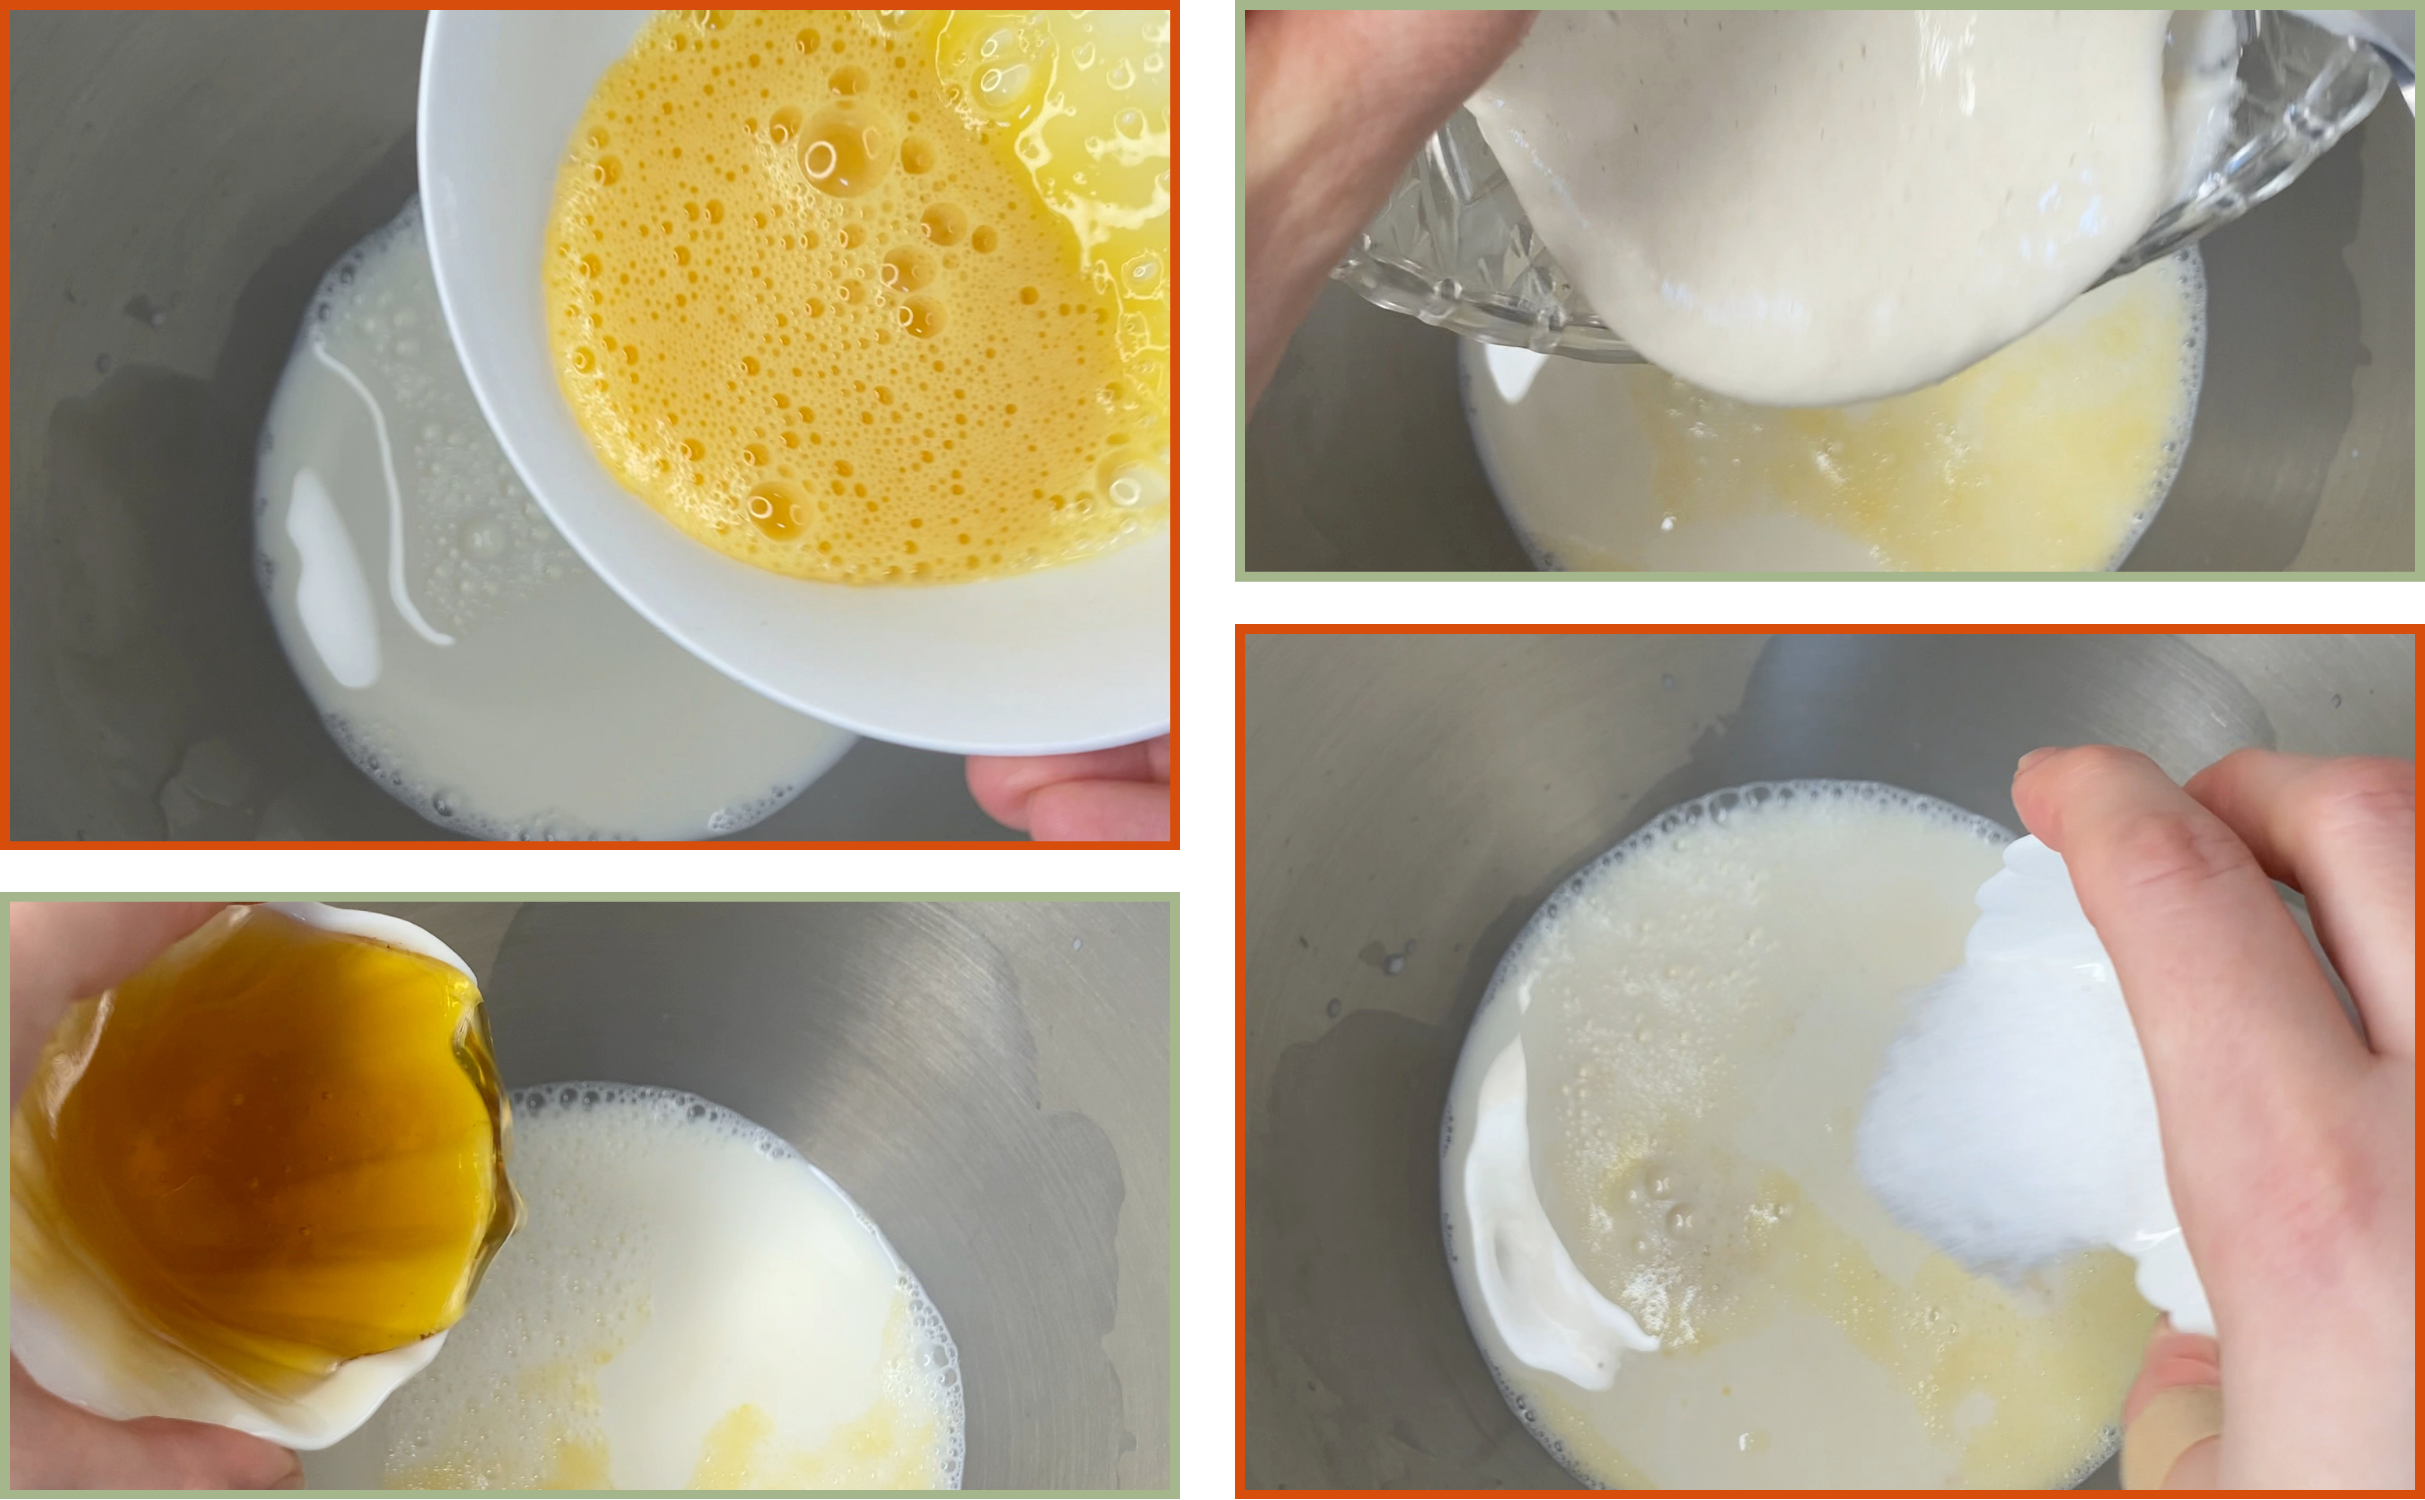
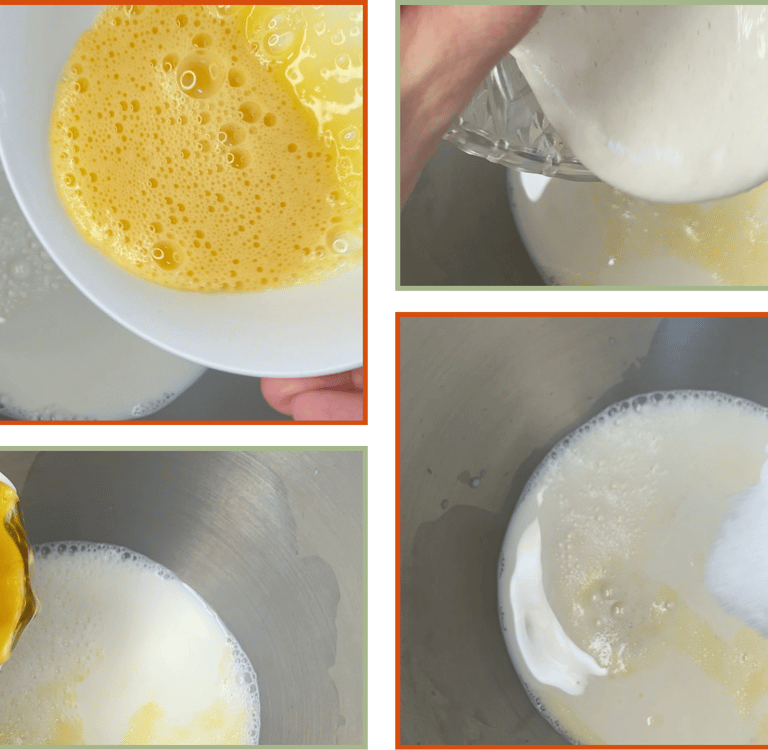
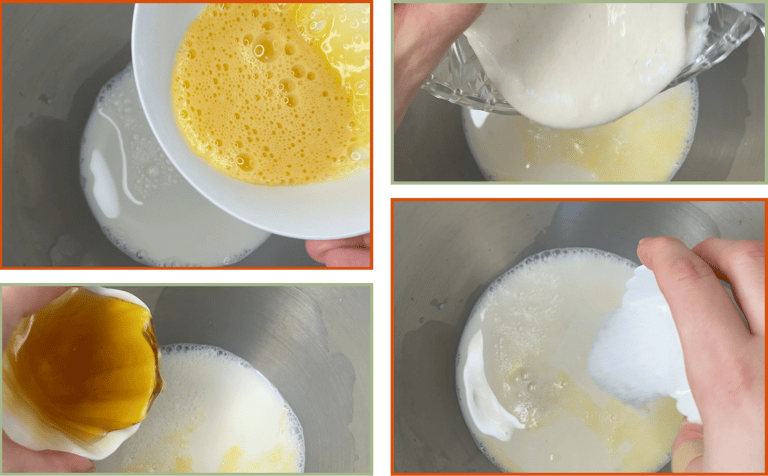
Add the warm milk, honey, egg and active sourdough starter to a large bowl. Whisk or stir until the mixture looks smooth and even.
Add both flours on top. Mix with a spatula, wooden spoon or the stand mixer paddle until there are no dry spots of flour. The dough will look sticky and rough at this stage. That is correct.
Step by Step
Kneading with a stand mixer
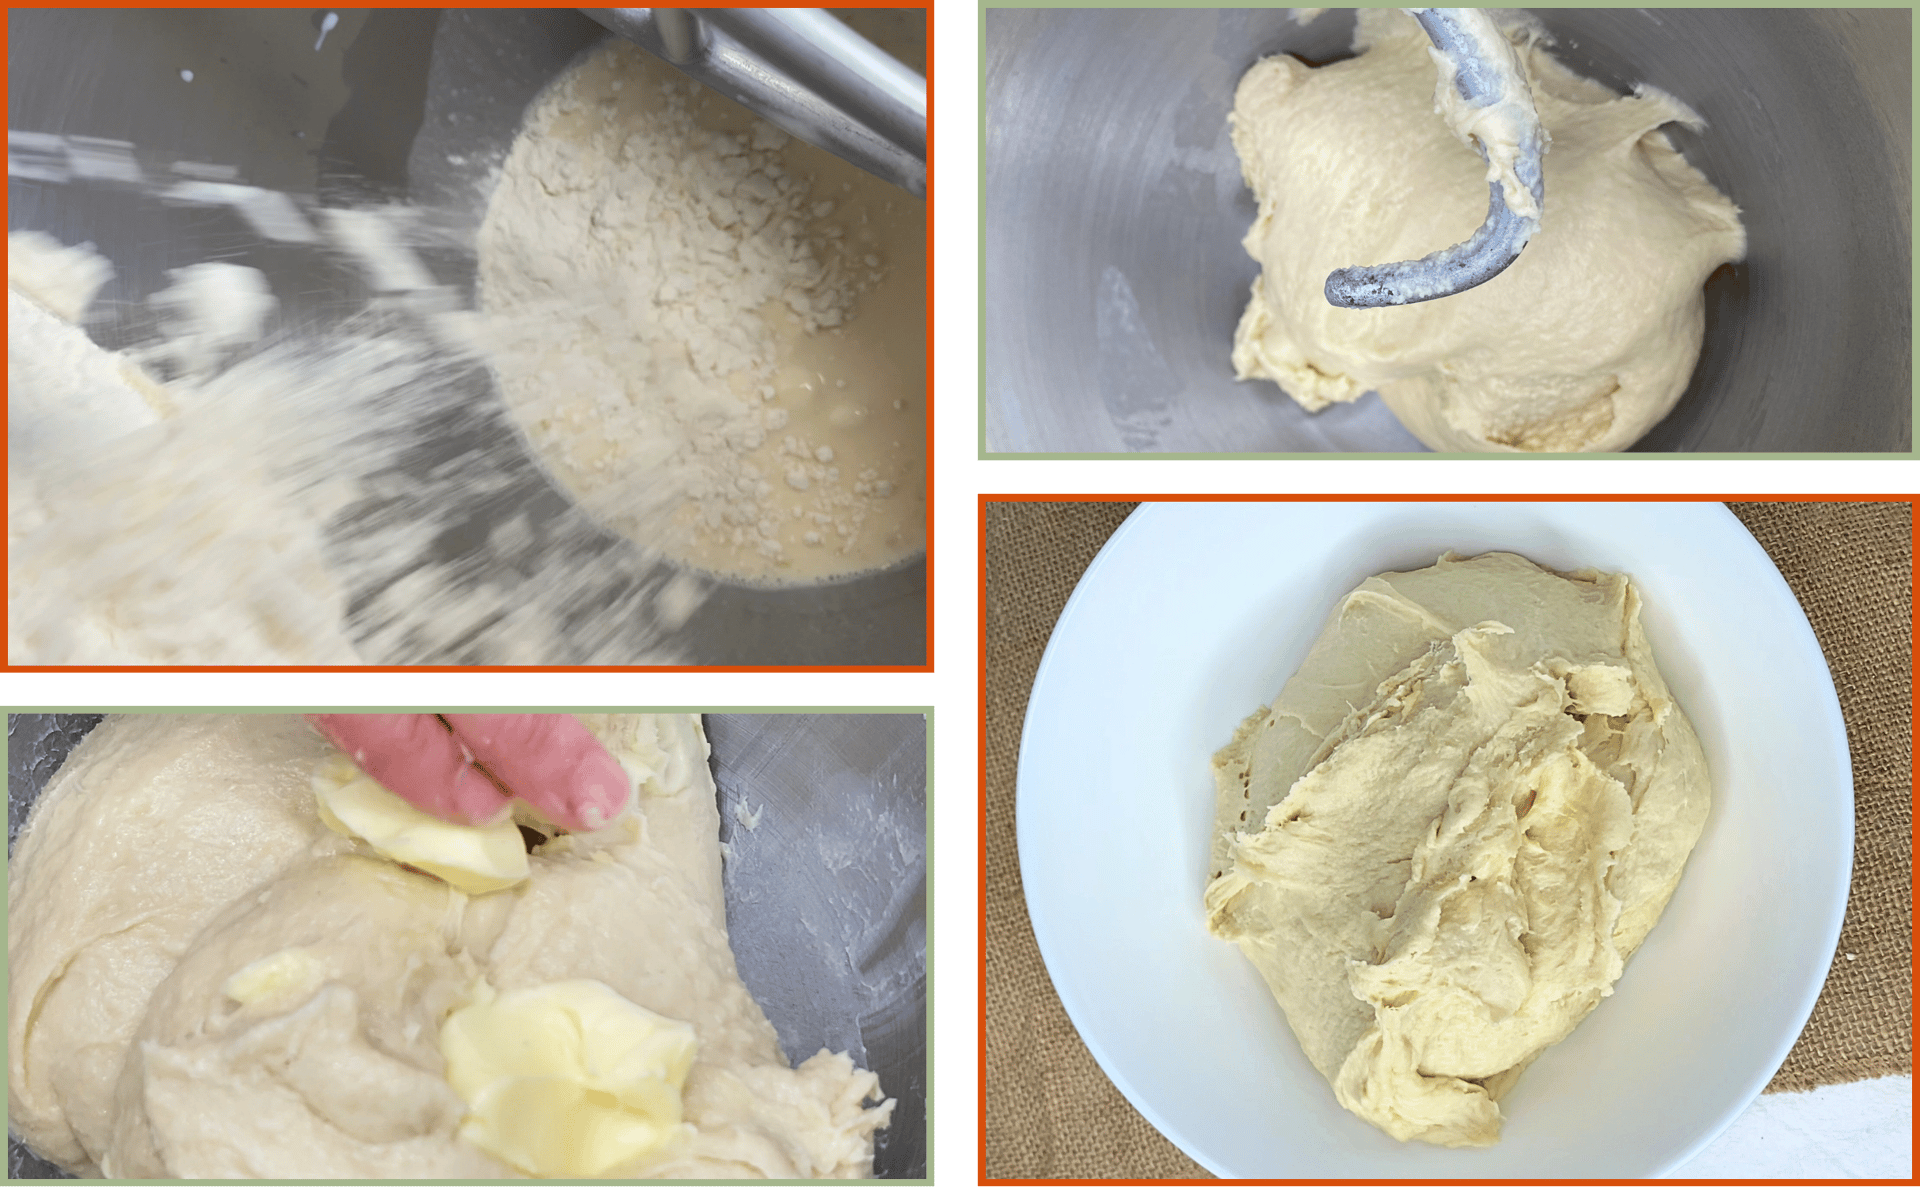
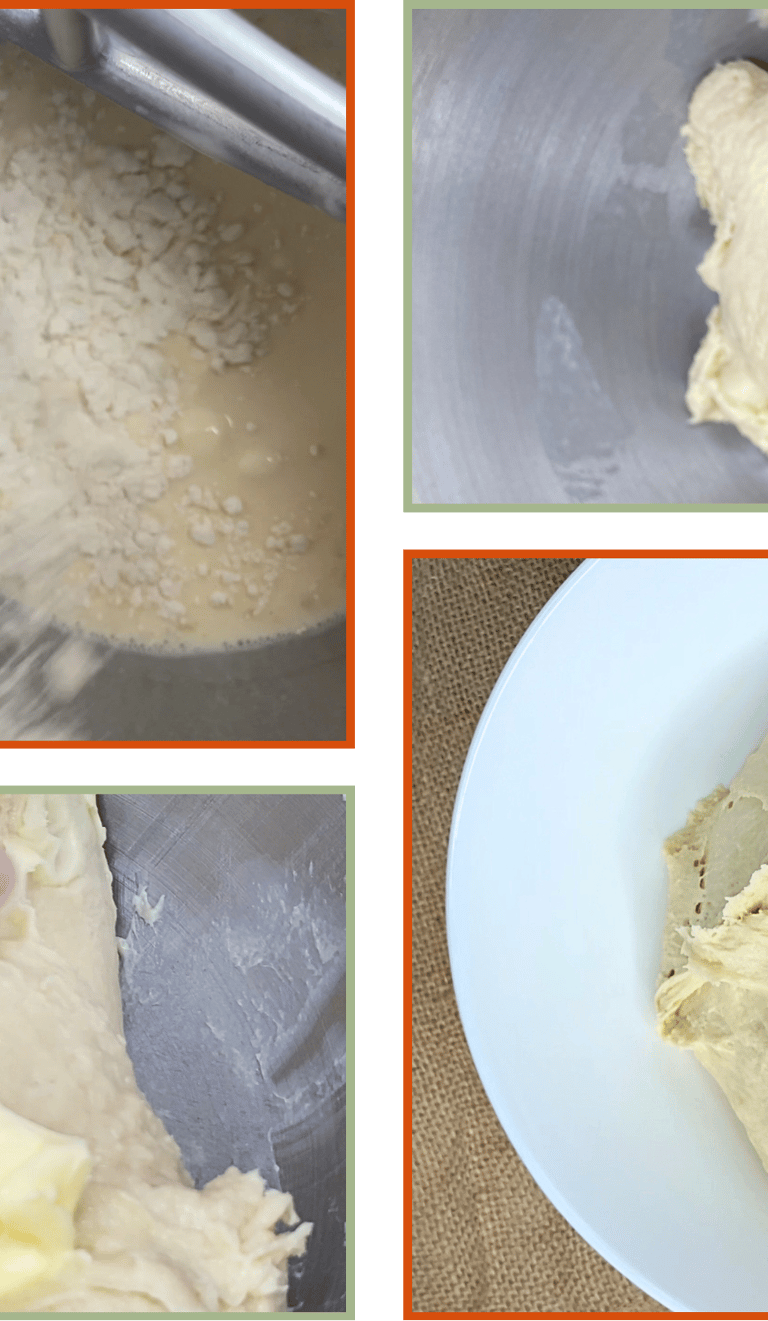
Switch to the dough hook and knead on low speed for about 5 minutes. The dough should start to look smoother and more elastic.
Add the softened butter in three additions. Drop one third of the butter into the bowl and let the hook work until it disappears into the dough. Repeat with the second and third portions. The dough will look a little messy for a moment, then become smooth and shiny as the butter is absorbed.
After all the butter is incorporated, keep kneading on low for another 8 to 10 minutes. The dough should be soft, elastic and slightly tacky, but it should hold together in one piece.

Shape the rolls
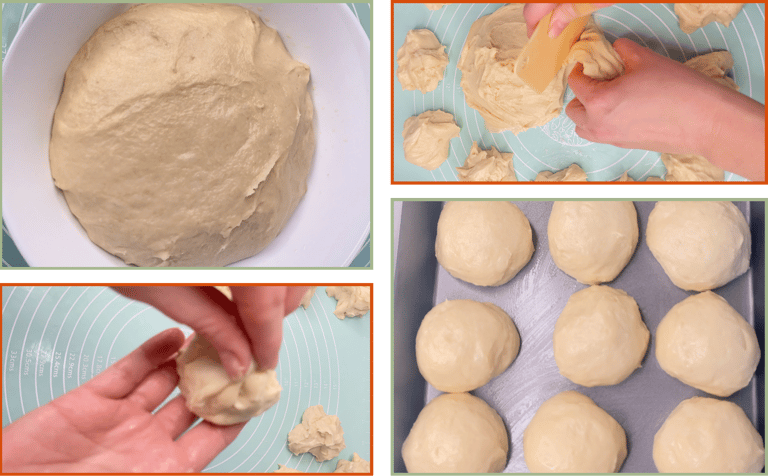
Prepare a non stick baking tray and, if you want to be extra safe, brush it with a very thin layer of oil.
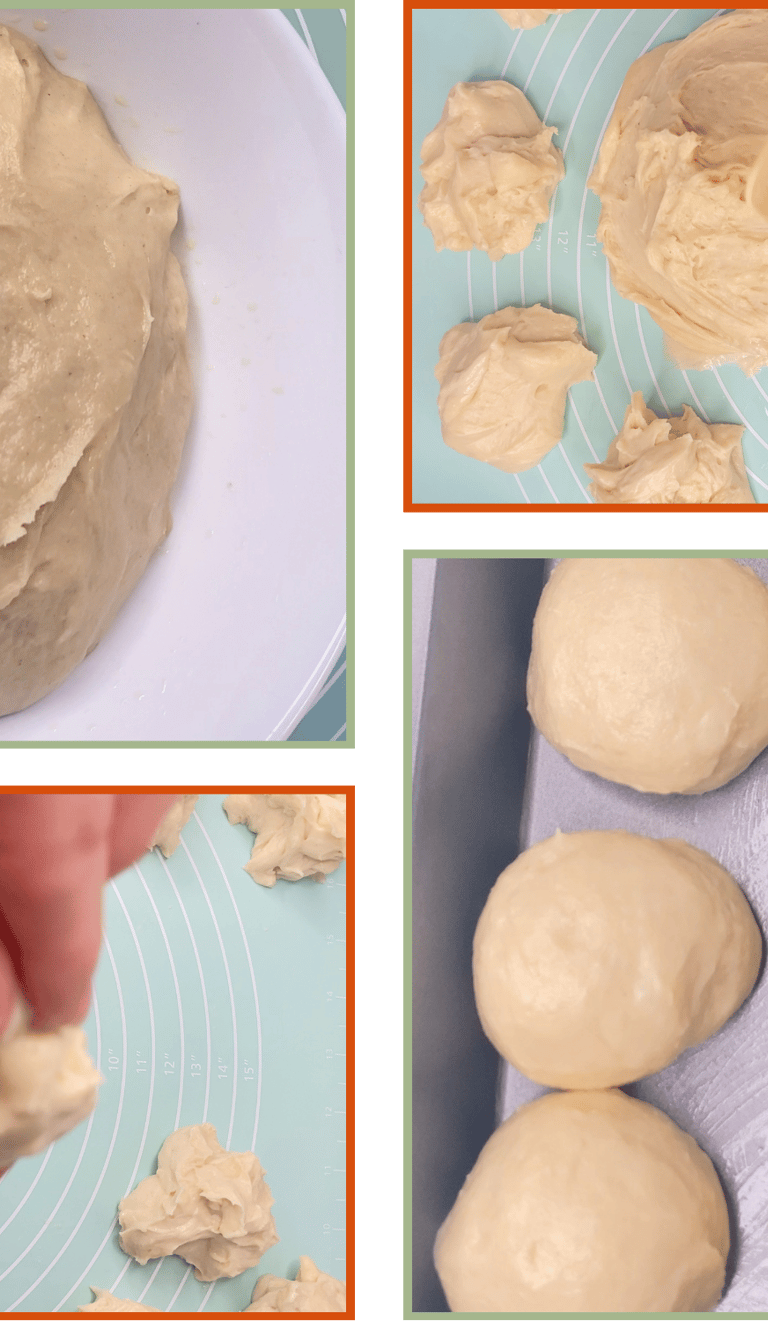
Turn the dough out onto a clean surface. Divide it into equal pieces.
To shape each roll, flatten the piece slightly, then tuck the edges toward the centre and pinch them together underneath. Turn the ball seam side down and roll it gently against the counter to create a smooth round top.
Place the rolls on the tray with a little space between them. As they rise they will touch and form the pull apart shape.
First rise
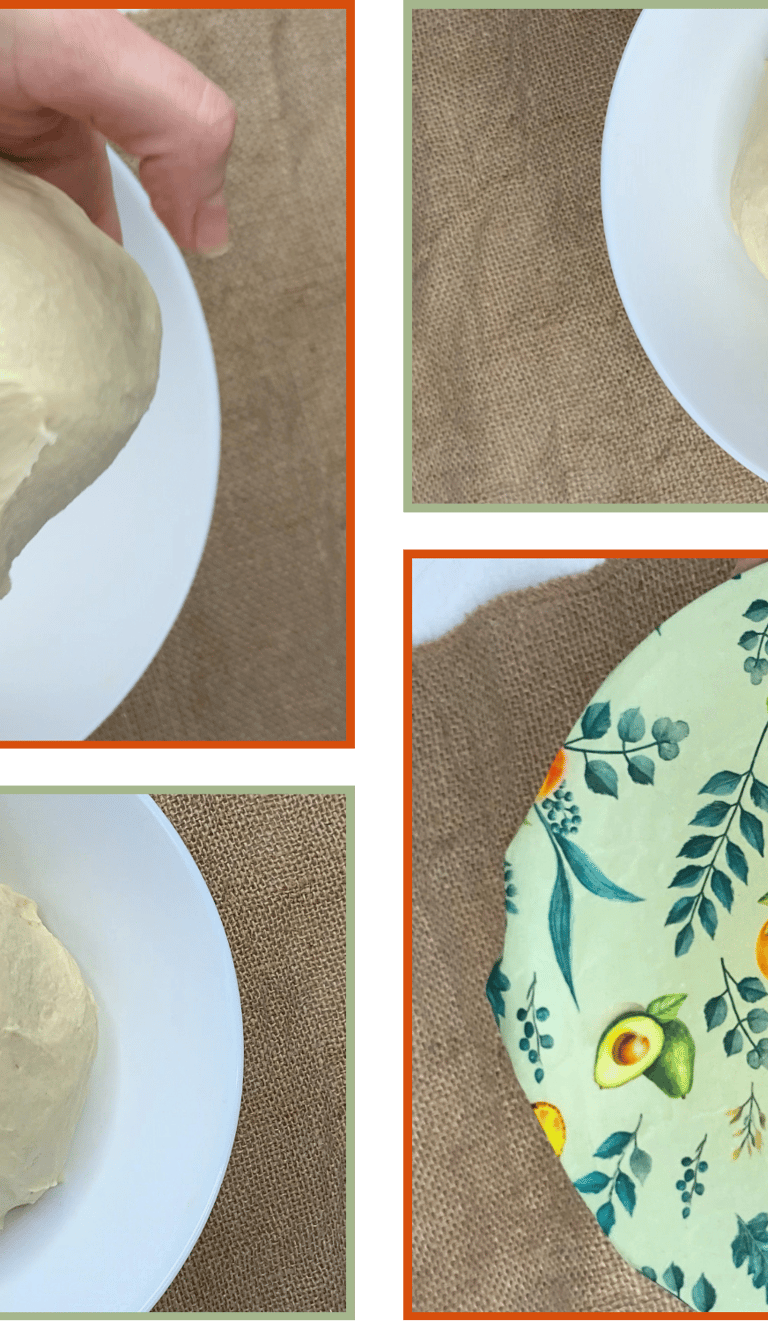
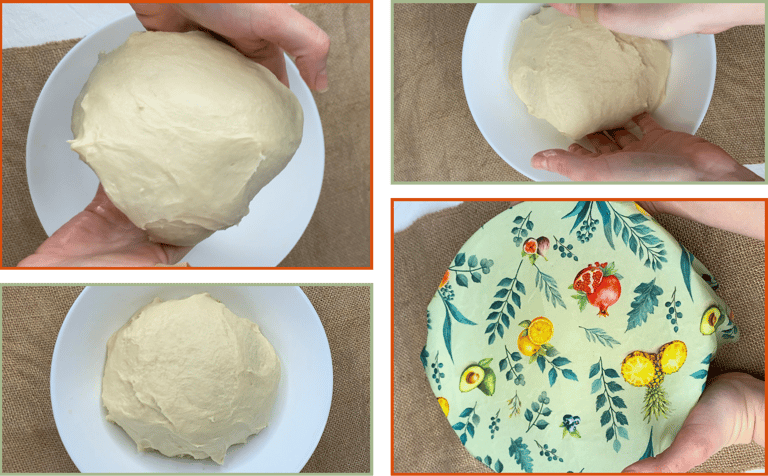
Place the dough in a lightly oiled bowl and cover it.
Let it rise at room temperature until it increases by about 70 to 80 percent. The exact time depends on the temperature of your kitchen. It may take around 2 to 4 hours. You are looking for a dough that feels lighter, slightly jiggly and full of small bubbles when you gently press it.


Second rise and timing options
At this point you can choose how to fit the recipe into your schedule.
Option 1. Same day bake
Cover the tray and let the rolls rise at room temperature until they look puffed and almost doubled in size. When you touch one gently with your fingertip, it should feel very light and the mark should slowly spring back.
Option 2. Overnight in the fridge
Cover the tray and place it in the fridge for up to 12 hours. The next day take the rolls out and let them finish rising at room temperature until they are fully puffy. This option gives more flavour and is very practical for holiday dinners.
Option 3. Freeze the shaped rolls
Place the shaped rolls on a tray and freeze them until firm. Then transfer them to a bag or container. When you want to bake, place the frozen rolls on a tray and let them rise until doubled. This will take longer because they start from frozen, but it is an excellent make ahead option.
If your kitchen is cold, place the tray in the oven with the light on or put a mug of hot water inside the cold oven and close the door. This creates a gentle warm space that helps the rolls rise without drying out.
Kneading by hand
After mixing all the ingredients in the bowl, scrape the dough onto a lightly oiled or very lightly floured surface.
Use a simple stretch and fold or slap and fold motion. Lift the dough, stretch it forward and fold it back over itself. Repeat the movement for about 5 minutes until the dough starts to feel smoother.
Add the softened butter in three small portions. For each portion, place the butter on top of the dough, press it in with your fingers and fold the dough over it. At first it will look greasy and broken, but keep folding, pressing and gathering the dough. The butter will slowly disappear and the dough will become smooth again.
Once all the butter is inside the dough, keep working it gently for a few more minutes. If the dough is very sticky, you can let it rest for 5 to 10 minutes, then do a set of gentle stretch and folds. Two or three short rounds of folds with rests in between are easier than one long knead.
The final dough should feel soft, elastic and slightly tacky.
Glaze and baking
Preheat the oven to 180 C.
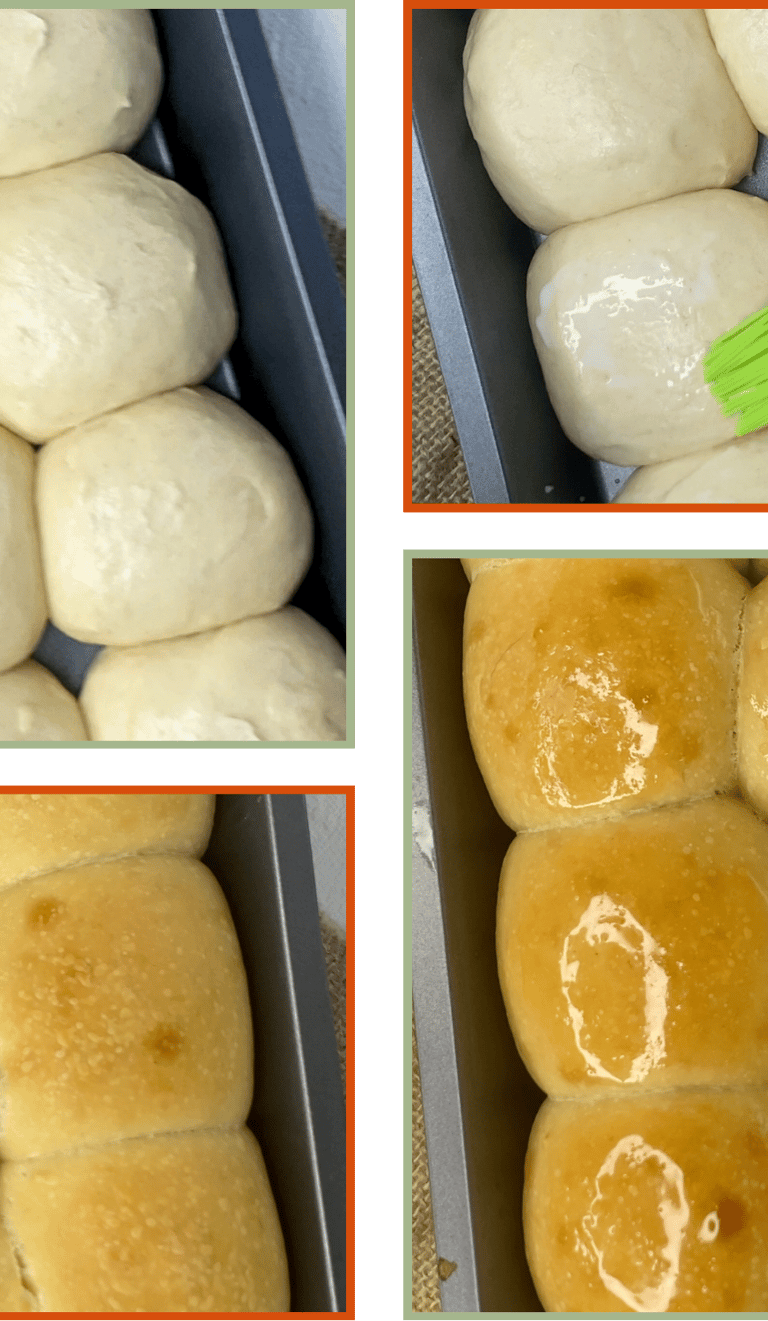
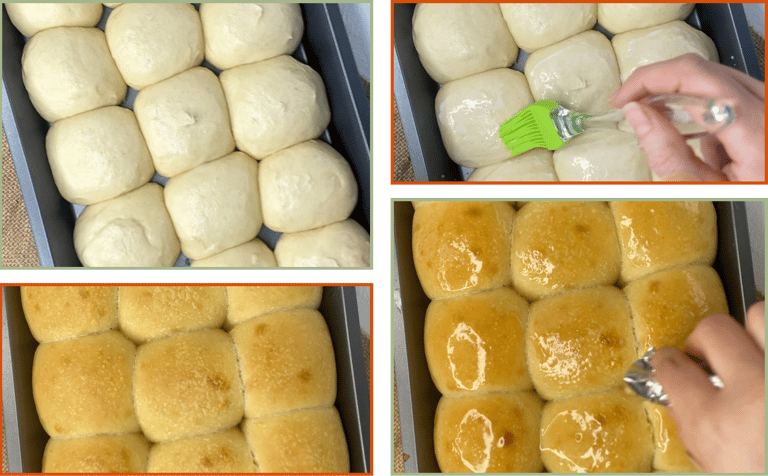
Brush the tops of the rolls with milk. This gives them a soft, lightly golden crust.
If you prefer a deeper colour, you can use an egg wash instead. Beat one egg with a splash of milk and brush a thin layer over the rolls.
Bake for about 20 minutes, until the tops are golden and the rolls feel set.
As soon as they come out of the oven, brush them with melted butter. This adds shine, flavour and keeps the crust extra soft.
If you want to use less butter, you can simply take a small piece of cold butter and rub it gently over the hot rolls as soon as they come out of the oven. This creates a very thin, delicate layer.
Explore these cozy seasonal recipes and fill your kitchen with warm, festive aromas.
Try our Winter Orange Sourdough with a Touch of Honey and Rosemary. A comforting loaf that brings soft citrus notes to your winter baking.
Or bake our Caramelized Panela Holiday Cookies: Buttery Christmas Cookies with a Touch of Lemon. Golden, melt-in-your-mouth cookies with a delicate citrus twist.

Serving ideas
These rolls are incredibly versatile and pair beautifully with both sweet and savoury flavours.
Here are a few serving ideas to make them shine at your table.
Serve them warm with herb butter, honey butter or a simple pat of soft salted butter.
Pair them with soups, stews or roasted dishes for a cozy winter meal.
Use them as mini sliders for festive gatherings or leftovers.
Enjoy them at breakfast with jam, cream cheese or a drizzle of honey.
Their soft, fluffy texture makes them perfect for any holiday spread or everyday comfort meal.
Storing and Refreshing
Once baked, these rolls stay soft for two to three days when stored correctly.
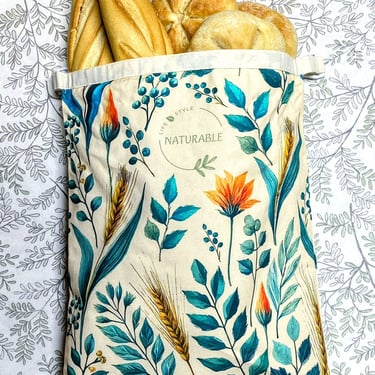
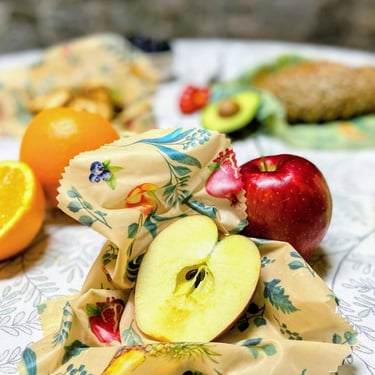
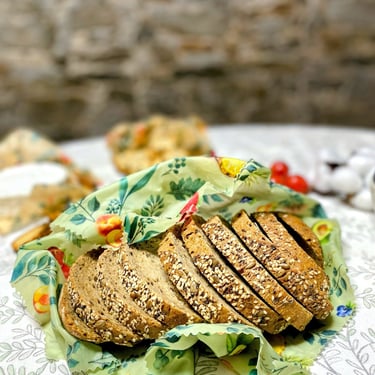
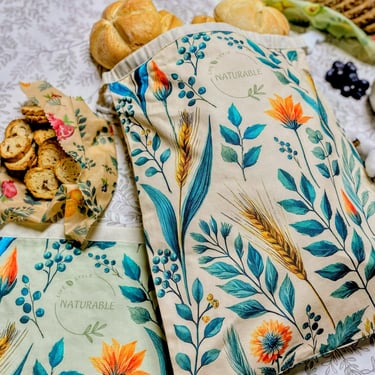
To store them, place the rolls in an airtight container or inside your Naturable bag or wrap.
If the rolls have a generous layer of butter on the outside, simply wrap them first in parchment paper or a clean kitchen towel to keep everything tidy and protected.
These rolls also freeze extremely well. Freeze them once baked, and when you're ready to enjoy them, use one of the reheating methods below.
To refresh the rolls, you have two easy options.
For the softest texture, wrap the rolls in foil and warm them in a low oven until soft and tender again.
If you want a quicker method, microwave each roll for 10 to 15 seconds until warm and fluffy, then wrap it in foil to help retain the moisture and keep it soft for longer.
Ready to upgrade how you store your fresh bread and rolls?
Click here to get your Naturable Beeswax Bags & Wraps set.


These sourdough rolls are soft, comforting and surprisingly easy to make.
Perfect for holiday celebrations or any special meal at home.
With a little planning, you can always have them ready and freshly baked.
And the best part is that every bite tastes like home.
Have You Tried Our Beeswax Bags & Wraps?
A natural way to keep your food and bread fresh while reducing plastic in your kitchen.
Each set includes 2 reusable bread bags and 2 wraps, made from 100% cotton, beeswax, jojoba oil, and pine resin.
Simple, sustainable, and long-lasting.
Let’s Connect on Instagram

Soft, fluffy and perfect for holiday meals
These sourdough pull apart dinner rolls are soft, fluffy and gently sweet. The dough is enriched with milk, egg, butter and a touch of honey, and the rolls bake into a golden pillow that pulls apart easily. They are perfect for holiday dinners, cozy weekends or any meal that needs a warm bread basket.
You can make the dough with a stand mixer or by hand. I will explain both options.

Ingredients
150 g bread flour
300 g all purpose flour
220 g warm milk, about body temperature
100 g active sourdough starter
40 g honey
10 g salt
1 egg
65 g butter, softened
Tools you will need
Large mixing bowl
Digital scale
Measuring jug for the milk
Spatula or wooden spoon
Stand mixer with paddle and dough hook attachments, optional
Dough scraper, helpful but optional
Non stick baking tray, or tray lightly greased
Pastry brush for milk or egg wash
Kitchen towel to cover the dough
Cooling rack
Mix the dough
Add the warm milk, honey, egg and active sourdough starter to a large bowl. Whisk or stir until the mixture looks smooth and even.
Add both flours on top. Mix with a spatula, wooden spoon or the stand mixer paddle until there are no dry spots of flour. The dough will look sticky and rough at this stage. That is correct.
Step by Step

Kneading with a stand mixer
Switch to the dough hook and knead on low speed for about 5 minutes. The dough should start to look smoother and more elastic.
Add the softened butter in three additions. Drop one third of the butter into the bowl and let the hook work until it disappears into the dough. Repeat with the second and third portions. The dough will look a little messy for a moment, then become smooth and shiny as the butter is absorbed.
After all the butter is incorporated, keep kneading on low for another 8 to 10 minutes. The dough should be soft, elastic and slightly tacky, but it should hold together in one piece.
Kneading by hand
After mixing all the ingredients in the bowl, scrape the dough onto a lightly oiled or very lightly floured surface.
Use a simple stretch and fold or slap and fold motion. Lift the dough, stretch it forward and fold it back over itself. Repeat the movement for about 5 minutes until the dough starts to feel smoother.
Add the softened butter in three small portions. For each portion, place the butter on top of the dough, press it in with your fingers and fold the dough over it. At first it will look greasy and broken, but keep folding, pressing and gathering the dough. The butter will slowly disappear and the dough will become smooth again.
Once all the butter is inside the dough, keep working it gently for a few more minutes. If the dough is very sticky, you can let it rest for 5 to 10 minutes, then do a set of gentle stretch and folds. Two or three short rounds of folds with rests in between are easier than one long knead.
The final dough should feel soft, elastic and slightly tacky.
First rise
Place the dough in a lightly oiled bowl and cover it.
Let it rise at room temperature until it increases by about 70 to 80 percent. The exact time depends on the temperature of your kitchen. It may take around 2 to 4 hours. You are looking for a dough that feels lighter, slightly jiggly and full of small bubbles when you gently press it.
Shape the rolls
Prepare a non stick baking tray and, if you want to be extra safe, brush it with a very thin layer of oil.
Turn the dough out onto a clean surface. Divide it into equal pieces.
To shape each roll, flatten the piece slightly, then tuck the edges toward the centre and pinch them together underneath. Turn the ball seam side down and roll it gently against the counter to create a smooth round top.
Place the rolls on the tray with a little space between them. As they rise they will touch and form the pull apart shape.
Second rise and timing options
At this point you can choose how to fit the recipe into your schedule.
Option 1. Same day bake
Cover the tray and let the rolls rise at room temperature until they look puffed and almost doubled in size. When you touch one gently with your fingertip, it should feel very light and the mark should slowly spring back.
Option 2. Overnight in the fridge
Cover the tray and place it in the fridge for up to 12 hours. The next day take the rolls out and let them finish rising at room temperature until they are fully puffy. This option gives more flavour and is very practical for holiday dinners.
Option 3. Freeze the shaped rolls
Place the shaped rolls on a tray and freeze them until firm. Then transfer them to a bag or container. When you want to bake, place the frozen rolls on a tray and let them rise until doubled. This will take longer because they start from frozen, but it is an excellent make ahead option.
If your kitchen is cold, place the tray in the oven with the light on or put a mug of hot water inside the cold oven and close the door. This creates a gentle warm space that helps the rolls rise without drying out.
Glaze and baking
Preheat the oven to 180 C.
Brush the tops of the rolls with milk. This gives them a soft, lightly golden crust.
If you prefer a deeper colour, you can use an egg wash instead. Beat one egg with a splash of milk and brush a thin layer over the rolls.
Bake for about 20 minutes, until the tops are golden and the rolls feel set.
As soon as they come out of the oven, brush them with melted butter. This adds shine, flavour and keeps the crust extra soft.
If you want to use less butter, you can simply take a small piece of cold butter and rub it gently over the hot rolls as soon as they come out of the oven. This creates a very thin, delicate layer.
Explore these cozy seasonal recipes and fill your kitchen with warm, festive aromas.
Try our Winter Orange Sourdough with a Touch of Honey and Rosemary. A comforting loaf that brings soft citrus notes to your winter baking.
Or bake our Caramelized Panela Holiday Cookies: Buttery Christmas Cookies with a Touch of Lemon. Golden, melt-in-your-mouth cookies with a delicate citrus twist.
Serving ideas
These rolls are incredibly versatile and pair beautifully with both sweet and savoury flavours.
Here are a few serving ideas to make them shine at your table.
Serve them warm with herb butter, honey butter or a simple pat of soft salted butter.
Pair them with soups, stews or roasted dishes for a cozy winter meal.
Use them as mini sliders for festive gatherings or leftovers.
Enjoy them at breakfast with jam, cream cheese or a drizzle of honey.
Their soft, fluffy texture makes them perfect for any holiday spread or everyday comfort meal.


Storing & Refreshing
Once baked, these rolls stay soft for two to three days when stored correctly.
To store them, place the rolls in an airtight container or inside your Naturable bag or wrap.
If the rolls have a generous layer of butter on the outside, simply wrap them first in parchment paper or a clean kitchen towel to keep everything tidy and protected.
These rolls also freeze extremely well. Freeze them once baked, and when you're ready to enjoy them, use one of the reheating methods below.
To refresh the rolls, you have two easy options.
For the softest texture, wrap the rolls in foil and warm them in a low oven until soft and tender again.
If you want a quicker method, microwave each roll for 10 to 15 seconds until warm and fluffy, then wrap it in foil to help retain the moisture and keep it soft for longer.
Ready to upgrade how you store your fresh bread and rolls?
Click here to get your Naturable Beeswax Bags & Wraps set.
These sourdough rolls are soft, comforting and surprisingly easy to make.
Perfect for holiday celebrations or any special meal at home.
With a little planning, you can always have them ready and freshly baked.
And the best part is that every bite tastes like home.
Have You Tried Our Beeswax Bags & Wraps?
A natural way to keep your food and bread fresh while reducing plastic in your kitchen.
Each set includes 2 reusable bread bags and 2 wraps, made from 100% cotton, beeswax, jojoba oil, and pine resin.
Simple, sustainable, and long-lasting.
Let’s Connect on Instagram
Subscribe to Our Newsletter
Join the Naturable Blog! Stay updated with our tips, kitchen hacks, and much more
Subscribe to Our Newsletter
Join the Naturable Blog! Stay updated with our tips, kitchen hacks, and much more
Stay connected! Follow us for tips, updates, and a little extra inspiration for your home and kitchen.
Have a question or need assistance?
Feel free to contact us!
© 2025. Naturable – A brand of Horizon Origin LLC